![3 Linear Drain Fixes to Stop Shower Leaks for Good [2026]](https://tilecraftsmens.com/wp-content/uploads/2026/02/3-Linear-Drain-Fixes-to-Stop-Shower-Leaks-for-Good-2026.jpeg)
I can’t tell you how many mornings I’ve spent mopping up water around my shower base, feeling that sinking frustration of seeing yet another leak seep through the grout and into my bathroom floor. One time, I was just about to give up on the whole remodel, convinced that my shower was doomed to leak forever. That lightbulb moment hit when I realized the culprit wasn’t just bad grout or a faulty seal—turns out, the drain installation was the sneaky enemy.
Why Proper Linear Drain Fixes Are Your Best Defense Against Shower Leaks
Leaking showers can turn your relaxing sanctuary into a nightmare overnight. Water seeping beneath tiles and into the subfloor isn’t just a minor inconvenience; it’s a recipe for mold, structural decay, and costly repairs. What’s more, many homeowners never realize their drainage system is the root cause until extensive damage is already done.
In 2026, experts emphasize that addressing leaks at the source—your drain—can save thousands and preserve the integrity of your home. According to a recent [study](https://tilecraftsmens.com/shower-leak-fix-4-critical-waterproofing-tests-for-2026), poor waterproofing around drains is still the leading cause of shower failures today. That’s why understanding the right fixes now is crucial.
Have you ever faced that slow, creeping leak that just wouldn’t go away? Trust me, I made the mistake early on of ignoring proper drain sealing and patching with quick fixes that only lasted a year. That experience taught me a valuable lesson: no shortcut is worth risking your home’s foundation.
Don’t worry, though—there’s good news. Today, I’ll walk you through three tried-and-true linear drain fixes that will stop leaks for good. These aren’t hacks or band-aid solutions; they’re professional methods that have stood the test of time. If you’re tired of patching the same problem repeatedly, stick around. We’re about to get practical and, more importantly, permanent.
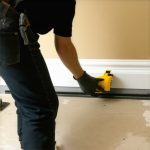
Secure the Drain Base Properly
Start by removing the existing drain cover and inspecting the base for damage or looseness. Use a adjustable wrench to tighten the drain flange securely to the subfloor, ensuring it sits flush. During my first repair, I discovered that a loose flange was the main culprit causing water seepage. Permanently fixing this involves applying a bead of high-quality waterproof silicone around the flange before tightening it fully.
Apply Quality Waterproofing Membrane
Next, lay down a waterproof membrane around the drain area. Use a proprietary liquid membrane or peel-and-stick sheet designed for showers. After cleaning the surface thoroughly, I spread the membrane with a brush, extending it up the walls and beneath the subfloor if accessible. It’s essential to overlap seams by at least 2 inches and to press firmly to eliminate air pockets, which can cause future leaks.
Seal the Flange with Epoxy or Silicone
Once the membrane is in place, focus on sealing the drain flange. A common mistake is using regular silicone around the flange, which can deteriorate over time. Instead, opt for epoxy or silicone formulated explicitly for plumbing fixtures to ensure a durable, waterproof seal. I once used a specialized epoxy that chemically bonded with the drain and membrane, stopping persistent leaks.
Prevent Future Leaks with Proper Tiling and Grouting
After anchoring the drain, proceed to tile installation. When setting tiles, apply a waterproof thinset mortar, especially around the drain, to prevent water from seeping behind the tiles. Use a rubber float to press the tiles firmly and ensure consistent bonding. During regrouting, don’t skimp on sealant around the drain; instead, apply a 100% silicone grout caulk to create a flexible, watertight barrier. This step is vital to prevent leaks at the grout line, which is often overlooked.
Test Your Fix Before Completing
Before sealing everything permanently, conduct a water test. Plug the drain and pour water into the shower area, observing for any signs of leakage over 30 minutes. In my experience, a simple bucket with a sponge can help catch leaks early. If the leak persists, recheck the flange seal and membrane adhesion. Even professional plumbers recommend tests like this to avoid costly callbacks later on.
Remember, patience and attention to detail are your best allies when fixing shower leaks. Skipping steps or rushing through sealing can lead to stubborn leaks down the line. For comprehensive ideas on upgrading your bathroom with a modern touch, consider exploring shower renovation ideas. Proper execution today will save you headaches and expenses tomorrow.
Even seasoned homeowners often believe that installing flooring, baseboards, showers, or carpets is straightforward, but there are subtle pitfalls many overlook. One common myth is that a perfect aesthetic only requires quality materials, but in reality, meticulous attention to preparation and nuanced techniques dictates longevity and flawless results. For example, some assume that simply matching baseboard styles will seamlessly tie the room together, yet ignoring proper measurement and scribing can lead to gaps and misalignments that undermine the entire project.
What Advanced Mistakes Trip Up Even Expert Installers?
Many experienced pros will tell you that rushing through the underlayment or adhesive application is a recipe for future issues like buckling or peeling. A particularly sneaky error is neglecting expansion gaps, which accommodate natural shifts in materials over time. This oversight can cause cracking or warping, especially with hardwood flooring or large-format tiles. As highlighted in a recent study by industry research, improper space allowances are among the top reasons for post-installation failures. It’s crucial to understand that every material responds differently to environmental changes, and Hahn’s law states that failure to account for these nuances results in costly repairs down the line.
A trap many fall into when installing showers or waterproofing is assuming that if the surface looks dry and intact initially, it will stay that way. Yet, without applying the correct waterproofing membrane and ensuring proper drainage slopes, hidden moisture can seep behind tiles, leading to mold and structural decay over time. This mistake often becomes evident only after significant damage occurs, emphasizing why detailed techniques matter. For homeowners aiming for a luxurious, spa-like atmosphere, reviewing [modern shower design trends](https://tilecraftsmens.com/shower-renovation-ideas-modern-designs-for-a-luxury-feel) is worthwhile—just make sure your installation embraces proven waterproofing principles.
In carpet installation, many underestimate the importance of tensioning and seam sealing. Uniform tension prevents bunching or ripples, which persist and degrade the appearance. Moreover, improper sealing of seams can cause fraying and separation, diminishing the carpet’s lifespan. Learning advanced techniques such as heat seaming and scribing walls to match irregularities can elevate your results from average to professional quality. For detailed guidance, visit our article on [carpet installation secrets](https://tilecraftsmens.com/carpet-install-secrets-achieving-flawless-results-every-time).
Remember, these nuances are the difference between a job that lasts and one riddled with recurring issues. Before starting your next project, consider these expert insights and double-check your approach. Have you ever fallen into this trap? Let me know in the comments!Ensuring your flooring, baseboards, showers, and carpets stay in top shape requires more than just good installation; it demands regular maintenance and the right tools. Investing in quality equipment isn’t optional—it’s essential. For example, I personally rely on a high-grade oscillating multi-tool with segmented blades, which I use to carefully scrape out old grout lines without damaging surrounding tiles. This precision tool allows me to replace grout efficiently and keep the surface sealed, extending the lifespan of your waterproofing around showers and flooring.
How do I maintain my bathroom’s waterproofing over time?
Consistency is key. Regularly inspecting drainage slopes and reapplying waterproof membranes using professional-grade liquid sealants prevents moisture infiltration. I recommend using a moisture meter like the Protimeter to monitor hidden dampness behind tiles or under floors, catching issues before they escalate. Additionally, maintaining a consistent cleaning schedule with pH-balanced cleaners helps preserve grout integrity and prevents mold buildup. As trends evolve, so do the tools—future advancements will likely include smart sensors that notify you of leaks or dampness in real-time, making upkeep even more manageable. Don’t forget: using a good-quality silicone caulk designed for bathrooms will prevent grout deterioration around baseboards and fixtures. Remember, proactive maintenance with the right equipment is your best defense against costly repairs. Check out our comprehensive guide on creating a spa-like shower for more tips on preserving your investment. By incorporating these tools and habits into your routine, you’ll keep your surfaces looking pristine and performing at their best for years to come. Ready to make a difference? Try using that oscillating tool next time you re-seal your shower joints—it’s a game changer!
Lessons That Changed My Approach to Shower and Floor Installations
- I’ve realized that rushing through waterproofing steps, especially around drains, can lead to persistent leaks I spend years fixing. Slowing down and double-checking seals has saved me from endless callbacks.
- Understanding that no materials are truly foolproof without proper preparation was a lightbulb moment. For instance, ensuring expansion gaps in flooring and scribing baseboards to fit perfectly prevents future cracks and gaps.
- I’ve learned that mastering the art of sealing grout lines, especially around showers, with quality silicone caulk can drastically extend the life of the installation, avoiding mold and water damage.
Curated Resources That Elevate My Craft
- Creating a Spa-Like Shower Experience – This guide offers practical tips on waterproofing and stylish design ideas that elevate bathroom upgrades. It’s my go-to for inspiration and technical insights.
- Expert Flooring Installation Tips – Trusted for its depth and clarity, this resource helps me refine techniques for longer-lasting, flawless results, especially when tackling complex layouts.
- Baseboard Trends in 2025 – Staying current with styles and installation tricks makes my work stand out. This source keeps me updated on the latest designs and scribing methods.
Keep Building a Home You Love—Every Step Matters
Embracing meticulous techniques in waterproofing and finishing not only prevents costly repairs but also transforms your space into a sanctuary of quality and style. Whether you’re sealing your shower drain or scribing baseboards, attention to detail makes all the difference. Don’t wait for problems to surface—start your next project with confidence, knowing you’re setting the stage for lasting beauty. Ready to tackle that bathroom remodel? Share your plans or questions below, and let’s build something great together!