Just last year, I thought I had nailed my bathroom remodel. All the tiles were in place, the grout was perfect, and I finally breathed easy—that is, until I noticed that telltale damp smell creeping across the floor. A peek behind the baseboard revealed unspeakable damage: rotting subfloor, warped plywood, and a forgotten leak that had been quietly residing beneath my shiny new shower. It was a gut punch—one I wouldn’t wish on anyone tackling home upgrades.
That frustrating moment illuminated a harsh truth: even the most beautiful installations can hide lurking issues that cause irreversible damage over time. It turns out, most of these problems stem from concealed drainage flaws—tiny mistakes that, if left uncorrected, can turn your pristine bathroom into a moldy nightmare, especially with the moisture challenges technology has introduced to modern homes. Recognizing these risks early can save a lot of heartache—and costly repairs.
Why Shower Drain Flaws Are More Dangerous Than You Think
In recent years, improvements in shower design and waterproofing have certainly made renovations more stylish and efficient. But even the slickest setups can betray you if drainage isn’t managed perfectly. A small crack or misaligned flange can let water seep into the subfloor, setting the stage for rot, mold, and structural damage. And what’s worse—it often happens behind your back, hidden beneath layers of flooring.
Early in my project, I made the mistake of assuming that a standard sealant would fix minor leaks. Turns out, caulk alone isn’t enough. According to industry experts, neglecting proper waterproofing steps and inspection can lead to leaks that silently ruin the subfloor in a fraction of the time you’d imagine. The key is to identify those flaws proactively—knowing exactly where and how water might escape.
If you’re tackling a bathroom upgrade or simply want peace of mind, understanding these common drainage pitfalls is essential. I’ll show you straightforward, effective methods to shield your home from future rot problems, ensuring your investment lasts longer and stays healthier.
Ready to dive into the practical fixes? Stay tuned as we explore the four critical shower drainage secrets that keep water where it belongs—inside your shower, and away from your floors.
Inspect Before You Install
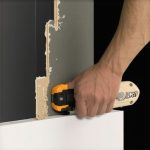
Before laying down new tiles or sealing your shower, take a step back and examine the existing drain setup. Use a flashlight to peer into the flange area and check for corrosion or misalignment. During my first bathroom remodel, I caught a crooked flange that could have caused leaks down the line, allowing me to correct it on-site—saving me from future headaches. This early inspection helps identify issues that aren’t visible once everything’s covered up.
Ensure Proper Drain Flange Placement
Position the drain flange so it sits flush with the subfloor surface. Use a level to verify alignment across the entire assembly. When I installed my shower, I temporarily set the flange without adhesive, checked for levelness, and adjusted as necessary. Proper placement guarantees a secure seal, reducing the risk of water seeping beneath tiles and into the subfloor.
Seal with Durable Waterproofing Materials
Neglecting comprehensive waterproofing is a common catastrophe. Apply a high-quality waterproof membrane around the flange and the floor opening, extending it at least 6 inches in all directions. During my project, I used a liquid membrane that dried quickly, creating a seamless barrier. This prevents water penetration even if minor leaks develop over time.
Use Proper Drain Gasket and Torque
Install a universal drain gasket designed to provide a watertight seal; tighten the drain flange securely using a torque wrench to avoid over-tightening, which can crack the flange, or under-tightening, which leaves gaps. In one instance, I used a torque wrench to ensure consistent pressure, which eliminated wobbling during water tests. This step is critical to maintaining a leakproof connection over years of use.
Test Your Drain Before Finishing
After assembly, perform a pressure test by plugging the drain and filling the shower pan with water, then monitoring for drips or drops over a 30-minute period. My quick test revealed a slight leak at one flange, prompting me to reseal before tiling. This proactive step confirms that the drainage system is watertight, preventing unseen leaks from damaging your subfloor later. For more insights, check out this detailed guide on sealing drain flanges.
When it comes to home renovations, many homeowners believe that following standard guidelines guarantees perfect results. However, even experienced remodelers can fall prey to overlooked details that compromise longevity and aesthetics. Let’s dig deeper into what most people get wrong about flooring installation, showers, baseboards, and carpet setups, and how understanding these nuances can save you costly fixes later.
### Don’t Rely Solely on Visual Cues
A common myth is that if everything looks straight and level during installation, the job is flawless. Yet, subtle shifts can occur post-installation due to material expansion, contraction, or slab movements. For example, many believe that a perfectly aligned baseboard indicates a perfect wall, but sneaky gaps may develop over time—especially on uneven surfaces. It’s crucial to check for these changes periodically and consider advanced techniques like scribing baseboards to accommodate wall imperfections, as discussed in [baseboard trends in 2025](https://tilecraftsmens.com/baseboard-trends-in-2025-fresh-styles-for-every-room).
### Overlooking Moisture Control in Showers
Everyone emphasizes waterproofing tiles and membranes, but a less obvious mistake is neglecting the importance of proper slope and drainage planning. Proper slope ensures water exits the shower quickly, preventing pooling that leads to mold and rot. The misconception that premium grout alone prevents leaks can be dangerous; sealing and waterproofing must work in tandem. For nuanced waterproofing tips, check out [leaky shower waterproofing fixes](https://tilecraftsmens.com/stop-leaky-showers-4-hidden-tile-waterproofing-fixes-2026).
### Underestimating the Impact of Subfloor Preparation on Flooring Longevity
Many think that choosing high-quality flooring material is enough for a durable finish. Still, the real secret lies beneath—proper subfloor preparation is often overlooked. Uneven subfloors, hidden moisture, or improper framing can cause tiles to crack, vinyl to warp, or carpets to ripple over time. Advanced installers measure joist stability, moisture content, and apply suitable underlayment. For detailed strategies, see [expert flooring tips](https://tilecraftsmens.com/expert-flooring-installation-tips-for-lasting-results-in-1015).
### Avoiding the Miter Trap
Baseboards and moldings are often cut with miter joints, assuming that perfect angles will hide imperfections. This can backfire when walls are wavy or uneven, resulting in ugly gaps or misaligned joints. The key is to use coped joints or scribing techniques, which adapt better to wall irregularities, as explored in [scribing baseboards](https://tilecraftsmens.com/stop-baseboard-gaps-why-coping-beats-miters-in-2026). This nuance can dramatically improve your finish.
### The Oops Factor: Failing to Test After Installation
A critical mistake many homeowners make is neglecting thorough testing before finishing touches. For instance, performing a water test on a shower or inspecting flooring for movement after installation can reveal hidden problems. Pro installers recommend pressure tests, moisture checks, and visual inspections—step that could save you from disruptive repairs down the line.
In conclusion, mastering these subtle, often-overlooked details can elevate your renovation results from average to professional-grade. Remember, a little extra care upfront avoids big headaches later. Have you ever fallen into this trap? Let me know in the comments, and stay tuned for more expert insights.Maintaining your home improvements over time requires not only quality materials but also the right tools and a strategic approach. When it comes to flooring, showers, baseboards, or carpet installations, having the proper equipment can significantly extend the lifespan of your work and save you costly repairs down the line.
Invest in Precision Tools for Better Outcomes
One of my go-to tools is a high-quality digital moisture meter, such as the Protimeter MMS2, which measures moisture levels in subflooring and wall structures. This device ensures your surfaces are adequately dry before installation, preventing future warping, mold, or peeling. During a recent renovation, using this tool saved me from installing new flooring over a damp slab, which would have caused serious problems later.
Additionally, a calibrated torque wrench is invaluable when sealing shower drains or tightening baseboard screws. Consistent torque prevents cracks or leaks caused by over-tightening or under-tightening. I prefer the CDI 2503, which provides precise torque settings, ensuring sealants and gaskets stay secure over years of use. This proactive step is especially critical in waterproofing showers, as highlighted in this expert guide.
Harness Software and Planning Tools for Efficiency
Software like MeasureSquare allows me to plan layouts accurately, whether I’m placing tile patterns or aligning baseboards with uneven walls. These programs help visualize the final look, reduce material waste, and catch potential issues before physical work begins. As homes become more complex, integrating digital planning tools is becoming essential.
Future Trends in Home Maintenance
I predict that smart inspection devices, combining high-resolution cameras and thermal imaging, will become a standard for assessing hidden issues like leaks or structural shifts. Incorporating these technologies will enable homeowners and professionals to catch problems early, avoiding the costs associated with neglected maintenance.
How do I maintain my home’s flooring and showers over time?
Regular inspections paired with the right tools—such as moisture meters for subfloors, torque wrenches for sealing, and software for layout accuracy—are key. Don’t forget to check for signs of wear, leaks, or unevenness periodically, so you can address minor issues before they escalate. For more advanced renovation tips, I recommend visiting this resource.
To truly maximize your efforts, try implementing a comprehensive maintenance routine using a moisture meter before every flooring or shower project, ensuring long-term durability and peace of mind.

What I Wish I Knew About Waterproofing From the Start
I overlooked the importance of thorough waterproofing, thinking sealants alone would suffice. That misjudgment nearly cost me thousands in repairs when unnoticed leaks caused subfloor rot. Now, I always incorporate waterproof membranes and proper slope planning to protect my investments.
Why Proper Drain Flange Placement Is a Game-Changer
Initially, I rushed installation without verifying flange alignment with a level, which led to leaks down the line. The realization that a small misplacement can undermine an entire shower’s integrity was a lightbulb moment. Precise positioning and secure sealing make all the difference.
The Power of Early Inspection in Preventing Costly Repairs
Performing moisture and integrity tests before finalizing the floor or wall covers caught potential issues early. I learned that proactive testing isn’t a hassle, but a safeguard. This foresight saved me from disruptive repairs years later, emphasizing the value of diligence.
My Favorite Tools That Keep My Home Dry and Beautiful
Using a high-quality moisture meter like the Protimeter MMS2 ensures surfaces are dry before flooring installation, preventing long-term problems. A calibrated torque wrench helps me secure drain components tightly without damage. These tools are my secret weapons for a durable, leak-free bathroom.
Embracing Continuous Learning for Better Home Upgrades
Every project teaches me something new—whether it’s about tile layouts, baseboard fitting, or carpet stretching. I stay updated through resources like expert installation guides and never settle for shortcuts. The journey improves with each experience, and I encourage you to do the same.