My Personal Journey into Perfect Carpet & Baseboard Installation
Let me start by sharing a little story. A few months ago, I decided to remodel my living room, and one of the most daunting tasks was installing new carpet and matching it with stylish baseboards. I had always admired the seamless look of professional installation, but I was determined to learn the craft myself. Little did I know, this journey would turn into a rewarding experience that transformed my space and boosted my confidence in home improvement projects.
Why Attention to Detail Makes All the Difference
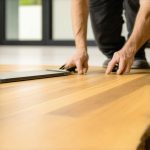
When I first attempted to lay the carpet, I quickly realized that precision is key. Achieving a flawless finish isn’t just about laying the material; it’s about meticulous measurements, proper stretching, and careful trimming. I discovered that using quality tools, like a power stretcher and sharp blades, significantly improved my results. As I read more from trusted sources, I learned that proper carpet installation can increase the durability and aesthetic appeal of your flooring, an insight I wish I had known earlier. For comprehensive tips, I often refer to expert carpet installation advice.
Matching Baseboards: The Secret to a Cohesive Look
One aspect that truly elevated my project was installing matching baseboards. They frame the room beautifully and hide any imperfections along the edges. I experimented with different styles, from sleek modern trims to more ornate designs, but I found that choosing the right height and profile really ties the whole room together. I also learned that updating baseboards is a simple way to refresh your interior without a complete overhaul. If you’re curious about the latest trends, check out baseboard trends for 2025.
How Do I Achieve a Flawless Finish? A Deep Dive
Achieving that perfect, professional look requires patience and the right techniques. I recommend starting with accurate measurements—this is where many DIYers stumble. Use a chalk line or laser level for straight cuts and always double-check your measurements. When installing the carpet, ensure you stretch it correctly to prevent wrinkles, which I found is crucial for longevity and appearance. For baseboards, caulk and paint seamlessly to hide any gaps. For further guidance, I turn to specialized articles like expert flooring installation tips.
What are common mistakes to avoid during carpet and baseboard installation?
Great question! From my experience and research, common pitfalls include rushing the measurement process, using blunt tools, and neglecting proper surface preparation. Skipping these steps can lead to uneven edges, wrinkles, or gaps. It’s also important to choose quality materials suited for your space—cheap options often result in a less durable finish. Remember, patience and attention to detail are your best allies in this DIY journey.
If you’re considering tackling your own carpet and baseboard project, I highly recommend reading detailed guides and perhaps consulting professionals when needed. And I’d love to hear your experiences or tips—feel free to share in the comments below or contact me through this link.
Mastering the Art of Seamless Carpet and Baseboard Installation
Embarking on a DIY project for carpet and baseboard installation can be both rewarding and challenging. As an interior expert, I’ve learned that attention to detail, proper planning, and choosing quality materials are essential for achieving a professional finish. From precise measurements to finishing touches, each step impacts the overall look and durability of your work.
Understanding the Nuances of Carpet Stretching and Trimming
The key to flawless carpet installation lies in meticulous stretching and trimming. Using tools like a power stretcher ensures the carpet remains taut, preventing unsightly wrinkles and bubbles. Proper trimming, especially along walls and doorways, requires sharp blades and careful measurement to avoid gaps or overlaps. If you’re unsure about the best techniques, consult expert guides such as expert carpet installation tips.
Choosing and Installing the Perfect Baseboards
Baseboards do more than finish a room—they elevate its style and hide imperfections. When selecting baseboards, consider the height, profile, and material that complement your interior design. Installation involves precise cutting, especially around corners and transitions, which can be tricky without the right tools and techniques. Updating your baseboards is also a simple way to refresh your space; for the latest trends, explore baseboard trends for 2025.
How Can Expert Techniques Elevate Your DIY Results?
Applying expert techniques can transform a basic installation into a showcase of craftsmanship. For instance, using a laser level for accurate measurements, caulking gaps before painting, and choosing the right adhesives and nails are crucial steps. Proper surface preparation, like cleaning and leveling the subfloor, prevents future issues such as uneven edges or gaps. For comprehensive guidance, review expert flooring installation tips.

Visualize your finished project with a high-quality image of a perfectly installed carpet with matching baseboards, showcasing clean lines and seamless transitions, emphasizing craftsmanship and style.
What Are the Common Pitfalls and How to Avoid Them?
Common mistakes include rushing measurements, neglecting surface preparation, and poor tool selection. These can lead to uneven edges, wrinkles, or gaps that diminish the overall aesthetic. Patience, along with thorough planning and using quality materials, is your best defense. Remember, seeking advice from trusted sources and tutorials can save you time and frustration. For more insights, visit expert installation advice.
If you’re eager to improve your skills or need professional assistance, don’t hesitate to contact specialists at our contact page. Sharing your experiences or asking questions can also help build a community of DIY enthusiasts and professionals alike.
Delving Deeper: The Intricacies of Seamless Transitions and the Art of Fine Detailing
As I continued refining my skills, I realized that achieving truly professional results entails mastering subtle techniques that often go unnoticed by the average DIYer. For instance, the importance of precise corner cuts and the delicate process of aligning seams in high-traffic areas cannot be overstated. I found that employing a combination of a miter saw for clean cuts and a seam roller for blending seems to create a virtually invisible transition, elevating the overall aesthetic. Moreover, I discovered that the choice of adhesives and nails plays a pivotal role in ensuring longevity, especially in areas prone to moisture or heavy use. According to expert flooring tips, the right materials can dramatically reduce issues like buckling or peeling over time.
What Are the Hidden Challenges in Matching Baseboard Profiles and Finishes?
One question that often puzzled me was how to seamlessly match new baseboards with existing architectural details. I learned that subtle variations in profile, material, or paint finish can disrupt the harmony of a room. It’s worth investing time in sourcing high-quality trims that replicate the original design, especially in historic homes. I also found that applying a primer before painting not only enhances adhesion but also ensures a more uniform color, preventing unsightly streaks or mismatched shades. Sharing my experience, I would advise anyone undertaking this to carry out mock-ups and test paints on scrap pieces—small steps that save headaches later. For additional inspiration, check out current baseboard trends.
How Do I Handle Complex Transitions and Irregular Wall Contours?
One of the more rewarding yet challenging aspects I faced was installing baseboards along walls with irregular contours or at complex angles. My initial approach was to use flexible caulk for minor gaps, but I soon realized that custom mitering and strategic cutting yield cleaner results. Using a coping saw for intricate corners allows for a snug fit, especially around archways or decorative moldings. I found that marking the wall and transfering those measurements onto the baseboard ensures precision. Additionally, employing a contour gauge for irregular surfaces can save significant time and frustration. It’s these nuanced techniques that distinguish a good job from a truly exceptional one. If you’re interested in elevating your craftsmanship, explore advanced installation tips.
What Personal Lessons Have I Learned About Patience and Perseverance?
Beyond the technical skills, perhaps the most valuable lesson I’ve embraced is the importance of patience. There were moments when I felt overwhelmed by the complexity of perfect cuts or the challenge of aligning seams flawlessly. But each mistake became a learning opportunity. I learned to approach each step with calm focus, understanding that rushing often leads to errors that are hard to correct later. This mindset not only improved my results but also made the process more enjoyable. Sharing this journey, I encourage fellow DIY enthusiasts to see setbacks as part of the learning curve—each one brings you closer to mastery. Remember, even seasoned professionals continually refine their skills through practice and persistence. For further insights, visit professional tips for home finishing.
How Can Personal Passion and Attention to Detail Transform Your Space?
Ultimately, what keeps me motivated is the satisfaction of transforming a space into something uniquely mine. The careful selection of materials, attention to every cut, and the subtle finishing touches create a home that reflects my personality and dedication. I’ve come to appreciate that these seemingly small details—like a perfectly caulked corner or a seamless seam—add up to a significant aesthetic impact. It’s this blend of craftsmanship and personal expression that makes DIY projects so fulfilling. If you’re contemplating a similar journey, I invite you to share your experiences or ask questions—your insights could inspire others. Feel free to connect through this contact page.
The Art of Precision: Mastering Complex Transitions and Irregular Surfaces
One of my most challenging yet rewarding experiences was tackling complex transitions where walls and floors defy standard geometry. Precision in these areas is crucial; employing tools like a contour gauge or flexible measuring tapes allows for meticulous tracking of irregular wall contours. I often use a combination of a miter saw for clean cuts and a coping saw for intricate angles, ensuring seamless fits. For example, when dealing with archways or curved walls, I found that custom-cutting baseboards with a jigsaw and fitting them with strategic caulking creates a near-invisible transition, elevating the overall aesthetic. According to industry standards outlined in expert flooring tips, the key lies in adapting your approach to the unique contours of each space, turning potential obstacles into opportunities for craftsmanship.
Advanced Material Selection: Enhancing Durability and Style
Choosing the right materials for carpet and baseboards is more nuanced than it appears. High-quality, moisture-resistant MDF or PVC trims offer longevity and ease of maintenance, especially in high-traffic or humid areas. For carpets, selecting fibers with superior stain resistance and durability, such as nylon or wool blends, ensures your investment stands the test of time. I also experimented with innovative adhesives like low-VOC, high-strength double-sided tapes for initial positioning—these facilitate easier adjustments before final nailing or stapling. This layered approach combines longevity with aesthetic finesse, echoing insights from cutting-edge flooring guides. Remember, the choice of materials influences every subsequent step, making it vital to select wisely for a flawless finish.
Refining Seams and Joints: The Subtle Secrets of Invisible Transitions
One of my favorite techniques involves perfecting seams in both carpet and baseboards to achieve an invisible transition. I employ seam rollers to press down and blend fibers in carpets, ensuring the seam line is undetectable. For baseboards, mitered corners are glued and nailed meticulously, then reinforced with wood filler and sanded smooth before painting. The use of a high-quality seam adhesive, combined with precise alignment, creates the illusion of a continuous surface. This process demands patience and a keen eye for detail but yields professional-grade results that can rival those of seasoned installers. For an in-depth understanding, I recommend reviewing expert installation tips. Never underestimate the power of small, deliberate adjustments—these are what distinguish a good job from a masterpiece.
Engaging with the Community: Sharing and Learning Advanced Techniques
As I continue refining my craft, I realize that engaging with a community of home improvement enthusiasts can exponentially expand your skills. Participating in online forums, attending workshops, or consulting with professionals provides exposure to nuanced techniques and innovative solutions. I encourage you to document your progress and share your discoveries—sometimes, a fresh perspective can unlock a new level of mastery. If you’re eager to dive deeper into specialized strategies or need personalized guidance, I invite you to reach out through our contact page. Remember, mastery is a continuous journey built on curiosity, perseverance, and passion for excellence.
Things I Wish I Knew Earlier (or You Might Find Surprising)
Patience Is a Virtue
One of the biggest lessons I learned is that patience truly pays off. Rushing through measurements or cutting corners often led to mistakes that were hard to fix later. Taking my time allowed for more precise work and a cleaner finish, making the entire process more enjoyable and less stressful.
Quality Tools Make a Difference
Investing in good-quality tools like a power stretcher, sharp blades, and a reliable measuring tape transformed my results. Cheap tools tend to frustrate and produce uneven edges or wrinkles, so I always recommend upgrading your toolkit for professional-looking outcomes.
Surface Preparation Is Key
Before laying down the carpet or installing baseboards, ensuring the surface is clean, level, and smooth is essential. Skipping this step can lead to uneven seams, gaps, or wrinkles that diminish the aesthetic appeal and durability of your work.
Matching Baseboards Elevates the Room
Choosing the right style, height, and finish for your baseboards can dramatically change the look of a room. I found that matching the baseboard profile with existing architectural details created a cohesive and polished appearance, even in older homes.
Proper Measurement and Cutting Techniques Save Time
Using laser levels, chalk lines, and transfer measurements from wall to baseboard minimized errors. Accurate cuts around corners and irregular surfaces require patience and careful planning, but the results are worth it.
Seamless Transitions Are All About Details
Mastering techniques like mitering, coping, and blending seams can create invisible transitions, elevating your project from good to professional quality. Small adjustments in alignment and finishing touches make a noticeable difference.
Resources I’ve Come to Trust Over Time
- Expert Carpet Installation Advice: This resource provided step-by-step guidance that helped me understand the nuances of stretching and trimming. It’s a must-read for DIYers.
- Baseboard Trends in 2025: Staying updated on current styles helped me choose the perfect trim that complements my interior design.
- Top Flooring Installation Tips in 2024: This site offers comprehensive strategies for achieving durable, flawless results, which I found invaluable.
Parting Thoughts from My Perspective
Embarking on a DIY project like carpet and baseboard installation has been a rewarding journey filled with learning and personal growth. Attention to detail, patience, and quality materials are your best friends in creating a professional finish. Remember, the satisfaction of transforming your space with your own hands is truly unparalleled. If this resonates with you, I’d love to hear your thoughts or experiences. Feel free to share in the comments or reach out through this link. Happy renovating!