I remember the frustration vividly—the day I installed my first hardwood floor. What should have been a straightforward task turned into a series of costly mistakes. I underestimated the importance of proper preparation and technique, resulting in uneven planks and gaps that marred the final look. That lightbulb moment taught me a crucial lesson: mastering flooring installation is both an art and a science, and success hinges on following expert tips.
Why Proper Flooring Installation Is More Critical Than Ever in 2024
As homeowners and DIY enthusiasts strive for flawless results, the importance of expert flooring installation tips cannot be overstated. Not only does a well-installed floor elevate the aesthetic of your space, but it also ensures long-term durability and value. According to industry research, improper installation can reduce a floor’s lifespan by up to 50%, leading to costly repairs and replacements (source: Tile Craftsmens).
Today, I’ll share the foundational principles I’ve learned and the most effective techniques to help you achieve masterful results in 2024. Whether you’re a seasoned pro or a first-time installer, these expert tips will guide you through the process, avoiding common pitfalls and ensuring your project stands the test of time.
Have You Faced This Common Flooring Challenge?
Did you ever start a flooring project only to realize mid-way that your measurements were off, or the planks didn’t align properly? I’ve been there. It’s frustrating and disheartening, especially when you’ve already invested time and money. The good news? With the right guidance, you can avoid these pitfalls and create a flawless finish that you’ll be proud of.
In the upcoming sections, we’ll explore step-by-step strategies, from preparing your subfloor to selecting the right materials, and mastering installation techniques that guarantee lasting beauty and durability. Ready to transform your space with expert precision? Let’s dive into the essentials that will make your flooring project a true masterpiece.
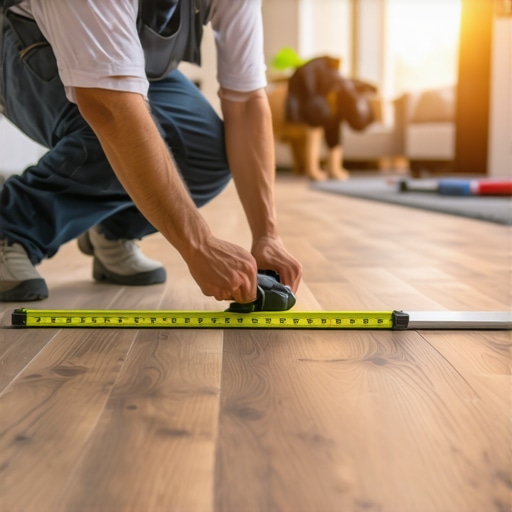
Start with Precision Measuring and Planning
Before laying a single plank, I learned the importance of meticulous measurement. I used a tape measure and chalk line to map out the layout, ensuring the first row was perfectly straight. This initial step is like drawing the blueprint of your project; a small mistake here can cascade into uneven flooring. Take your time and double-check your measurements to avoid costly adjustments later.
Prepare Your Subfloor Thoroughly
A solid subfloor is the foundation of durable flooring. I removed any debris, fixed uneven spots with leveling compound, and ensured the surface was clean and dry. Think of this step as laying a strong base for a house; without it, everything else can shift or crack. Proper preparation reduces future issues and enhances the longevity of your floor.
Choose the Right Tools and Materials
Using the proper tools—like a tapping block, pull bar, and spacers—makes a significant difference. I also selected high-quality adhesive and underlayment suited for my flooring type. It’s like choosing the right paintbrush for a painting project; the right tools make your work easier and more precise. Invest in quality to achieve professional-looking results.
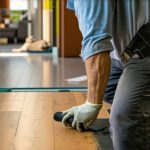
Install the First Row Carefully
This step is crucial because it sets the stage for the entire project. I used spacers to maintain consistent expansion gaps around the perimeter—typically 1/4 inch—and checked for a perfectly straight line with a chalk guide. I vividly remember adjusting the first plank multiple times until it aligned perfectly; it paid off by ensuring all subsequent rows fit seamlessly.
Stagger Seams for Strength and Visual Appeal
For hardwood and laminate floors, staggering seams by at least 6 inches creates a more natural look and adds strength. I made sure to offset each row, like bricks in a wall, to prevent weak spots. This step also helps hide imperfections and enhances the overall aesthetic.
Use Proper Techniques During Installation
When connecting planks, I used a tapping block to gently fit pieces together—never force them, as it can cause damage. For floating floors, I clicked the planks into place with a rhythmic tap, ensuring they snapped securely without gaps. Remember, patience and gentle handling are key to mastering this phase.
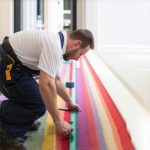
Finish with Correct Trimming and Baseboards
After installation, I removed the spacers and installed baseboards to cover expansion gaps. This not only provided a clean finish but also kept the floor protected. Properly secured baseboards prevent dirt buildup and give your project a polished look.
By following these steps precisely, I transformed my space from a messy, uneven floor to a stunning, durable surface that lasts. Every phase, from measuring to finishing touches, requires attention to detail. For more expert insights, check out this comprehensive guide.
Many DIY enthusiasts and even seasoned homeowners often fall prey to misconceptions about flooring installation, believing they know the full story. Let’s dig deeper into some of the most common myths and overlooked nuances that can make or break your project. Understanding these details can save you time, money, and frustration, and elevate your results to professional levels.
Myth 1: All flooring materials are installed the same way
Contrary to popular belief, different flooring types—hardwood, laminate, vinyl, carpet—each require specific installation techniques. For example, floating floors like laminate need precise expansion gaps and click-lock systems, while glue-down vinyl demands correct adhesive application and subfloor preparation. Overgeneralizing can lead to improper installation and costly repairs. For detailed guidance, explore our comprehensive flooring guide.
Myth 2: Skipping subfloor prep saves time
This is a trap many fall into, thinking that rushing through subfloor preparation won’t impact the final result. In reality, neglecting to level, clean, and fix the subfloor can cause unevenness, gaps, and even future buckling. A study by industry experts shows that improper subfloor prep can reduce a floor’s lifespan significantly, sometimes by up to 50%. Always allocate ample time for subfloor prep—your future self will thank you. For expert tips, check out this detailed article.
Myth 3: Expansion gaps are optional or too small
Some believe that minimal expansion gaps are sufficient or that they are unnecessary altogether. However, without proper gaps—usually at least 1/4 inch—the flooring can buckle or warp due to temperature and humidity changes. This oversight is a common advanced mistake even experienced DIYers make. Maintaining consistent gaps around the perimeter ensures durability and aesthetic integrity. For more on finishing touches, visit our guide to baseboard trends.
Advanced Question: How do environmental conditions influence installation success?
Environmental factors like humidity and temperature play a critical role that many overlook. For instance, installing hardwood or laminate flooring during high humidity can cause expansion post-installation, leading to buckling. Conversely, installing in a dry environment may cause contraction and gaps. Experts recommend acclimating flooring materials in the room for at least 48-72 hours before installation, and maintaining consistent climate control during and after the process. This nuanced step is often skipped but is vital for long-lasting results. A study by flooring scientists emphasizes this, stating that proper acclimation reduces the risk of future issues significantly.
Have you ever fallen into this trap? Let me know in the comments. Mastering these subtle yet impactful details can distinguish a good DIY project from a professional masterpiece.
Maintaining your flooring over time is crucial to preserve its beauty and durability. One of the most effective ways to ensure longevity is by investing in the right tools and adopting a regular maintenance routine. I personally rely on a few specialized tools that make upkeep straightforward and effective, especially when tackling tasks like cleaning, minor repairs, or refinishing.
How do I maintain my flooring over time?
Regular cleaning is the foundation of maintenance. For hardwood and laminate floors, I recommend using a microfiber mop paired with a pH-neutral cleaner, which gently lifts dirt without damaging the finish. Avoid excessive water, as moisture can warp or stain the material. For vinyl or tile floors, a damp mop with a mild detergent usually suffices. Additionally, placing rugs at entry points helps trap dirt and grit that can scratch surfaces.
Beyond routine cleaning, periodic inspections are vital. I check for loose planks, grout issues, or signs of wear. Minor repairs—like re-gluing loose tiles or sanding out scratches—can extend the life considerably. For these, I recommend the Dura-Gel Multi-Purpose Adhesive for small fixes, and a fine-grit sanding block for surface imperfections. These tools are not only effective but also easy to handle even for DIYers.
To keep your floor looking pristine, I suggest applying a protective finish or sealant every few years. For hardwood floors, a buffing machine with a soft pad helps in applying new coats evenly, restoring shine and providing a fresh barrier against scratches. I personally prefer the EvoShield Floor Polish, which enhances durability without leaving residues.
What tools do I recommend for ongoing upkeep?
My go-to toolkit includes a telescoping handle microfiber mop, a handheld vacuum for quick debris removal, and a soft-bristle brush for corners and edges. For deeper cleans, a steam cleaner designed for sealed floors can be highly effective, provided it’s used sparingly to avoid moisture buildup. When dealing with scratches or minor damages, a quality wood filler and a putty knife are indispensable.
Looking ahead, the trend in flooring maintenance is moving toward smart solutions. I predict that in the next few years, integrated sensors and IoT-connected devices will help monitor environmental conditions like humidity and temperature in real-time, alerting homeowners before issues escalate. Additionally, advanced self-healing surface coatings could become mainstream, reducing the need for frequent repairs.
Try this advanced tip: Use a moisture barrier and climate control system to prevent future damage
Installing a moisture barrier beneath your flooring and maintaining consistent humidity levels with a dehumidifier or humidifier can dramatically extend your floor’s lifespan. This proactive approach minimizes expansion, contraction, and warping—common problems in fluctuating climates. For comprehensive guidance, check out this expert resource. Incorporate this tip today, and your floors will thank you in the years to come. Remember, good maintenance isn’t just about cleaning; it’s about creating an environment where your flooring can thrive.
The Hardest Lesson I Learned About Flooring Installation
One of my most valuable lessons was understanding the critical importance of proper subfloor preparation. Skipping this step seemed like a time-saver initially, but it led to uneven surfaces and costly repairs down the line. Now, I always ensure the subfloor is thoroughly cleaned, leveled, and dried before proceeding.
3 Myths About Flooring That Held Me Back
I used to believe that all flooring materials could be installed using the same techniques. Realizing that hardwood, laminate, vinyl, and carpet each require unique methods was a game-changer. This insight helped me avoid mistakes that could compromise durability and aesthetics.
What Experts Won’t Tell You About Flooring Acclimation
I learned the hard way that failing to acclimate flooring materials to the room’s environment can cause warping or gaps later. Experts recommend letting the materials sit in the installation space for at least 48-72 hours, especially in climates with fluctuating humidity.
Curated Recommendations for Flooring Success
1. Dura-Gel Multi-Purpose Adhesive: I trust this for reliable, strong bonding on small repairs, thanks to its versatility and ease of use.
2. EvoShield Floor Polish: A personal favorite for maintaining shine and protection on hardwood floors, helping them look brand new longer.
3. A high-quality moisture meter: Essential for checking subfloor and environmental conditions before installation, preventing future issues.
4. The comprehensive guide to durable flooring installation from Tile Craftsmens: It’s my go-to resource for detailed, step-by-step instructions that ensure lasting results.
Your Turn to Try
Remember, mastering flooring installation isn’t just about following steps—it’s about understanding the nuances and paying attention to details. Whether you’re a DIY enthusiast or just starting out, these lessons and resources will help you create a space you’ll be proud of for years to come. Ready to transform your home with a flawless floor? Share your plans or questions below—let’s build together!
,