Have you ever scrambled to finish a room renovation, only to be disappointed by uneven carpet edges or crooked baseboards? I’ve been there. That frustrating moment when your carefully chosen materials seem to fight back, revealing every mistake instead of hiding it. Early in my DIY journey, I made a critical error: rushing the installation without understanding the nuances of expert strategies. The result? A less-than-perfect finish that cost me time and money. But I learned that the secret lies in a few proven techniques that transform a good job into a stunning one.
Why Proper Installation Matters: The Foundation of Your Home’s Look
When I first started tackling carpet and baseboard installations, I underestimated their impact. But as I discovered, these details can make or break the overall aesthetic. A flawless carpet edge or a perfectly aligned baseboard elevates your entire space, adding a polished, professional feel. According to industry experts, proper installation not only improves visual appeal but also extends the lifespan of your flooring and trim. In fact, mistakes during installation can lead to costly repairs down the line, which is why investing time in learning the right strategies is essential.
Question Header: Is Skipping Expert Techniques Really Worth the Risk?
I used to think that rushing through installation saved me time. That was until I faced uneven seams and loose baseboards just months after completing the job. The truth is, cutting corners might seem tempting, but it often results in a less durable finish. Early on, I made the mistake of ignoring the importance of proper measuring and substrate preparation, which led to uneven surfaces and gaps. Now, I always consult trusted resources like this comprehensive guide before starting any project. Learning from mistakes—and expert advice—can save you from similar frustrations and ensure your home looks impeccable for years to come.
Accurate Measurement and Planning
The foundation of a flawless installation begins with precise measurements. Use a high-quality tape measure and double-check every dimension. For example, when I renovated my living room, I marked the carpet boundaries twice to avoid cutting errors. This step prevents misaligned edges and ensures the carpet fits snugly, reducing the need for adjustments later. Planning your layout beforehand also involves deciding on the direction of the carpet pile, which can affect the room’s appearance and durability. Remember, a well-planned layout minimizes waste and saves time during installation.
Surface Preparation
Inspect and Clean the Substrate
Before laying down your carpet, thoroughly inspect the subfloor. Remove debris, loose nails, and any uneven patches. I once skipped this step and ended up with a bumpy surface that caused the carpet to ripple. Use a level to identify high spots and sand them down. A smooth, clean surface is crucial for a professional-looking finish and long-lasting durability. This step is equally important for baseboard installation, as a clean wall surface ensures a tight fit and clean lines.
Address Moisture and Stability
If your subfloor has moisture issues, apply a vapor barrier to prevent future damage. For stability, consider adding a plywood underlayment if the existing surface is weak or uneven. When I added a plywood layer beneath my new carpet, it dramatically improved the evenness of the surface, making the installation process smoother and the final result more polished. Proper surface stabilization guarantees your flooring remains secure and visually appealing over time.
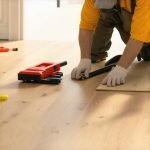
Cutting and Layout Techniques
Accurate cutting is key to achieving seamless edges. Use a straightedge and a sharp utility knife, making multiple shallow cuts rather than one deep cut. I once attempted to cut a carpet in one go and ended up with jagged edges; switching to shallow, controlled cuts improved my precision. When laying out the carpet, roll it out in the room, allowing it to relax for 15-20 minutes before making final cuts. This helps eliminate wrinkles and ensures a perfect fit.
Installation of Carpet and Baseboards
Seam Placement and Securing
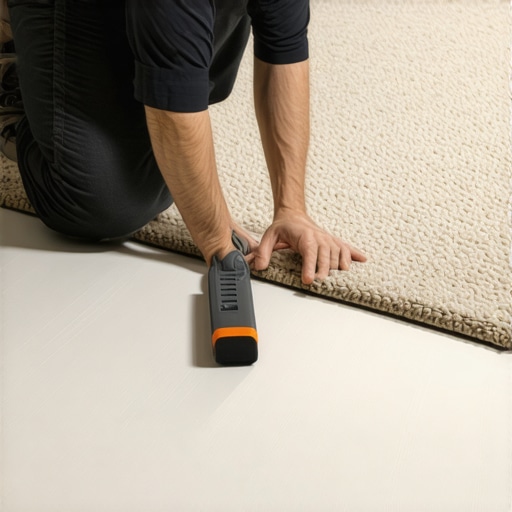
When joining sections of carpet, align the pile direction and overlap seams by a few inches. Use a seam roller and heat-activated seam tape for a clean, durable join. During my first seam, I used too little tape, which caused the seam to come apart after a few months. Proper seam alignment and securing prevent shifting and create a seamless look. For baseboards, attach them with finishing nails, ensuring they are level and flush against the wall. Use a level and spacers if needed to keep everything straight.
Finishing Touches
Trim excess carpet carefully with a carpet tucker or a sharp knife for clean edges against walls and baseboards. When installing baseboards, caulk gaps for a polished appearance, and paint or stain as desired. I once left gaps between baseboards and the wall, which detracted from the overall look; filling these gaps made the room appear professionally finished. The detailed work in this step elevates your entire project, giving it that professional touch.
Final Inspection and Adjustments
After installation, walk through the space to check for loose edges, wrinkles, or gaps. Use a carpet kicker to tighten loose areas and re-secure seams if needed. Small adjustments here can make a significant difference in the long-term appearance and durability of your work. Regular maintenance and timely repairs will keep your flooring and baseboards looking pristine for years.
Many DIY enthusiasts believe that following basic steps guarantees a perfect finish in carpet and baseboard installation. However, there are subtle nuances and common myths that can trip you up if you don’t dig deeper. Let’s dig deeper into what most people get wrong about these tasks and how understanding these details can elevate your craftsmanship.
Myth: Rushing the Process Saves Time
A prevalent misconception is that speed is your friend during installation. While it might seem efficient, rushing often leads to overlooked details such as precise measurements, proper surface preparation, or seam alignment. These oversights can cause wrinkles, gaps, or uneven edges that are only visible months later. Industry experts emphasize that meticulous preparation and patience are the real time-savers in the long run. For example, thorough substrate inspection and leveling prevent future repairs and aesthetic flaws. To master these nuances, I recommend reviewing this comprehensive guide that highlights the importance of deliberate pacing and attention to detail.
Oops Factor: The Cost of Ignoring Surface Preparation
One of the biggest pitfalls I’ve seen is neglecting the importance of surface preparation. Skipping steps like cleaning debris, fixing high spots, or addressing moisture issues can compromise the entire project. For instance, installing baseboards over uncleaned walls results in gaps and poor adhesion, which looks unprofessional and can lead to damage over time. This mistake is often overlooked because it seems trivial initially but becomes glaringly obvious after completion. Proper surface prep ensures your work is durable and visually appealing. Remember, a flawless finish depends heavily on foundation quality—so don’t cut corners here. You can learn more about surface preparation techniques at this resource.
Advanced Question: How Does Pile Direction Impact Seam Visibility and Wear?
For the experienced DIYer aiming for perfection, understanding the impact of carpet pile direction is crucial. Pile direction affects seam visibility, as mismatched pile can create a visible line, ruining the seamless look. It also influences wear patterns; installing with the pile running in the same direction enhances durability. Experts suggest planning your layout by considering the natural flow of the room and the carpet’s pile orientation from the start. This nuanced detail can make the difference between a professional-looking finish and a noticeable mistake. Studies on carpet longevity, such as those by the Carpet and Rug Institute, confirm that consistent pile direction improves both aesthetics and lifespan. Incorporate this advanced insight into your projects for truly expert results.
Have you ever fallen into this trap? Let me know in the comments.
Maintaining your newly installed flooring and baseboards is crucial to ensure they stay looking pristine and functional for years to come. A few dedicated tools and simple routines can make all the difference in preserving your investment and scaling your DIY skills over time.
How do I maintain my flooring and baseboards over time?
First, invest in quality cleaning tools tailored to your flooring type. For hardwood and laminate floors, a soft microfiber mop paired with a gentle cleaner prevents scratches and buildup. I personally prefer a microfiber flat mop because it traps dust effectively without damaging the surface. For carpets, a high-efficiency vacuum with adjustable height settings and a beater brush ensures deep cleaning without fraying fibers or pushing dirt deeper. Regular vacuuming every 2-3 days is vital for preventing dirt from settling into the pile and causing premature wear.
Additionally, a small handheld brush or detailer brush is excellent for cleaning along baseboard edges and tight corners where dust and pet hair accumulate. I keep a set of these on hand, as they help maintain clean lines and prevent dirt from creeping into gaps or under trims.
For more stubborn stains or grime, a soft-bristled scrub brush and eco-friendly cleaning solution are sufficient. Always avoid harsh chemicals that can damage finishes or discolor surfaces. When it comes to periodic maintenance, applying a protective sealant or polish on wooden baseboards can restore shine and provide a barrier against moisture and scratches. I recommend doing this once or twice a year, depending on foot traffic and exposure.
Tools I recommend for maintenance:
- Microfiber Mop: Gentle, effective for daily cleaning on hard floors, prevents scratches, and traps dust.
- Vacuum with Adjustable Height: Essential for carpets; a HEPA filter helps improve air quality and prolong carpet life.
- Detail Brush Set: Perfect for baseboard edges, corners, and tight spaces, keeping your trim looking sharp.
- Eco-friendly Cleaner: A pH-neutral solution that keeps surfaces pristine without damaging finishes. I personally use a mixture of water and a few drops of mild dish soap.
- Protective Sealant or Polish: For wooden baseboards, apply once or twice annually to preserve appearance and resist moisture damage.
Looking ahead, I believe the trend in home maintenance tools will lean towards smart, automated devices. Robotic vacuum cleaners with mapping capabilities are becoming more affordable and effective, making upkeep effortless. For long-term results, establishing a routine using these tools coupled with periodic inspections—such as checking for loose nails or scratches—can significantly extend the life of your flooring and trim.
Final tip: Don’t forget regular inspections
Regularly walk through your space to identify issues early. Tighten loose baseboards with a screwdriver, re-glue any lifting edges on carpets, and promptly address scratches or stains with appropriate touch-up products. This proactive approach helps prevent small problems from escalating into costly repairs, ensuring your home remains beautiful and functional for years.
If you want to explore advanced maintenance strategies, I recommend checking out this resource for expert advice on long-lasting results. Start incorporating these tools and routines today, and enjoy the peace of mind that comes with well-maintained floors and trim!
The Hardest Lesson I Learned About Carpet and Baseboard Installations
One of the most valuable insights I gained was the importance of patience and meticulous planning. Rushing through the process often led to mistakes like uneven seams or gaps, which took extra time to fix later. Taking the time to double-check measurements and prepare surfaces thoroughly saved me headaches and ensured a professional finish. This lesson taught me that quality craftsmanship isn’t about speed but about attention to detail.
3 Myths About Carpet and Baseboard Installation That Held Me Back
I used to believe that you could skip surface preparation or cut corners to save time. However, I discovered that these myths can cause long-term issues such as wrinkling or loose trims. Properly cleaning and leveling the subfloor, and carefully aligning seams, are non-negotiable steps that significantly impact the durability and appearance of your work. Busting these myths opened my eyes to the value of thorough preparation and patience.
What Experts Won’t Tell You About Achieving a Perfect Finish
Many professionals emphasize the importance of understanding the nuances of seam placement and pile direction, which are often overlooked by DIYers. For example, matching the carpet pile direction and carefully planning seam locations can make a huge difference in the overall look. Learning these subtle techniques from trusted resources like this comprehensive guide transformed my approach and helped me achieve results that rival professional work.

2 thoughts on “Expert Carpet & Baseboards Installation Strategies for Perfect Home Finish”
Jessica Morgan
February 5, 2026 at 5:00 pmReading this post really resonated with me because I learned firsthand how skipping proper surface preparation can cause issues down the line. I once overlooked cleaning the subfloor thoroughly before installing new baseboards, and I ended up with gaps and uneven lines that needed fixing after the fact. The extra time spent on meticulous measurement and surface prep truly saved me headaches later. I also appreciated the tip about managing pile direction for carpet seams—it’s a detail many DIYers might overlook, but it makes a big difference in how seamless everything looks and how well it wears over time. Has anyone found specific tools or techniques that make surface prep or seam matching easier? Sharing practical tips could really help those of us looking to elevate our DIY game while avoiding rookie mistakes.
Samuel Thompson
March 1, 2026 at 12:40 pmThis post really hits home for me because I’ve learned through trial and error that patience and proper preparation are everything when it comes to DIY flooring and trim work. I once rushed the installation of my living room carpet, neglecting to check the subfloor thoroughly, and ended up with ripple and seam issues that only got worse over time. The extra effort I put into proper measurement, leveling, and surface prep since then has made a huge difference. The tip about planning the pile direction is especially crucial—matching it correctly during installation keeps seams less visible and ensures the carpet wears more evenly. For folks doing this on their own, I highly recommend investing in a good seam roller and a cutting guide. Has anyone else found particular tools or techniques that help make surface preparation or seam matching easier and more consistent? I’d love to hear your tips or recommendations on simplifying these steps without compromising quality.