Ever spent hours staring at a bathroom that looks outdated but felt completely overwhelmed about where to start? That was me, not too long ago. I’d renovate the shower, pick out the perfect tiles, but somehow, the room still felt incomplete. It wasn’t until I realized the magic of finishing touches—like stylish baseboards and a modern shower design—that everything clicked. I finally saw my bathroom transform from tired to trendy, and you can too.
Why Small Details Make a Big Difference in Your Bathroom
When I first tackled my bathroom makeover, I focused on the big stuff—fixtures, tiles, lighting. But the real game-changer turned out to be the details. Think about it: a sleek set of baseboards can tie the whole room together, hiding imperfections and adding a polished look. Similarly, a well-designed shower can elevate the entire vibe, making your space feel like a luxury retreat. If your bathroom feels flat or uninspired, chances are, it’s missing those design accents that bring everything together.
Is Investing in Trendy Baseboards and Shower Ideas Actually Worth the Hype?
Absolutely. But I get it—these upgrades seem minor compared to larger projects. Early on, I made the mistake of ignoring the importance of quality baseboards, thinking they were just decorative trim. That was a mistake. Choosing the right style and material for your baseboards can prevent future damage and give your bathroom a cohesive look. Similarly, exploring innovative shower ideas—like creating a spa-like experience—can dramatically boost your daily comfort and home value. Want to discover how to pick the best options? Check out this guide for simple updates that elevate your interior.
As I learned from my own experience, the key is not just to follow trends but to choose durable, stylish options that suit your space. Whether it’s a modern, minimalist look or something more classic, there are plenty of ways to customize your bathroom’s look and feel. Ready to dive into the practical steps that will turn your renovation dreams into reality? Let’s get started!
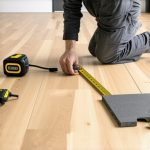
Start with Precise Measurements and Planning
Before you pick out new baseboards or shower fixtures, measure your space meticulously. Use a tape measure to determine the length of walls for baseboards and the dimensions of your shower area. Sketch a rough layout to visualize where each element will fit. I remember the first time I tried this—my initial measurements were off by a few inches, leading to wasted materials. Taking the time to plan saves both time and money in the long run.
Select Durable Materials for Longevity
Choosing the right materials is crucial. For baseboards, opt for moisture-resistant options like MDF or PVC, which handle humidity better than traditional wood. When upgrading your shower, consider water-resistant tiles, high-quality grout, and corrosion-proof fixtures. I once installed a shower with inexpensive fixtures that rusted within a year—learning this the hard way taught me to prioritize durability. For detailed guidance, check this guide.
Preparation Is Key to a Seamless Finish
Preparation involves cleaning surfaces thoroughly, removing old materials, and making repairs. For baseboards, sand the edges to ensure a flush fit. For showers, ensure walls are smooth and sealed. I once rushed the prep stage, which resulted in uneven edges and grout cracks. Proper prep creates a solid foundation for a flawless finish. Use painter’s tape to mask areas you want to protect during installation.
Install Baseboards with Precision and Care
Start by cutting your baseboards to length with a miter saw, ensuring clean, tight corners. Use a high-quality adhesive and finishing nails for secure attachment. When I installed my baseboards, I used a level to keep everything straight and a nail set to hide the nail heads—these small steps made a big difference. For a professional look, consider caulking gaps and painting or staining after installation. For detailed strategies, explore this resource.
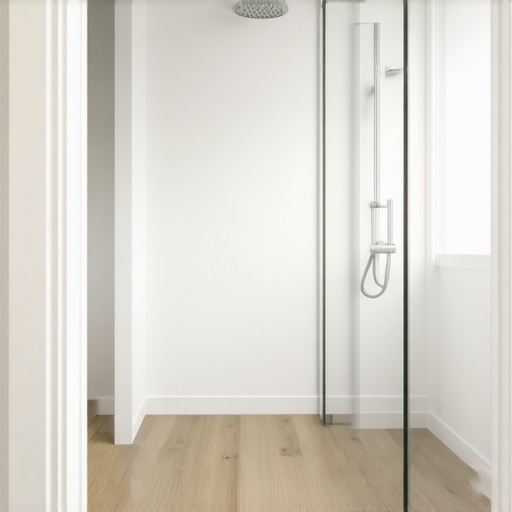
Upgrade Your Shower with Modern Designs for a Spa-Like Experience
Choose a sleek shower enclosure or a walk-in design to maximize space. Incorporate features like rainfall showerheads, body jets, or built-in shelves for convenience. I experimented with creating a spa-like shower by adding LED lighting and a bench—transforming the space into a personal retreat. For inspiration and tips, visit this guide. Remember, sealing all edges properly prevents leaks and water damage, so take your time during installation.
Finish with Artistic Touches and Safety Features
Painting your baseboards with moisture-resistant paint or staining them enhances durability and style. Add non-slip mats or textured tiles in the shower for safety. I found that small details like matching hardware and trim paint really tie the room together. Don’t forget to regularly inspect seals and caulking to maintain your upgrade’s longevity. These finishing touches turn a basic renovation into a true modern bathroom.
Many homeowners jump into bathroom upgrades believing they know the essentials, but some widespread misconceptions can actually sabotage your efforts. Let’s dig deeper into what most people get wrong and how to avoid costly mistakes that could delay or ruin your renovation. Overconfidence in DIY skills, for example, often leads to subpar results, especially when it comes to critical details like waterproofing and sealing. Remember, a small oversight here can cause leaks and mold growth down the line, which is why expert guidance is invaluable. For those considering installing baseboards or updating shower fixtures, it’s tempting to think that cheaper materials will suffice. But in reality, investing in durable, water-resistant options ensures your project stands the test of time, saving you money in the long run. A common myth I encountered early on was that all grout is equal—nothing could be further from the truth. High-quality, mold-resistant grout significantly reduces maintenance and prevents discoloration, especially in humid bathrooms. When tackling shower renovations, many assume that sealing edges is a minor step. However, improper sealing can lead to water infiltration, damaging walls and floors, which is why meticulous attention to detail here is critical. An advanced tip for seasoned renovators is to consider the hidden nuances of tile layout and pattern alignment, which can elevate your design from good to stunning. Think about how a subtle offset or a custom border can make a big visual impact.
Why do some bathrooms still look outdated even after renovation?
This often boils down to neglecting the finishing touches—like matching hardware, lighting, and trim styles—that tie everything together. It’s easy to focus on the big-ticket items but forget that the small details often deliver the most significant aesthetic upgrade. Expert designers emphasize that consistency in style and quality materials creates a cohesive, upscale look. Be cautious of rushing through these finishing steps or choosing trendy, cheap options just to save time or money. Instead, take the time to plan each element, from baseboards to shower fixtures, with a focus on durability and style. Check out this guide for tips on selecting the right finishes that will truly enhance your space.
Have you ever fallen into this trap? Let me know in the comments! Remember, a successful bathroom renovation isn’t just about aesthetics but also about long-term functionality. By avoiding common myths and understanding the hidden nuances, you can create a space that’s both beautiful and resilient.
Once you’ve completed your bathroom upgrade with stylish baseboards and modern shower designs, the journey doesn’t end there. Keeping everything in top shape requires the right tools and a proactive maintenance routine. Over the years, I’ve learned that investing in quality equipment and adopting simple upkeep strategies can dramatically extend the lifespan of your renovation, saving you time and money.
Must-Have Tools for Bathroom Upkeep
First, a high-quality multi-tool like the Dremel Multi-Max has become my go-to for minor repairs. Its versatility allows me to sand, cut, and clean hard-to-reach spots without hassle. For sealing and grout maintenance, a silicone caulking tool ensures smooth, professional-looking edges, preventing water infiltration. I personally prefer the Goni Caulking Finisher because it applies a consistent bead and shapes the sealant perfectly. Additionally, a digital moisture meter helps monitor humidity levels, which is crucial in preventing mold growth around showers and baseboards. Regularly checking moisture levels with a reliable device like the Protimeter Surveymaster has saved me from costly repairs down the line.
Why Regular Maintenance Matters
Consistent upkeep keeps your bathroom looking pristine and functional. For example, periodically inspecting grout lines and reapplying sealant prolongs the life of your tiles and prevents leaks. Cleaning your baseboards with a damp cloth prevents dust accumulation, which can cause discoloration over time. I recommend setting a monthly schedule to check for signs of water damage or deterioration, especially in areas prone to humidity. This proactive approach can catch issues early before they escalate into major repairs.
How do I maintain my bathroom’s appearance over time?
The secret is using the right cleaning products and tools. For tiles and grout, I swear by a mixture of vinegar and baking soda—it’s natural and effective for removing soap scum without damaging surfaces. For stubborn stains, a soft-bristle scrub brush paired with a commercial grout cleaner does the trick. To protect your new baseboards, apply a moisture-resistant paint or stain periodically, especially if your bathroom experiences high humidity. Also, consider installing a dehumidifier or exhaust fan if you notice persistent dampness, which can prevent mold and keep your surfaces looking fresh for years to come.
In terms of long-term results, investing in quality materials like water-resistant grout and corrosion-proof fixtures will pay off. Trends indicate that smart maintenance, such as integrating moisture sensors and automated cleaning systems, might become standard in future bathroom upgrades. Staying ahead of these innovations can keep your space both beautiful and smart.
Take my advice—try incorporating a digital moisture meter into your routine or using a professional-grade silicone tool for sealing. These small but impactful steps will help your bathroom stay beautiful and functional long after the initial renovation. For detailed guidance on maintenance routines tailored to your specific fixtures and finishes, check out this resource.
After tackling my bathroom renovation, I realized that the secret to a truly polished look lies in the details—like stylish baseboards and modern shower features. These small updates can make a big difference, turning a tired space into a luxurious retreat that reflects your personal style.
Lessons I Learned from My Bathroom Makeover
- Don’t Underestimate Baseboards: Choosing water-resistant, stylish baseboards not only protects your walls but also elevates the overall aesthetic. I once installed cheap trim, which warped quickly—investing in quality materials like MDF or PVC saved me headaches later.
- The Power of the Finish Line: Finishing touches like caulking, painting, and matching hardware are what make the renovation look professional. Rushing through these steps can leave your space feeling incomplete or poorly assembled.
- Innovate with Your Shower: Incorporating spa-like features such as rainfall showerheads, LED lighting, or built-in shelving transformed my daily routine. It’s worth exploring ideas that combine comfort and style for a truly indulgent experience.
- Plan and Prepare Carefully: Precise measurements and thorough preparation set the foundation for success. I learned the hard way that rushing this phase leads to wasted materials and uneven finishes—take your time for the best results.
Tools and Resources That Made a Difference
- This guide helped me select durable, stylish baseboards that resist moisture and look great long-term. Investing in quality tools like a miter saw and high-quality caulking gun also made the installation smoother and more precise.
- For bathroom safety and comfort, I recommend these spa-inspired shower ideas. They inspired me to add features that turned my shower into a personal retreat, boosting both enjoyment and value.
- Long-term maintenance is easier with the right products. I rely on a moisture meter and mold-resistant grout to keep my bathroom looking fresh, which I learned about through trusted sources.
Seize the Moment and Make It Your Own
Embarking on a bathroom upgrade might seem daunting, but with the right mindset and tools, you can create a space that’s both beautiful and functional. Remember, the details matter—your choice of materials, finishes, and safety features will pay off in years to come. So why wait? Dive into your renovation with confidence and turn your bathroom into a space you love to spend time in.
What’s the one detail you’re most excited to upgrade in your bathroom? Share your thoughts below—I’d love to hear about your project!

One thought on “Best Baseboards & Shower Renovation Ideas for a Modern Bathroom Makeover”
Madeline Carter
March 11, 2026 at 9:30 pmReading this definitely resonated with me because I underestimated the power of small details in my previous upgrades. I once installed new fixtures, but the final look felt incomplete until I added matching hardware and some carefully chosen trim. It’s amazing how much those finishing touches can elevate a space from looking good to truly standout. I love the idea of creating a spa-like shower—LED lighting and built-in shelves can make a huge difference, not just visually but also in daily practicality. In your opinion, what are some affordable ways to incorporate luxury touches without breaking the bank? I’m curious because I want to upgrade my shower but am cautious about overspending. Also, I’ve found that investing in moisture-resistant paint for trims and baseboards really helps keep everything looking fresh over time, especially in humid environments. It’s a small step that makes a big difference. Would love to hear what others have found effective, especially in balancing style with durability!