Ever spent a weekend painstakingly installing new flooring only to find it doesn’t hold up after a few months? I’ve been there. I remember the frustration of seeing my beautiful new hardwood start to warp or my sleek tiles crack prematurely. It felt like all that effort was wasted, and I wondered if I’d ever get it right. That lightbulb moment hit me hard—there’s more to a lasting finish than just picking the right materials. Proper installation is key, and that’s what I want to share with you today.
Why Proper Installation Matters More Than You Think
Most homeowners focus on the look of the floor, but what happens underneath is just as important. A flawless finish isn’t just about the top layer; it’s about the foundation. Poorly installed flooring can lead to issues like buckling, gaps, or even damage that costs a fortune to repair. I learned this early on when I rushed through my first project without paying attention to the details. The result? A warped floor within the first year. It was a harsh lesson, but it pushed me to learn the best installation practices. Today, I’ll walk you through the essentials that can make your flooring last for decades.
Have you ever faced a flooring disaster soon after installation?
If so, you’re not alone. Many DIY enthusiasts or even seasoned pros overlook critical steps, leading to long-term problems. According to industry experts, a significant portion of flooring failures stem from improper installation rather than the materials themselves. That’s why investing in expert tips can save you money and headaches in the long run. Want to avoid the mistakes I made? Keep reading, because the following strategies are proven to ensure your floors stay stunning and durable for years to come.
Prepare Your Surface Like a Pro
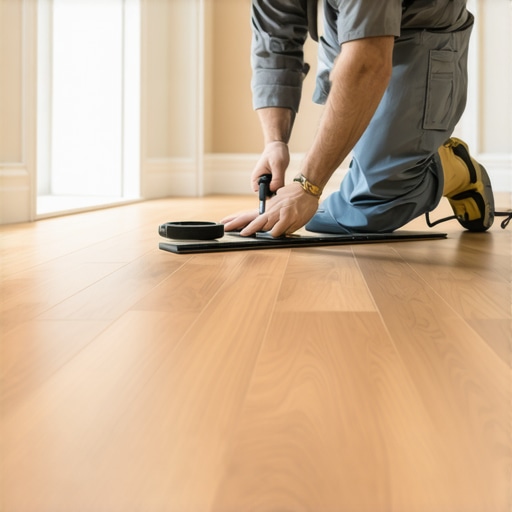
Before laying down the new flooring, inspect the subfloor thoroughly. Remove any debris, old adhesive, or uneven patches. Think of this step as preparing a canvas before painting; a smooth, clean surface ensures your masterpiece lasts. I once skipped this step in a rush, only to find my new tiles cracking later. The fix was costly and frustrating. Always use a level and a vacuum to clear the area, and repair any dips or bumps with self-leveling compound. Learn more about preparing your subfloor.
Choose the Right Underlayment for Your Needs
Underlayment acts as a shock absorber and moisture barrier. For hardwood, cork or foam underlayments provide stability and soundproofing. For tile, a cement-based backer board prevents cracking and water damage. When I installed laminate flooring in my living room, I used a high-density foam underlayment which significantly reduced noise and improved comfort. Always match the underlayment to your flooring type for long-lasting results. Discover the best underlayment options here.
Master the Cutting and Layout Techniques
Accurate measurements and cuts are vital. Use a quality tape measure, chalk line, and a fine-tooth saw for precision. Plan your layout from the center of the room outward, ensuring symmetrical cuts at the edges. I once faced a tricky corner where the tiles needed to fit perfectly; I measured thrice, cut once, and used spacers to align everything flawlessly. This patience paid off with a professional-looking finish. Remember, a well-laid pattern enhances durability and visual appeal. Get expert tips on layout planning.
Secure Proper Adhesion and Spacing
Applying the right adhesive in the correct amount is crucial. Follow manufacturer instructions meticulously. For hardwood, use a recommended glue and ensure the planks are pressed firmly into place. For tile, use a notched trowel to spread thin-set evenly and avoid air pockets. Leave expansion gaps around the perimeter—these prevent buckling as materials expand and contract with temperature changes. I once ignored this step, and my floor warped within months. Proper spacing is like giving your flooring room to breathe. Learn about spacing and adhesive techniques.
Finish with Quality Transitions and Edging
Transitions and baseboards not only frame your flooring but also protect edges from damage. Use matching or complementary baseboards and secure them properly. When replacing my old baseboards, I chose a modern profile that added a sleek finish. Caulk and paint the edges for a seamless look. This final touch prevents moisture intrusion and ensures the floor remains in top condition long-term. For fresh styling ideas, check out latest baseboard trends.
While many believe that choosing high-quality materials guarantees a long-lasting floor, the real secret lies in mastering the subtle art of installation. A frequent myth is that the material quality alone determines durability; however, even the best flooring can fail prematurely if not installed correctly. Small errors during the process can lead to significant issues over time, such as warping, cracking, or gaps. As an expert in flooring installation, I’ve seen how overlooking these nuances can cost homeowners dearly.
What advanced mistakes do most people make when installing flooring?
One critical oversight is neglecting the importance of climate considerations. Many assume that flooring will adapt naturally to temperature and humidity changes, but without proper acclimation and expansion gaps, materials can expand or contract excessively. This is especially true for hardwood, which requires a period of acclimation before installation. Skipping this step can lead to buckling or gaps later, despite using high-end materials. Industry expert advises that understanding and managing these nuances is essential for lasting results.
Another common mistake is improper subfloor preparation. While many focus on the visible surface, the foundation often gets overlooked. An uneven or contaminated subfloor can cause the entire installation to fail, regardless of the quality of the flooring or adhesive used. Ensuring the subfloor is perfectly level, clean, and dry is a step that can’t be skipped if you want a durable, flawless finish. This is why professional-grade preparation techniques are vital and are often underestimated by DIYers.
Furthermore, many installers underestimate the significance of correct adhesive application and spacing. Using too much or too little adhesive can compromise the bond, leading to early lifting or cracking. Additionally, neglecting expansion gaps at edges can cause buckling as the material expands during temperature fluctuations. These details are often dismissed as minor but are crucial for long-term stability. Remember, the devil is in the details, and paying attention to these advanced installation nuances will save you headaches later.
In conclusion, achieving a perfect and durable flooring installation requires more than just selecting the right material. It demands a comprehensive understanding of environmental factors, meticulous preparation, and precise application techniques. Don’t fall into the trap of oversimplifying this process. For more insights on creating durable, stunning floors, check out expert tips for long-lasting results. Have you ever fallen into this trap? Let me know in the comments!
Keeping your floors in top shape over the years requires more than just initial installation expertise; it demands the right tools and consistent maintenance routines. As someone who has been in the trenches, I can tell you that investing in quality equipment and adopting effective upkeep strategies can dramatically extend the life of your flooring. Today, I’ll share the tools I personally recommend and some maintenance tips that will keep your floors looking stunning for decades.
How do I maintain my flooring over time?
First, regular cleaning is fundamental. For most surfaces, a high-quality vacuum with a soft brush attachment is invaluable. I prefer the Dyson V11 because it offers powerful suction, excellent for removing dust and debris from intricate patterns or textured surfaces. For hardwood or laminate, I use a microfiber mop paired with a gentle cleaner like Bona Hardwood Floor Cleaner, which is designed to protect the finish without stripping it away.
Next, protective measures are vital. Installing felt pads under furniture prevents scratches, and using rugs in high-traffic areas helps distribute wear. I always keep a small can of 3M Scotchgard on hand for spot treatments—this protects the surface from spills and stains, especially in kitchens and entryways.
Tools that make a difference in maintenance
One underrated tool is a steam mop. Unlike traditional mops, steam cleaners sanitize and lift dirt without harsh chemicals, making them ideal for sealed hardwood or tile floors. I recommend the Bissell Steam Mop, which heats quickly and has adjustable steam settings. It’s perfect for weekly deep cleans, ensuring your floors stay hygienic and lustrous.
For periodic deep maintenance, a buffer or floor polisher can restore shine and remove minor scratches. I use the Makita 9237CX2 buffer—its variable speed control allows me to gently buff surfaces without damaging the finish. Remember, always follow manufacturer instructions and test on a small area first.
Keep it working: Future trends and smart solutions
Looking ahead, I believe smart cleaning devices will become more prevalent. IoT-enabled vacuum cleaners and robotic mops are already on the rise, offering scheduled maintenance and real-time monitoring. Integrating these tools into your routine can save time and ensure consistent care—something I plan to incorporate into my own home soon.
Finally, don’t forget to schedule professional inspections and recoats every few years. A trained technician can spot issues early and apply protective finishes that prolong your floor’s life. For comprehensive guidance, check out these expert tips for durable results.
Now, I challenge you to try using a steam mop for your next cleaning session. It’s a simple step that can keep your floors looking pristine and extend their lifespan significantly. Happy maintaining!
After years of tackling flooring projects, I’ve stumbled upon some insider wisdom that truly transforms the way floors perform over time. These lessons aren’t found in typical DIY guides—they’re the result of real-world experience and expert advice that changed my approach forever.
The Hardest Lesson I Learned About Flooring Installation
One pivotal moment was realizing that even the most beautiful materials can fail if the installation isn’t meticulous. I once skipped acclimating hardwood to the room’s climate, and it warped within months. That experience taught me the importance of managing environmental conditions and following manufacturer guidelines precisely. It’s a small step that makes a huge difference in longevity.
Myths About Flooring That Held Me Back
Believing that high-quality materials alone guarantee durability was a costly misconception. I learned that proper subfloor preparation and correct spacing are just as vital. This myth led me to overlook foundational details, resulting in issues like buckling or cracks. Now, I know that the foundation of your flooring is everything—check out this guide for expert tips on preparation.
What Industry Insiders Won’t Tell You
Most people don’t realize that climate control and expansion gaps are crucial for long-lasting floors. I used to ignore these details until I experienced the stress cracks caused by temperature swings. Learning to leave appropriate gaps and control humidity levels has saved me from costly repairs. Industry expert advises that managing these environmental factors is essential for durability.
Curated Tools That Elevate Flooring Projects
Over the years, I’ve relied on a few key tools that make installation and maintenance easier. A high-quality laser level ensures perfect alignment, while a moisture meter helps verify subfloor dryness. For cleaning, I swear by the Dyson V11 vacuum and a microfiber mop with gentle cleaner. These tools help preserve the integrity of floors and keep them looking new longer.
Embrace The Future of Flooring Care
Looking ahead, smart cleaning devices like robotic vacuums and IoT-enabled mops will revolutionize maintenance routines. I plan to incorporate these tech solutions to ensure my floors stay pristine effortlessly. Remember, consistent care—combined with smart tools—is the secret to extending your flooring’s lifespan. For comprehensive insights, visit this article.
Now, I challenge you to evaluate your current flooring routine. Are you paying attention to environmental controls, or skipping maintenance steps? Share your experiences below—I’d love to hear what’s worked (or not!) for you.

3 thoughts on “Expert Flooring Installation Tips for Long-Lasting Results Today”
Matthew Roberts
January 27, 2026 at 3:50 pmThis post really hits home for me because I’ve seen firsthand how overlooked details can make or break a flooring project. I once rushed the subfloor preparation and ended up with some minor squeaks and unevenness that persisted even after months of use. It’s incredible how such small steps, like using a moisture meter or leveling compound, can save so much trouble later. I’ve also found that investing in quality tools, especially for measurements, pays off very long-term. I’m curious—what are some specific signs homeowners should look for during routine inspections to catch potential issues early? I believe regular checkups can prevent costly repairs if caught in time. Would love to hear other tips or personal stories on how they maintained their floors over the years, especially in varying climates.
Sarah Emily Johnson
February 1, 2026 at 11:00 pmI completely agree with this post’s emphasis on proper flooring installation—it’s often the hidden culprit behind early damage. I experienced this firsthand when I installed hardwood in my dining area without acclimating the wood beforehand; within a few months, I noticed gaps and some slight warping. Since then, I’ve learned how vital environmental factors are. Regular inspections for signs like slight lifting, gaps, or pop sounds can alert homeowners to underlying issues early. I’ve found that using a simple moisture meter periodically helps me verify that the subfloor remains dry, especially during seasonal changes. Also, ensuring expansion gaps are maintained is crucial. Have others found any specific tools or routines that help them catch problems before they escalate? I’d love to hear suggestions for how to handle minor issues before they turn into costly repairs, especially in climates with high humidity swings.
Evelyn Carter
February 22, 2026 at 8:20 amThis post really highlights the importance of meticulous installation and environmental awareness. I’ve learned from personal experience that even top-tier materials can fail prematurely if not given proper care and setup. During my last hardwood project, I took extra time to acclimate the wood and left adequate expansion gaps, which later paid off during seasonal changes. It’s interesting how much small details, like proper spacing and subfloor prep, influence long-term durability. I’m curious, has anyone used digital moisture meters or indoor climate controls to monitor and optimize their environment? I’ve found that maintaining consistent humidity levels really helps prevent issues like warping or buckling. Also, what methods do others recommend for DIYers to easily inspect their floors for early signs of trouble without professional tools? I’d love to hear different routines that have worked well for different climate zones. It’s clear that a combination of right techniques and ongoing vigilance makes all the difference in preserving our floors over the years.