Ever spent hours, maybe days, painstakingly installing new flooring only to have it warp, buckle, or lose its luster within a year? I’ve been there. I remember my first attempt at laying down a hardwood floor—excited, confident, and completely unaware of the critical details that make or break the project. The result? A warped mess that made me wish I’d just hired a pro from the start. That lightbulb moment taught me a vital lesson: successful flooring isn’t just about choosing the right material; it’s about mastering expert installation techniques that ensure your investment lasts and looks stunning for years to come.
Why Proper Flooring Installation Matters More Than You Think
Choosing beautiful flooring is the fun part. But without proper installation, even the most premium materials can turn into a nightmare. I learned this the hard way when my DIY efforts led to uneven surfaces and gaps that showed up just months after I finished. It was frustrating and costly to fix. That’s why I now swear by a few essential tips that make all the difference—from preparing the subfloor to finishing touches. These techniques help prevent common problems like warping, buckling, or scratches, making your floors not only durable but also breathtaking.
In fact, according to a study by the National Wood Flooring Association, improperly installed floors are responsible for over 70% of flooring failures within the first five years. That’s a staggering number that underscores how crucial expert techniques are. Whether you’re laying tile, carpet, or hardwood, knowing the right steps can save you time, money, and a lot of headaches.
Is It Really Worth the Extra Effort to Do It Yourself?
Early in my DIY journey, I made a costly mistake—skipping the detailed prep work because I thought I could save a few bucks. The result? Gaps and uneven edges that required professional repair. Learning from that, I now focus on proper surface prep and precise measurements. If you’re wondering whether tackling installation yourself is worth it, I’d say it depends on your patience and willingness to learn. For many, a few hours of research and following expert advice—like those found in top flooring installation strategies for durable results—can make all the difference.
So, if you’re tired of costly mistakes and want your floors to truly stand the test of time, stick around. I’ll walk you through the key steps, backed by experience and expert insights, to help you achieve stunning, long-lasting results. Let’s get started!
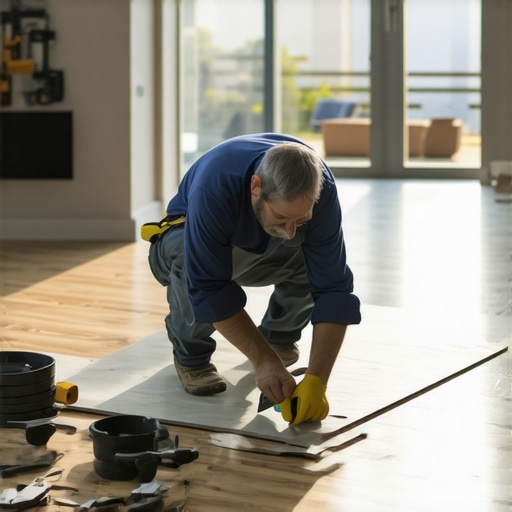
Prepare the Subfloor with Precision
My first experience with subfloor prep was a messy lesson. I attempted to skip the detailed cleaning and leveling, thinking it was a minor step. The result was uneven flooring that squeaked and shifted. Since then, I learned to thoroughly inspect and prepare the subfloor. Use a level to identify high or low spots and sand or fill as needed. Clean the surface meticulously to remove dust and debris, ensuring the adhesive or flooring material adheres perfectly. This step is like laying a solid foundation for a house; without it, everything else can crumble.
Acclimate Your Flooring Material
One of my most overlooked steps was neglecting to acclimate the flooring. I once stored hardwood planks in a humid garage for a week, only to find them warped when installed. Experts recommend letting flooring sit in the room where it will be installed for at least 48 hours. This allows the material to adjust to the room’s temperature and humidity, preventing future warping or gaps. Think of it like letting wine breathe before serving—your flooring needs to settle into its environment.
Accurate Measurements and Layout Planning
During a recent project, I vividly remember double-checking measurements multiple times. I used a chalk line to mark a straight starting line across the room. Misaligned measurements can lead to uneven edges or awkward cuts. I recommend measuring twice, marking your starting point, and planning the layout to minimize small cuts at the edges. This step saves time and material, much like plotting a map before a road trip.
Master the Cutting Technique
Cutting flooring precisely is crucial. I once used a dull blade, which caused jagged edges and wasted material. Upgrading to a sharp carbide blade and using a straightedge made a world of difference. For complex cuts around doorframes or vents, a jigsaw or a coping saw provides better control. Think of cutting as sculpting—accuracy creates a clean, professional look that lasts.
Lay the Flooring Methodically
When I started laying planks, I found it helpful to work in small sections, clicking or nailing each piece into place systematically. Employ spacers between the wall and the flooring to allow for expansion, especially in hardwood. I once ignored this and faced buckling in winter. Use a tapping block and mallet to snugly fit planks together without damaging edges. It’s like assembling a puzzle—patience and care ensure a tight, seamless fit.
Use the Right Adhesive and Fasteners
Choosing the correct adhesive or nails makes a big difference. I experimented with different types before settling on the manufacturer-recommended options. Applying adhesive evenly prevents gaps and future movement. For nail-down floors, set the nails below the surface and fill the holes with wood filler for a smooth finish. Think of this as sealing the deal—proper fastening guarantees durability and a polished look.
Finish with Proper Sanding and Sealing
My last project involved a thorough sanding with fine-grit paper, which eliminated minor imperfections. Sealing or finishing the floor with a high-quality coat enhances durability and appearance. I learned that rushing this step leads to scratches and wear. Treat your floor like a fine piece of wood—careful finishing preserves its beauty for years to come.
By following these core techniques—meticulous preparation, precise measurements, careful cutting, and correct finishing—you set the stage for flooring that endures and impresses. Remember, expert installation isn’t just about aesthetics; it’s the key to long-lasting, stunning results that can elevate your entire home.
Many homeowners dive into flooring projects with a set of assumptions that, surprisingly, can lead to costly mistakes. Let’s dig deeper into what most people get wrong about expert flooring installation and how to avoid falling into these traps.
Is It Really Just About Picking the Right Material?
While selecting top-quality flooring is crucial, the real secret lies in the installation process itself. A common myth is that professional installation is only necessary for complex projects. In reality, even straightforward flooring jobs benefit immensely from expert techniques. Improper subfloor prep, incorrect acclimation, or rushed measurements can cause issues down the line—warping, squeaking, or gaps—regardless of the material’s quality. For instance, ensuring your subfloor is perfectly level and clean is a step many underestimate, but it’s vital for durability. If you want to learn more about durable installation techniques, check out this guide to durable flooring.
The Hidden Trap of Neglecting Climate Conditions
Many forget that flooring materials are sensitive to environmental changes. Hardwood, for example, needs to acclimate properly; otherwise, it risks warping or gaps later. The misconception is that storing flooring in the garage or basement is sufficient, but in reality, it must sit in the installation room for at least 48 hours. Ignoring this step is a rookie mistake that can lead to big problems. The science behind this comes from studies highlighting how humidity and temperature fluctuations cause wood to expand or contract—an insight supported by experts in flooring installation. Do yourself a favor and always acclimate your flooring, or you might face costly repairs later.
Advanced Mistake: Overlooking Expansion Gaps
One of the most overlooked details during installation is leaving enough expansion space around the edges. Many DIYers and even some pros forget this step, leading to buckling or cracking when the floor expands in humid months. The rule of thumb is to leave a gap of about ¼ inch to ½ inch along walls, which is then covered by baseboards or molding. Skipping this can seem harmless at first but will cause serious problems over time. For a professional touch on finishing your floors seamlessly, consider consulting baseboard updates that hide these gaps beautifully.
Have you ever fallen into this trap? Let me know in the comments. Remember, mastering expert techniques is the key to flooring that lasts and impresses for years to come.
Keeping your flooring in top shape over the years requires more than just expert installation; it demands the right tools and regular maintenance. From specialized equipment to routine checkups, I’ve learned firsthand that investing in quality tools and following a maintenance plan can dramatically extend the lifespan and beauty of your floors. In this guide, I’ll share the specific tools I personally recommend and how to use them effectively to keep your floors working beautifully for decades.
Invest in a High-Quality Floor Buffer
One of the most underrated tools in my arsenal is a professional-grade floor buffer. I use a **Dual-Action Orbital Buffer** because it offers gentle yet effective cleaning without damaging the finish. It’s perfect for maintaining hardwoods and vinyl floors, removing dirt and minor scratches that can accumulate over time. Regular buffing, combined with the right polish, keeps the surface glossy and resistant to wear. For high-traffic areas, I recommend a buffer with adjustable speed settings to customize the care routine.
Use a Moisture Meter to Prevent Warping
Preventative maintenance starts with monitoring environmental factors. I rely on a **digital moisture meter** to regularly check humidity levels in my home. Excess moisture can lead to warping or swelling, especially in hardwoods. Maintaining a humidity level between 35-55% is ideal, and the moisture meter helps me stay vigilant. This simple device is invaluable for avoiding costly repairs caused by moisture imbalance. In the future, I predict smart moisture sensors integrated with home automation will become standard, allowing real-time monitoring and alerts.
Keep a Quality Floor Cleaning Kit Handy
Cleaning is fundamental. I prefer a **microfiber mop and pH-neutral cleaner** specifically formulated for flooring. The microfiber head picks up dust and debris effectively without scratching, while the neutral cleaner preserves the finish. Avoid harsh chemicals that can degrade protective coatings. I also keep a soft-bristled brush for stubborn spots and a vacuum with a hardwood floor setting for quick daily cleanup. Regular cleaning prevents dirt buildup that can cause scratches and dullness over time.
Don’t Forget About Protective Pads and Sealants
Protective pads under furniture prevent scratches, especially on hardwoods. I make it a habit to check and replace these pads annually. Additionally, periodic sealing with a high-quality urethane or polyurethane sealant re-energizes the surface and protects against stains and moisture. I recommend scheduling a professional re-sealing every 2-3 years for optimal results. This simple step can preserve the appearance and integrity of your floors for decades.
Plan for Regular Inspections and Updates
Finally, I conduct a visual inspection of my floors every few months, looking for signs of wear or damage. Addressing minor issues early, such as filling in scratches or re-gluing loose boards, saves significant repair costs later. To stay ahead, I follow expert advice from this guide to durable flooring and incorporate advanced maintenance techniques into my routine. As technology advances, I believe more homeowners will leverage smart sensors and automated cleaning devices to keep floors pristine effortlessly.
Take your flooring maintenance seriously—try incorporating a professional floor buffer or moisture meter into your routine today. These small investments in tools and regular upkeep will pay off in long-term beauty and durability. Remember, a well-maintained floor isn’t just about looks; it’s about creating a space that lasts. For more detailed maintenance tips, don’t hesitate to explore this expert guide to flooring care.

Ever struggled with warped hardwood or uneven tiles that ruined your home’s aesthetic? I’ve been there, and I know that the secret to durable, stunning floors isn’t just choosing the right material — it’s about applying expert installation techniques that stand the test of time. In this guide, I’ll share some hard-earned lessons and insider tips that will elevate your flooring project from average to extraordinary.
3 Mistakes I Made That Taught Me the Hard Way About Flooring
- Skipping Subfloor Prep: I once installed new tiles over a neglected, uneven base. The result was cracked grout and shifting tiles. Now I know a perfectly level, clean subfloor is the foundation of success.
- Neglecting Climate Acclimation: Storing hardwood in a humid garage seemed fine at first, but it caused warping after installation. Proper acclimation in the room prevents this costly mistake.
- Overlooking Expansion Gaps: Forgetting to leave space near the walls led to buckling as the wood expanded. Reserve a ¼ to ½ inch gap to keep your floors safe from seasonal changes.
Tools and Resources That Keep My Floors Looking New
- High-Quality Floor Buffer: Regular buffing with a dual-action orbital buffer keeps hardwoods shiny and scratch-free. It’s a game changer for maintenance.
- Moisture Meter: Monitoring humidity helps me avoid warping—staying within 35-55% keeps my floors stable.
- pH-Neutral Cleaner and Microfiber Mop: Gentle cleaning prevents finish degradation and preserves that just-installed look.
- Protective Furniture Pads and Sealants: Small touches that prevent scratches and extend the life of my floors.
Take Action and Elevate Your Flooring Game
Proper flooring installation can transform your home and save you from future headaches. Whether you’re a DIY enthusiast or hiring a pro, applying these expert techniques will make your floors durable, beautiful, and worth every penny. Now is the time to take the first step—your future self will thank you for it.
What’s the biggest flooring mistake you’ve ever made or avoided? Share your story in the comments below!
4 thoughts on “Expert Flooring Installation Tips for Durable, Stunning Results”
Liam Morgan
December 21, 2025 at 7:50 amI’ve definitely learned the hard way about subfloor prep and climate acclimation! My first hardwood install was over a less-than-perfect base, and within a year, I had warping and squeaking. Now I always spend extra time leveling and cleaning the subfloor, which makes a huge difference. As for acclimation, I used to think just storing the flooring in the garage was okay, but I saw firsthand how humidity caused warping if not allowed to settle in the room. For anyone tackling floors, I’d recommend investing in a good moisture meter and spending that extra day or two ensuring the environment is right. Has anyone found a specific method or tool particularly effective for maintaining humidity and temperature consistently in their home? I’d love to hear about solutions that really work for year-round stability.
Emily Carter
January 11, 2026 at 9:10 amThis post resonates a lot with my recent experience. I learned the hard way that even small oversights, like not leaving enough expansion gap or skipping proper subfloor prep, can cause major issues down the line. In my case, I didn’t account for seasonal humidity changes, and my hardwood floors developed cracks—definitely a costly lesson! Since then, I’ve started using a combination of a moisture meter and a digital hygrometer to keep the environment stable, especially during extreme weather shifts. I’ve found that consistent monitoring and using dehumidifiers or humidifiers as needed really make a difference. Has anyone used advanced smart sensors that integrate directly with home automation systems? I’m curious if they’ve been worth the investment for maintaining consistent indoor climate conditions year-round.
Sophia Reynolds
January 11, 2026 at 5:10 pmYour post really hits home about the importance of proper subfloor prep and climate control. I learned the hard way after rushing those steps and dealing with warped hardwood floors over time. Now, I make sure to use a high-quality moisture barrier and regularly check humidity levels with a good digital hygrometer. Personally, I’ve found that portable dehumidifiers and humidifiers with digital displays help maintain a stable environment and prevent seasonal issues. Have you or anyone else here tried smart home sensors that monitor humidity and temperature automatically? I’ve been considering investing in those to take the guesswork out of climate regulation. Would love to hear about real-world experiences or recommendations. It seems like the investment in these tech tools really pays off in the longevity and appearance of the floors—any insights much appreciated!
Benjamin Turner
April 16, 2026 at 2:00 pmThis post really emphasizes the importance of meticulous preparation and environmental control in flooring projects. I recall my own experience with hardwood floors in a humid subtropical climate where I neglected to monitor humidity levels closely. The result was noticeable warping and gaps after just a few seasons. Since then, I’ve invested in a good digital hygrometer and a small, reliable dehumidifier, which has made a significant difference in maintaining consistent indoor conditions. It’s amazing how small tools like these can extend the lifespan of floors and keep them looking their best. Has anyone experimented with integrating smart home humidity sensors that trigger dehumidifiers or humidifiers automatically? I’m curious if that tech really delivers on making climate control effortless and more precise. Also, I’d love to hear tips on seasonal adjustments—what are your best practices for ensuring your flooring remains pristine no matter the weather outside?