Ever spent hours installing new flooring, only to see it buckle, gap, or wear out sooner than expected? I remember my first big project, thinking I knew it all after watching a few tutorials. Big mistake. The floor looked great initially, but within months, I faced creaking, gaps, and a lot of frustration. That was my lightbulb moment—realizing that the secret to a lasting, beautiful floor isn’t just about the materials but how you install them.
Why Proper Installation Makes All the Difference
In my experience, many homeowners underestimate the importance of meticulous installation. It’s tempting to rush through the job, especially if you’re eager to see the finished result. But skipping steps or ignoring expert advice can turn a dream renovation into a costly nightmare. According to industry experts, improper installation is one of the leading causes of flooring failures within the first few years. For example, a study by the National Wood Flooring Association highlights that nearly 70% of flooring problems are linked to installation errors rather than material defects.
Today, I want to share the top tips I’ve gathered over the years—tips that can help you avoid common pitfalls and ensure your flooring looks stunning and lasts for decades. Whether you’re tackling hardwood, laminate, tile, or carpet, these insights will give you a solid foundation for success. So, if you’ve ever wondered whether you’re doing it right or are just feeling overwhelmed by all the advice out there, stick around. I’ll guide you through each step, backed by real-world experience and expert knowledge.
Is Skipping Professional Help Actually Worth the Savings?
One mistake I made early on was thinking I could save money by skipping professional help. Big mistake. I underestimated how crucial proper tools, techniques, and experience are in achieving flawless results. This is why I recommend consulting with experts or at least following their detailed guides—like the ones you can find at Top Flooring Installation Tips for Lasting Results in 2024. Trust me, investing in proper installation pays off in the long run.
So, have you faced issues with flooring that just didn’t hold up? If so, don’t worry. The good news is that with the right approach, you can avoid these problems from the start. Ready to dive into the essential tips that will make your flooring project a lasting success? Let’s get started.
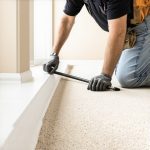
Prepare Your Surface Like a Pro
Start by clearing the space and inspecting the subfloor. Remove any debris, nails, or uneven patches. Think of the subfloor as the foundation of a house; if it’s shaky, everything built on top will suffer. Use a level to check for dips or high spots, and sand or fill as needed. I once skipped this step on a small project, and months later, I faced squeaks and gaps that were a nightmare to fix. Taking time here saves headaches later.
Acclimate Your Flooring Materials
Allow your flooring to sit in the room where it will be installed for at least 48 hours. This lets the material adjust to the room’s temperature and humidity, much like a musician tuning their instrument before a concert. When I installed hardwood without acclimation, I ended up with cupping and buckling. Proper acclimation is essential for durability, especially with hardwood or laminate.
Measure and Plan Carefully
Accurate measurements prevent waste and ensure a professional look. Use a tape measure and chalk line to mark your layout, considering the direction of natural light and traffic flow. I once misjudged my starting point, leading to narrow strips at one end, which I corrected by re-measuring and planning the layout more precisely. This might seem small, but it makes a big difference in the final appearance.
Cut and Fit with Precision
Use sharp tools and make clean cuts. For straight cuts, a quality saw makes all the difference. When fitting around door jambs or uneven walls, use a jamb saw or a file to get a perfect fit. I remember a project where I forced a cut and ended up with gaps; redoing it was frustrating. Take your time here — it’s worth it.
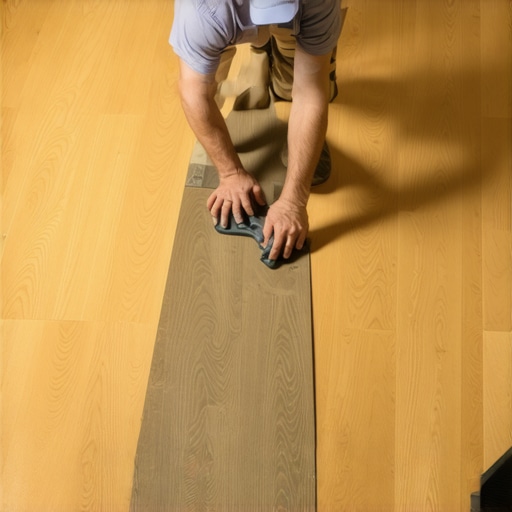
Lay the Flooring Systematically
Start in a corner and work your way out, locking the planks or tiles as you go. Use spacers to maintain expansion gaps around the perimeter, especially for hardwood or laminate. Think of it as building a puzzle; each piece needs to fit snugly but with room to expand. I once skipped expansion gaps to save time, and months later, the floor buckled. This step is non-negotiable for a lasting finish.
Secure and Finish Properly
Use the correct adhesive or nails for your flooring type. For carpets, stretch and tack the edges evenly. When installing baseboards, leave a small gap to allow for expansion and paint or caulk the edges for a clean look. I learned this lesson the hard way with uneven baseboards that looked amateurish. Check your work frequently to ensure everything is level and secure.
Final Touches and Maintenance
Seal or finish your flooring if needed, and install baseboards or trim for a polished look. For baseboards, consider modern trends by visiting latest baseboard styles to elevate your space. Regular cleaning and avoiding excess moisture will extend your investment’s lifespan. Remember, a good finish isn’t just about looks — it’s about protecting your work for years to come.
When it comes to installing flooring, many homeowners rely on popular myths that can lead to costly mistakes. As an expert in flooring installation, I’ve seen firsthand how these misconceptions can compromise the durability and appearance of your floors. Let’s dig into some of the most common misconceptions and reveal the truths that can save you time, money, and frustration.
Why Cutting Corners Usually Backfires
One widespread myth is that rushing through the installation process or skipping steps won’t impact the final result. In reality, rushing often results in misaligned planks, uneven surfaces, or gaps that appear months later. For example, many believe that as long as the top layer looks good initially, the subfloor doesn’t matter. However, improper subfloor preparation is a leading cause of floor failure, as noted in a study by the industry experts.
Another myth is that high-quality materials alone guarantee a long-lasting floor. While premium materials are important, poor installation can negate their benefits. Proper acclimation, precise measurements, and the right tools are equally crucial. I’ve seen beautiful hardwoods buckle or gap simply because the installer didn’t allow for expansion or used the wrong adhesive.
Beware of the DIY Trap: It’s Not Just About Tools
Many believe that with enough YouTube tutorials, they can DIY their flooring flawlessly. While tutorials are helpful, they often gloss over critical nuances like moisture barriers, expansion gaps, and subfloor leveling. These details are what separate professional results from amateurish ones. A common mistake is failing to account for humidity changes, which causes hardwood to expand and contract. Without proper planning, your beautiful floor could develop gaps or warping over time.
Furthermore, many underestimate the importance of professional-grade tools. Using a regular saw instead of a flooring-specific cutter can result in uneven cuts, which impacts the entire layout. This seemingly minor mistake compounds, leading to gaps or uneven transitions that detract from the overall look.
How to Avoid the Hidden Pitfalls
Let’s face it—flooring installation is a complex task that benefits from expert knowledge. Don’t fall into the trap of thinking it’s just about laying planks or tiles. Instead, focus on detailed preparation, such as ensuring the subfloor is perfectly level and moisture-free. Acclimate your materials for at least 48 hours in the room where they will be installed, and leave enough expansion gaps around the perimeter.
Invest in the right tools and consider consulting with professionals if you’re unsure. Even a single mistake in measurement or fitting can be costly to fix later. Remember, the goal is a seamless, durable finish that will stand the test of time. For more tips on perfecting your project, check out expert flooring installation tips for 2025.
Have you ever fallen into this trap? Let me know in the comments below!
Maintaining your flooring isn’t just about occasional cleaning; it involves using the right tools and techniques to ensure your investment stands the test of time. Over the years, I’ve refined my toolkit to include specific equipment that guarantees professional-quality results and simplifies ongoing maintenance. Let me walk you through the essentials I recommend, along with insights into future trends that will shape how we keep our floors looking pristine.
Invest in Quality Tools for Longevity
One of the most critical aspects of maintaining your flooring is having the right tools at your disposal. I personally swear by a high-quality oscillating multi-tool because of its versatility—whether I’m smoothing out uneven edges, removing old adhesive, or making precise cuts for repairs. Its variable speed settings allow me to adapt to different materials, from hardwood to tile, without risking damage.
For cleaning, I opt for a microfiber mop with a built-in spray system. It’s gentle yet effective at lifting dust and dirt without scratching delicate surfaces. Regular sweeping with a soft-bristled broom keeps debris from grinding into the finish, preventing premature wear. Remember, avoiding harsh chemicals and abrasive scrubbers is key—stick to pH-neutral cleaners designed for your flooring type.
Tools for Deep Maintenance and Repairs
Occasionally, your floors will need more than just routine cleaning. For deep maintenance, I rely on a floor sander with dust extraction capabilities. This tool helps restore the surface by removing scratches, stains, and worn finish layers, especially on hardwood. I also keep a set of putty knives and wood fillers handy to address minor gouges or cracks before they worsen.
When it’s time to reseal or refinish, a quality brush and roller designed for floor finishes ensure an even coat, prolonging the life of your sealant. Using the right applicators minimizes waste and provides a smooth, consistent appearance. Trust me—skimping on these tools often leads to uneven finishes and increased rework.
Monitoring and Preparing for Future Trends
Looking ahead, I predict that smart maintenance systems will become more prevalent. Imagine using moisture sensors that alert you when humidity levels fluctuate outside optimal ranges, preventing issues like cupping or buckling. Additionally, advances in self-healing coatings could revolutionize how we protect floors, reducing the need for frequent resealing. Staying informed about these innovations will help you adopt proactive maintenance routines and extend your flooring’s lifespan even further.
How do I keep my floors working over time?
To keep your flooring in top shape, establish a regular maintenance schedule that includes sweeping, gentle cleaning, and periodic inspections for damage or wear. Incorporate tools like a microfiber mop and soft brushes into your routine, and don’t hesitate to invest in professional equipment for deep cleaning or repairs when necessary. Remember, the key is consistency—address issues early before they become costly problems. Want to dive deeper into advanced maintenance techniques? Check out this guide for expert strategies that will keep your floors looking flawless for years to come. Try implementing a moisture sensor or upgrading your sealing process as your next step to future-proof your flooring investment.
The Hardest Lesson I Learned About Flooring Installation
One of the most valuable lessons I’ve learned is that rushing through flooring installation can cost you dearly in the future. I once skipped a few preparatory steps, thinking I was saving time, only to face uneven planks and gaps a few months later. The frustration was a wake-up call that patience and attention to detail are essential for lasting results.
3 Myths About Flooring That Held Me Back
I used to believe that high-quality materials could forgive poor installation. Turns out, even the best hardwood can buckle or gap if not installed properly. The second myth was that DIY is always cheaper. In reality, a small mistake can lead to costly repairs, making professional help worth every penny. The third myth was that subfloor preparation isn’t crucial—nothing could be further from the truth. Proper leveling and moisture barriers are the foundation of a durable floor.
What Experts Won’t Tell You About Flooring Installation
Many professionals keep quiet about how critical acclimation is. Allowing your flooring materials to sit and adjust to your room’s humidity and temperature can prevent warping and buckling down the line. Additionally, the importance of expansion gaps is often overlooked; neglecting these can lead to buckling as the material expands. Investing in the right tools might seem like a small detail, but it makes all the difference in achieving a flawless finish.
My Essential Toolkit for Flooring Success
Over the years, I’ve come to rely on a few key tools: a high-quality oscillating multi-tool for precise cuts, a moisture meter to monitor humidity levels, and a professional-grade saw for clean, straight cuts. For cleaning, a microfiber mop with gentle cleaning solutions keeps the surface pristine without damage. These tools not only save time but also ensure the installation looks professional and lasts for years.
Where to Go from Here
As we look toward future trends, I believe smart tools like moisture sensors and self-healing coatings will become standard in flooring maintenance. Staying informed about these innovations can help you extend your floor’s lifespan and reduce ongoing costs. To really future-proof your investment, consider consulting with experts, invest in quality tools, and never underestimate the power of proper preparation and patience.