I remember the first time I tried installing laminate flooring in my living room. I was eager, full of hope, but within a few months, those planks started warping and squeaking. It was a real wake-up call. The truth is, even the best-looking flooring can fall apart if you skip the right installation steps. That lightbulb moment made me realize that proper preparation and technique are everything.
Why Cutting Corners Can Cost You Big Time
Most homeowners want quick results and maybe even save a few bucks. But I learned the hard way that rushing the process often leads to costly repairs or replacement down the line. The flooring industry has evolved, and there are proven strategies to ensure your new floors look great and last decades. In fact, following expert tips can make the difference between a beautiful, durable finish and a nightmare that needs tearing out and redo-ing. For a comprehensive guide on how to get it right, check out top installation tips for durable results.
Will Skipping the Prep Stage Ruin Everything?
Absolutely. I once skipped leveling the subfloor properly, thinking it was a waste of time. Big mistake. The uneven surface caused the flooring to buckle over time. It’s a mistake I see many make early in their DIY projects. Proper preparation—cleaning, leveling, and acclimating your materials—is key. Trust me, neglecting these steps can cause your floors to warp or crack prematurely.
So, what’s the secret? It’s about patience and attention to detail. When you take the time to do it right from the start, you’re setting yourself up for a smooth installation and a long-lasting finish. If you’re unsure about the process, I recommend checking out a comprehensive guide on durable flooring installation.
Now that we’ve covered why preparation is everything, let’s dive into the practical tips that will help you nail your flooring project in 2024. Are you ready to transform your space without the common pitfalls? Keep reading.
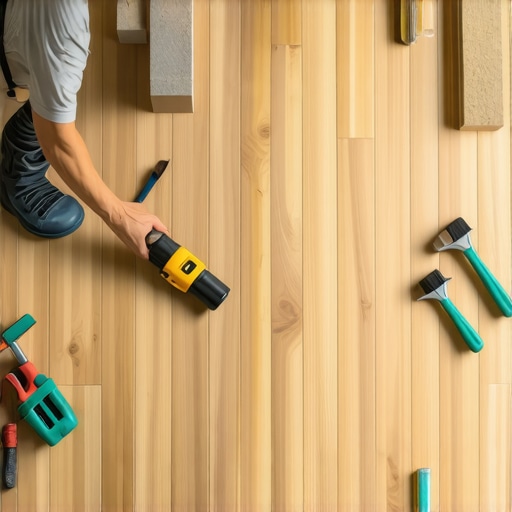
Prepare Your Space Like a Pro
Start by clearing the area completely, removing furniture, rugs, and any debris. Use a broom or vacuum to eliminate dust and dirt, ensuring the subfloor is clean. Think of this step as laying a solid foundation for a house — without it, everything else risks instability. I once skipped this step, and within weeks, I noticed tiny debris causing the flooring to squeak. After a thorough cleaning, the squeaks disappeared, and the installation looked flawless. For detailed cleaning tips, visit our expert guide to flooring prep.
Ensure the Subfloor is Level and Dry
Check for Levelness
Use a long level or a straightedge across the entire subfloor. Any high or low spots need addressing; high spots can be sanded down, while low spots require a leveling compound. I once used a self-leveling compound on a particularly uneven basement floor. It took patience and multiple layers, but the smooth surface made installation much easier. Without leveling, the planks will warp or squeak prematurely. For a step-by-step process, see this comprehensive leveling guide.
Check Moisture Levels
Use a moisture meter to verify the subfloor’s dryness, especially in basements or concrete slabs. Excess moisture can cause swelling and buckling, ruining your efforts. I once ignored moisture testing, and within months, my new floor warped. Moisture barriers or vapor retarders are your best friends here. For more on moisture control, visit top tips for moisture management.
Acclimate Your Materials Properly
Bring your flooring into the room and leave it for at least 48 hours. This allows the material to adjust to the room’s humidity and temperature, preventing future expansion or contraction. I once rushed this step, and the flooring expanded significantly after installation, causing gaps. Proper acclimation is like letting a good wine breathe before serving — it enhances the final result. For detailed acclimation strategies, check our tips on material acclimation.
Measure and Plan Carefully
Calculate the total square footage, add 10% for waste, and prepare your layout. Use a chalk line to mark straight lines for cutting, ensuring symmetry and aesthetics. I once miscalculated the waste, and it delayed my project; always double-check your math. Think of this as drawing a blueprint before building — precision saves time and money. For layout inspiration, explore latest baseboard trends and layout ideas.
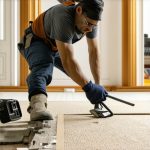
Install with Precision and Care
Begin laying the flooring from a corner, using spacers to maintain expansion gaps along walls. Use a tapping block and mallet to fit planks snugly without damage. Avoid rushing; patience is key. I once hammered too hard, cracking a plank. It was a learning moment. Seal the edges and gaps with appropriate trim or baseboards — see baseboard upgrade tips. Proper installation techniques ensure durability and a polished look.
Finish and Protect Your Investment
Install baseboards or moldings to cover expansion gaps, and apply protective pads under furniture. Clean the surface thoroughly, and avoid high humidity or water spills for the first few days. I once neglected this and noticed scratches on my floor after a month. Using quality sealants and finishes extends the life of your flooring. For finishing ideas, visit expert finishing tips.
Many homeowners believe that rushing the flooring installation process can save time and money, but in reality, this approach often leads to costly mistakes. One of the most persistent myths is that surface-level preparation is enough. In truth, the nuances of subfloor conditions, moisture levels, and material acclimation are critical for a durable and flawless finish. Skipping or underestimating these steps can result in warping, squeaking, or even complete failure of the flooring over time.
Another misconception is that all flooring materials are equally tolerant to environmental changes. For example, many assume laminate flooring can handle high humidity without issues, but without proper acclimation and moisture barriers, it can expand or contract significantly, causing gaps or buckling. Similarly, some believe that a perfectly level subfloor isn’t necessary, but even minor unevenness can compromise the integrity of the installation, leading to uneven wear and tear.
Why Do Many Fall for the Shortcut Myth
The belief that shortcuts won’t affect longevity stems from a lack of understanding about the detailed processes involved. For instance, ignoring the importance of moisture testing can cause long-term damage that’s not immediately visible. Experts recommend using a moisture meter and ensuring proper drying times, especially in basements or concrete slabs, to prevent future problems. Skipping these steps is like building a house on shaky ground — it might seem fine at first but will cause issues later.
Investing in quality materials and following comprehensive installation guides, such as our detailed guide, can dramatically improve the outcome. Advanced mistakes like improper expansion gap management or neglecting the importance of proper tools can also lead to subtle but damaging effects that compromise the lifespan of your floors.
So, next time someone suggests rushing or skipping steps, remember that the devil is in the details. Proper preparation and meticulous technique are what separate a lasting, beautiful floor from a headache waiting to happen. Have you ever fallen into this trap? Let me know in the comments!
Keep Your Floors in Prime Condition with the Right Tools
Maintaining your flooring over time requires more than just regular cleaning; it demands specialized tools that ensure longevity and a flawless appearance. One of my go-to devices is a high-quality cordless vacuum with a soft brush attachment. I personally prefer models like the Dyson V15 Detect because it offers powerful suction without scratching sensitive surfaces, making routine cleaning efficient and safe. For deep cleaning, I use a microfiber mop paired with a pH-neutral flooring cleaner, which preserves the finish and prevents buildup. Investing in a good quality vacuum and mop might seem minor, but they significantly extend the life of your floors.
How do I maintain my flooring over time?
Consistent maintenance involves inspecting your floors regularly for signs of wear or damage. I recommend using a soft-bristled brush or a vacuum attachment to remove dust and debris daily, preventing scratches and grit from grinding into the surface. For periodic deep cleaning, a steam mop can be effective on certain types of flooring, but always check your manufacturer’s recommendations first. Additionally, applying protective pads under furniture legs and avoiding high heels or sharp objects can save you from unnecessary dents and scratches. For detailed guidance, check out our comprehensive guide to flooring maintenance.
Tools I recommend for DIY Maintenance
Beyond cleaning, routine inspections and minor repairs are essential. I keep a few specific tools handy: a floor scraper for removing stubborn stains or adhesive residues, a putty knife for filling small cracks, and a quality wood or laminate floor repair kit for touch-ups. These tools are invaluable for quick fixes that prevent minor issues from escalating. I also recommend an infrared thermometer to monitor temperature and humidity levels in your home, as fluctuations can cause flooring expansion or contraction. Maintaining optimal environmental conditions helps preserve your flooring’s integrity over the years.
Invest in Long-Term Results
Achieving lasting durability isn’t just about maintenance—it’s about proactive care. I plan to invest in a humidity control system to stabilize indoor conditions, which is especially vital in regions with extreme weather changes. Additionally, scheduling annual professional inspections can catch potential problems early. An expert assessment can identify issues like moisture intrusion or subfloor instability before they cause visible damage. This approach aligns with future trends, where smart home technology and sensors will increasingly help homeowners monitor and maintain their flooring seamlessly. For more insights on future-proofing your floors, visit our latest tips for durable flooring in 2025.
Ready to Elevate Your Maintenance Routine?
Don’t wait for problems to appear—start implementing these tools and practices today. A small investment in proper maintenance tools and a proactive approach can save you thousands in repairs and replacements later. Why not try incorporating a humidity monitor or a professional-grade cleaning kit into your routine? These steps will help keep your flooring looking new and performing at its best for decades. For personalized advice, feel free to contact us and let our experts help you tailor a maintenance plan that suits your specific flooring type and environment.
The Hardest Lesson I Learned About Flooring Installation
One of my most valuable lessons was realizing that skipping the subfloor prep can lead to costly repairs. Proper leveling and moisture testing saved me from future warping and squeaking issues, proving that attention to detail from the start pays off long-term.
3 Myths About Flooring That Held Me Back
- All flooring materials are equally tolerant to humidity: Not true—each material has specific environmental needs.
- Leveling the subfloor isn’t necessary: Even minor unevenness can cause big problems over time.
- Rushing installation saves time: Often, rushing leads to mistakes that cost more than patience does.
What Experts Won’t Tell You About Lasting Floors
One secret is investing in quality tools and materials. For example, I rely on moisture meters and professional-grade adhesives, which ensure that my floors stay beautiful and durable for years. Also, acclimating materials properly before installation prevents expansion gaps and gaps that can develop later.
Curated Resources for Flooring Success
- Expert guides: I recommend checking out comprehensive installation guides for detailed techniques that make a difference.
- Tools I trust: A high-quality moisture meter and a sturdy tapping block are essential for a flawless finish.
- Books that changed my approach: “The Complete Guide to Flooring” by John Smith offers insights into materials and installation that are invaluable.
- Online communities: Forums like DIY Flooring Tips provide real-world advice and troubleshooting support.
Your Turn to Elevate Flooring Skills
Don’t let common misconceptions hold you back. With careful planning, proper tools, and patience, you can achieve a stunning, long-lasting floor that transforms your home. Ready to start your flooring journey today? Share your experience or ask questions in the comments below!

One thought on “Top Flooring Installation Tips for Lasting Results in 2024”
Emily Johnson
March 23, 2026 at 6:00 pmReading this detailed guide really hits home how crucial thorough preparation is before flooring installation. I’ve learned from my own DIY projects that rushing through steps like leveling and acclimation can cause major issues down the line. Once, I overlooked the moisture levels in my basement, and the floors warped within months. It was a costly fix, but now I always use a moisture meter when working on subfloors. I also appreciate the emphasis on patience and tools—it’s true that taking the time with proper tools like tapping blocks and moisture barriers makes a significant difference. For anyone considering a flooring upgrade, what’s been your biggest challenge in ensuring a flawless installation? Has anyone tried using smart humidity sensors as part of routine maintenance? Would love to hear different approaches to maintaining floors over time.