Ever spent hours wrestling with a stubborn piece of carpet or trying to align baseboards perfectly only to end up with gaps, uneven edges, or unsightly overlaps? I’ve been there. I remember a time when I thought I could wing it, only to realize that my DIY project looked more like a rookie’s failed attempt than a professional finish. That lightbulb moment hit me hard—nothing kills the vibe of a beautifully renovated space more than poorly installed flooring details.
Why Getting Carpet and Baseboards Right Matters
The truth is, these finishing touches are what truly make a home look polished. They hide imperfections, enhance the room’s aesthetic, and even add value. But let’s be honest—without the right techniques, it’s easy to mess up. I learned this the hard way after years of trial and error, and I want to save you that frustration.
Today, I promise to share the secrets I’ve picked up—tricks that will help you achieve a flawless, professional-looking finish on your carpet and baseboards. Whether you’re tackling a small room or a whole house remodel, these tips will elevate your game and make your space look finely crafted, not slapped together.
Is Perfect Installation Just a Myth?
One of my biggest fears early on was thinking that perfection was only for the pros. I was convinced that unless I had specialized tools or years of experience, I’d never nail that seamless look. I made the mistake of rushing the job, which led to uneven cuts and gaps. Trust me, perfect results are achievable with the right approach, and I’ll show you how.
In fact, a study by the National Association of Home Builders highlights that attention to detail in finishing touches like baseboards can make or break a room’s overall appearance. So, if you’ve faced issues like gaps or crooked lines, don’t worry. You’re not alone, and there are straightforward techniques to fix these problems and prevent them in the future.
Now, let’s dive into the core strategies that will help you master the art of flooring finishing—step by step, with clarity and confidence. Ready to transform your space into something truly stunning? Keep reading, because the secrets start here.
Choose the Right Tools and Prepare Your Space
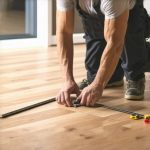
Start by gathering essential tools: a measuring tape, a utility knife, a miter saw or hand saw, a nail gun or hammer, and adhesive if needed. Clear the area of furniture and debris, and ensure your subfloor or wall is smooth and clean. I remember once rushing to install baseboards without cleaning the wall, which led to gaps and uneven lines. Cleaning the surface beforehand saved me hours of troubleshooting later.
Measure and Cut Precisely
Measure each wall’s length and cut your carpet and baseboards accordingly. Use a chalk line to mark straight cutting lines, especially for long pieces. When I replaced my old baseboards, I made a mistake by not double-checking measurements, resulting in gaps. Always measure twice and cut once to avoid costly errors. For corners, miter cuts at 45 degrees create seamless joints. Practice on scrap pieces first to master your cuts.
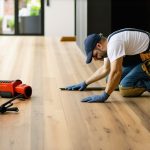
Install the Carpet with Expert Precision
Lay the carpet over the subfloor, ensuring it overlaps at the edges. Use a power stretcher for tight, wrinkle-free installation, pulling the carpet firmly into place. When I installed carpet in my living room, I used a knee kicker, but a power stretcher made the job much easier and professional-looking. Secure the edges with tack strips and trim any excess with a utility knife. For a flawless finish, tuck the carpet neatly into corners and along walls.
Secure and Finish the Edges
Use a knee kicker or carpet tucker to press the carpet into the tack strips, ensuring no loose edges. Trim excess carpet with a sharp utility knife, making clean cuts. Be cautious not to cut into the tack strip or wall base. When I learned this trick, my edges looked seamless, with no bunching or loose areas.
Install Baseboards for a Clean, Finished Look
Align your baseboards against the wall, using a level to ensure they’re straight. Cut corners with miter joints at 45 degrees; for outside corners, cut both pieces at 45 degrees to fit together snugly. When I installed my first set of baseboards, I struggled with uneven cuts, but practicing miters on scrap wood helped me perfect the technique. Attach the baseboards with nails or adhesive, then fill nail holes with wood filler and sand smooth.
Detail and Touch Up
Caulk along the top edge of the baseboards and where they meet the wall to hide small gaps. Paint or touch up any scuffs or nail holes. During my last project, a quick coat of paint transformed the look, making everything appear freshly finished. This final step ensures your installation looks polished and professional.
Mastering these steps takes patience and practice, but the results are worth it. With careful measurement, precise cuts, and attention to detail, you can achieve a flawless finish that elevates your home’s aesthetic. For more detailed tips, explore flooring installation secrets and baseboard makeover ideas.
Many homeowners and even some DIY enthusiasts fall into traps when tackling flooring, carpet, shower, or baseboard projects. Let’s examine some of the most pervasive misconceptions and advanced mistakes that can sabotage your efforts. By understanding these nuances, you can elevate your craftsmanship and avoid costly errors that are often overlooked.
Why Do People Believe Flaws Are Unfixable
A widespread myth is that imperfections like uneven cuts, gaps, or crooked lines are inevitable or require professional tools and expertise to correct. While basic mistakes are common, they are often fixable with simple tricks. For example, when installing baseboards, misaligned miters can be corrected by adjusting cuts or using filler and caulk to mask imperfections. The truth is, many DIYers shy away from fixing these issues because they think it’s too complicated or time-consuming. But in reality, addressing these problems early saves you from bigger headaches later. For advanced installers, knowing how to realign miscut edges or use precision tools like a miter saw with fine adjustments can make all the difference.
Beware the Hidden Trap of Poor Surface Preparation
One of the most overlooked factors that cause failure in flooring and shower installations is insufficient surface prep. Many assume that as long as the surface looks smooth, it’s ready. That’s a mistake. For floors, an uneven subfloor can lead to squeaks, cracks, or premature wear. In showers, a lack of proper waterproofing and surface cleaning can cause mold, leaks, or tile failure over time. Advanced installers emphasize meticulous surface prep, including leveling, cleaning, and moisture testing. Skipping this step is like building on shaky ground—your entire project may suffer. For detailed guidance, check out this comprehensive flooring guide.
What About the Role of Expert-Level Tools and Techniques?
Many assume that high-end tools are only for professionals. However, mastering a few advanced techniques with the right tools can dramatically improve results. For example, using a power stretcher instead of a knee kicker when installing carpet ensures a more uniform, wrinkle-free finish. Similarly, fine-tuning miter cuts with a miter saw and a proper angle gauge results in seamless corner joints. These seemingly small improvements can elevate your project from amateurish to professional-looking. Remember, investing in quality tools and learning how to use them properly pays off in the long run.
Have you ever fallen into this trap? Let me know in the comments. Being aware of these advanced nuances will help you avoid common pitfalls and achieve truly outstanding results in your home projects. For more expert tips, explore shower renovation ideas or carpet and baseboard installation secrets.
Keeping your flooring, carpets, showers, and baseboards in top shape requires more than just initial installation skills—regular maintenance and the right tools can extend their beauty and functionality for years to come. As someone who’s been through countless DIY projects, I can attest that investing in quality equipment and adopting proper upkeep routines makes all the difference.
Invest in Precision Power Tools for Long-Term Results
When it comes to maintaining or fixing flooring and baseboards, having the right tools is crucial. I personally rely on a high-quality electric miter saw for trimming baseboards. This tool’s accuracy ensures clean, seamless cuts every time, which is essential for restoring a professional look if your edges get nicked or warped over time. For carpet repairs, a powered carpet stretcher is an invaluable asset—manual tools like knee kickers are useful, but a power stretcher offers superior tension and a more uniform finish, especially in larger rooms. For shower maintenance, a handheld grout scraper with a sturdy blade helps keep tile joints clean and free of mold or soap scum, extending the lifespan of your installation. These tools, combined with a good set of brushes and cleaning agents, allow me to perform regular touch-ups that prevent minor issues from becoming costly repairs.
Establish Routine Maintenance for Durable Results
Proper upkeep starts with consistent cleaning. For flooring, using a microfiber mop and a pH-neutral cleaner preserves the finish and prevents scratches. Regularly inspecting baseboards for loose nails or chips allows me to re-secure or touch up paint, maintaining a fresh appearance. In showers, I schedule deep cleaning every few months with a grout-specific cleaner, and I seal grout lines annually to prevent water infiltration and mold growth. These simple routines significantly extend the life of your investments and keep your home looking sharp.
How do I maintain my flooring and trim over time?
Adopting proactive measures is key. Avoid using harsh abrasives or bleach that can damage surfaces and cause discoloration. Instead, rely on specialized cleaning solutions like those recommended by flooring manufacturers or tile experts (see this guide for detailed tips). Additionally, regular inspections help catch issues early—whether it’s a loose baseboard corner or a small crack in the grout—so repairs can be quick and less invasive. I also recommend setting aside time quarterly to review your tools, sharpen blades, and replace worn parts, ensuring your maintenance efforts are effective and efficient.
Trend-wise, I see a move toward smarter, automated maintenance tools—such as robotic vacuum cleaners with specialized flooring sensors and IoT-enabled grout cleaners that monitor humidity and mold risk. Staying ahead of these innovations can make home upkeep less of a chore and more of a seamless process.
Don’t forget to try out a detailed technique like using a fine-tooth saw blade for trimming baseboards or applying a grout sealer with a small brush for even coverage. These small upgrades can drastically improve your results and make ongoing maintenance less daunting. For more insights, explore this comprehensive guide or check out baseboard upgrade ideas to keep your home looking fresh and professional over time.
The Hardest Lesson I Learned About flooring installation,carpet install,showers,baseboards
The most significant insight I gained was the importance of patience and meticulous preparation. Rushing through measurements or skipping surface prep led to flaws that were hard to fix later, wasting time and resources. Taking the time to double-check every cut and ensure the surface was perfectly clean saved me from many headaches.
3 Myths About flooring installation,carpet install,showers,baseboards That Held Me Back
I used to believe that perfect edges were only achievable with professional tools or experience. Discovering that basic tools, like a good miter saw and a level, combined with careful technique, could produce professional results was a game-changer. Also, I thought gaps and uneven lines were unavoidable—now I know they can be easily fixed with simple adjustments and caulking.
What Experts Won’t Tell You About flooring installation,carpet install,showers,baseboards
One secret is that surface preparation is everything—it’s the foundation of a flawless finish. Skipping leveling or cleaning can sabotage your project, no matter how skilled you are. Additionally, mastering corner joints with precise miter cuts and proper fitting is often overlooked but makes a huge difference in the final appearance.
Curated Resources to Elevate Your Home Finishing Skills
My essential toolkit includes a high-quality miter saw and a power stretcher. I trust these because they’ve consistently delivered clean cuts and even tension, saving me time. For learning new techniques, I recommend the comprehensive guides available at this site. Books like “Home Improvement Masterclass” provided me with foundational knowledge that I still rely on. Lastly, online tutorials from seasoned professionals helped me troubleshoot unexpected issues effectively.
Keep Moving Forward: Your Next Step in Flooring and Finishing
Remember, every expert was once a beginner. Embrace the learning process, invest in the right tools, and don’t be afraid to make adjustments along the way. Your home deserves that extra touch of care and craftsmanship. For ongoing inspiration and guidance, explore advanced tips and baseboard upgrades. Now, I challenge you: Have you ever faced a flooring mistake that turned into a learning moment? Share your story below!”}