Ever spent hours installing new flooring, only to see it warp, crack, or loosen within months? That lightbulb moment hit me hard during my first DIY project. I thought, “How hard can it be?” and rushed through the prep and installation steps. The result was a floor that looked good initially but quickly showed signs of wear and poor adhesion. It was frustrating, expensive, and honestly, a huge learning curve. Over time, I realized that the secret to a lasting finish isn’t just about choosing the right materials but also about following expert installation tips that ensure durability and beauty for years to come.
Why Proper Flooring Installation Matters More Than You Think
Many homeowners underestimate the importance of correct installation. It’s tempting to cut corners—think less prep work or rushing through the seams. But trust me, shortcuts lead to issues down the line. Properly installed flooring can withstand the hustle and bustle of daily life, resist damage from moisture or temperature changes, and maintain its aesthetic appeal. According to the National Association of Home Builders, incorrect installation is one of the main reasons flooring fails prematurely, costing homeowners thousands in repairs and replacements.
Have you ever faced uneven floors or cracked tiles shortly after installation? If so, you’re not alone. I’ve been there, and I want to help you avoid those costly mistakes.
In this post, I’ll share the most important expert tips for flawless flooring installation that lasts. From choosing the right products to mastering the prep work and finishing touches, these insights will help you achieve professional results—without the hefty price tag. Ready to transform your space? Let’s dive into the practical steps that will make your next flooring project a lasting success.
Prepare Your Surface Like a Pro
Start by removing all furniture and debris from the area. Sweep and vacuum thoroughly to eliminate dirt that could cause bumps or unevenness. For example, during my first DIY attempt, I skipped this step and ended up with tiny air pockets under the flooring, which took days to fix. Use a level to check for dips or high spots; these must be addressed before laying down the new surface. If you encounter uneven patches, sand them smooth or fill with leveling compound. This ensures a flat, stable foundation, preventing future issues like cracking or warping.
Choosing the Right Underlayment
Select an underlayment suited to your flooring type—whether it’s vinyl, laminate, or hardwood. Think of it as the mattress under a bed; it cushions the surface and provides stability. During my project, I opted for a moisture barrier beneath laminate floors to avoid water damage. Proper underlayment also helps with soundproofing and insulates against temperature fluctuations, extending the lifespan of your flooring.
Get the Layout Right Before Installation
Lay out your planks or tiles without adhesive first, to visualize the pattern and minimize cuts. Think of it like a puzzle—arranging pieces beforehand ensures a seamless fit. I once laid out a pattern, only to realize I’d need to cut a lot of pieces at awkward angles, wasting material. By planning the layout, you can also determine the best starting point to balance the room visually and avoid narrow cuts at the edges. Use spacers to maintain consistent expansion gaps near walls, which is critical for materials like wood that expand with humidity.
Master Cutting Techniques
Use the right tools for precise cuts—jigsaw for curves, utility knife for tiles, or a mitre saw for straight edges. I learned this the hard way when I used dull scissors for vinyl, resulting in jagged edges and wasted material. Measure twice, cut once—this old saying holds especially true. For tricky cuts around door frames or vents, make a cardboard template to ensure accuracy before slicing into your actual material.
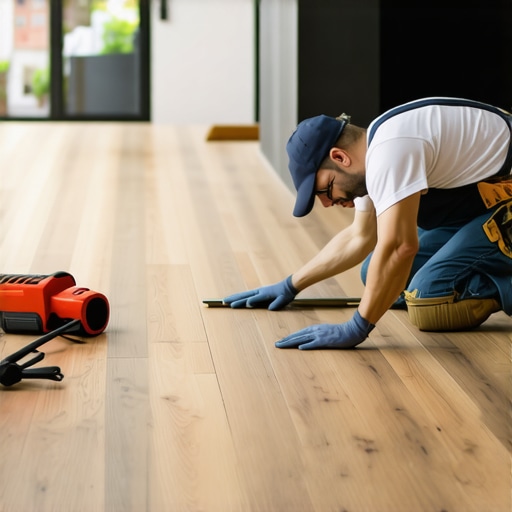
Lay Materials Carefully and Securely
Start from the corner or the most visible area, working your way out. Use a tapping block and mallet to snug planks together without damaging the edges. During my first floor, I used too much force and chipped a tile; the lesson was clear—gentle, consistent pressure is key. For glue-down floors, spread adhesive evenly with a notched trowel, working in small sections to prevent it from drying out before laying the tiles or planks. Follow manufacturer instructions precisely for best results.
Install Baseboards and Finish Edges
Once the main flooring is down, add baseboards and trim to cover expansion gaps and create a finished look. I recommend checking out baseboards trends in 2025 for stylish options. Use a nail gun or staples to attach them securely, and leave a small gap at the bottom for flooring movement. Caulk gaps and paint or stain the baseboards to match your decor. This step not only enhances aesthetics but also protects the edges from moisture and damage.
Final Checks and Clean Up
Walk across the flooring to spot any loose or uneven areas. Tighten or re-glue as needed. Clean the surface with a damp cloth—avoid excessive water that could seep into seams. For added durability, consider applying a protective sealant, especially for high-traffic areas. If you’re unsure about any step, contact an expert for guidance—check out our contact page for professional assistance. Proper installation takes patience and attention to detail, but the results will last for years, saving you money and headaches down the line.
Many homeowners and even some professionals often fall into the trap of oversimplifying the complexities involved in flooring, carpet, shower, and baseboard installation. While basic steps like measuring, cutting, and securing are well-known, the devil truly is in the details. Let’s dig deeper into some common misconceptions and overlooked nuances that can make or break your project’s durability and aesthetic appeal.
Why the Most Popular Myths About Installation Are Misleading
One prevalent myth is that all flooring materials can be installed using the same method. In reality, hardwood, vinyl, and tile each demand different techniques. For example, hardwood needs acclimation to room humidity, while vinyl benefits from a perfectly smooth subfloor to prevent telegraphing imperfections. Believing one-size-fits-all solutions can lead to premature damage or uneven surfaces. Always consult expert guides like our comprehensive flooring installation guide to understand specific requirements for each material.
Common Mistakes That Trip Up Even Experienced DIYers
One oops factor that many overlook is the importance of proper moisture barriers, especially in shower installations and ground-level flooring. Skipping or improperly installing moisture barriers can cause mold, warping, and structural damage over time. Another trap is ignoring expansion gaps around the room’s perimeter, which are crucial for materials like laminate and hardwood that expand with humidity. Not leaving these gaps can result in buckling or cracking. For detailed strategies on handling these issues, check out our tips on flawless carpet and baseboard installation.
How Advanced Installation Nuances Impact Long-Term Results
For the seasoned installer, understanding the subtleties of transition strips and finishing edges can elevate your work from good to professional quality. For instance, the choice of transition strips—whether T-molding, threshold, or reducer—should align with the specific flooring types and their expansion properties. Incorrect transitions can cause tripping hazards and visual dissonance. Additionally, precise caulking around showers and baseboards prevents water seepage and mold growth, extending the lifespan of your upgrades. These details are often overlooked but are essential for long-lasting beauty and function.
Have you ever fallen into this trap? Let me know in the comments. Remember, mastering these nuances can save you from costly repairs and ensure your project looks flawless for years to come. For a full deep dive into expert tips, visit our detailed installation masterclass.
Keep It Working: Tools and Maintenance Strategies for Longevity
Maintaining your flooring, carpets, showers, and baseboards is crucial to ensuring their durability and appearance over the years. Having the right tools at your disposal makes all the difference in keeping your installations pristine and functional. Personally, I swear by a few key pieces of equipment that have saved me time and money, and I recommend investing in quality to achieve professional results at home.
Power Tools That Make a Difference
For precise cuts and efficient installation, I always rely on a high-quality miter saw. It offers clean, accurate angles for baseboards and trim, saving me from tedious manual cuts and rework. When dealing with flooring, a flooring stapler or nail gun is indispensable—trust me, nothing beats the speed and consistency of pneumatic tools for securing planks or tiles firmly. I prefer models with adjustable pressure settings to prevent damage to delicate materials. For removing old adhesives or cleaning grout lines, a oscillating multi-tool with a variety of attachments provides versatility and control, making cleanup easier and more effective.
Essential Maintenance Materials
To keep your floors and showers in top shape, regular cleaning with pH-neutral cleaners prevents buildup that can degrade surfaces over time. For hardwood and laminate, applying a quality floor polish annually helps maintain shine and offers a protective layer against scratches. When it comes to showers, sealing grout lines periodically with a high-quality silicone or epoxy sealant prevents water seepage and mold growth. Always follow manufacturer instructions—using the right sealant and proper application techniques can extend the life of your investment significantly. Proper shower maintenance is vital for a luxurious, long-lasting bathroom.
Future Trends in Maintenance and Tools
Looking ahead, I believe smart, IoT-enabled tools will become more prevalent, allowing homeowners to monitor humidity, temperature, and surface conditions remotely. This technology can alert you to issues before they escalate, making maintenance more proactive and less costly. Additionally, eco-friendly cleaning products and sustainable materials are gaining popularity, aligning with the broader trend of environmentally conscious home improvements. Staying updated with these innovations can help you keep your installations in perfect condition for years to come.
How do I Maintain My Flooring and Showers Over Time?
Consistent cleaning and timely repairs are key. Use the appropriate tools and products regularly, and don’t wait until small issues become big problems. For example, re-sealing grout lines every couple of years prevents water damage and mold. Inspect baseboards and flooring edges periodically for signs of wear or damage, and address minor issues immediately to avoid costly replacements later. Remember, a little maintenance now extends the life of your investments significantly. If you’re unsure about specific maintenance routines or need professional assistance, don’t hesitate to reach out to experts for personalized advice. Incorporate these tools and habits into your routine, and you’ll enjoy beautiful, durable results for years to come.
The Hardest Lesson I Learned About Flooring Installation
One of the biggest mistakes I made early on was underestimating the importance of surface preparation. I thought simply laying down the flooring would be enough, but I learned that a flat, clean subfloor is crucial. Skipping this step led to warping and cracking down the line, which cost me time and money. Now, I always spend extra time leveling and cleaning before starting — it’s a game changer.
3 Myths About Flooring That Held Me Back
First, I believed all flooring materials could be installed the same way. Wrong. Hardwood needs acclimation to humidity, while vinyl requires a perfectly smooth subfloor. Second, I thought sealing edges was optional — big mistake. Proper sealing prevents water damage and mold. Third, I thought I could skip expansion gaps — but these gaps are vital for materials like laminate and hardwood to expand naturally without buckling. Challenging these myths helped me avoid costly mistakes and get professional results.
What Experts Won’t Tell You About Long-Lasting Floors
Many don’t realize that transition strips and finishing details are key to durability. Choosing the wrong transition can cause tripping or damage over time. Also, installing high-quality sealants around showers and baseboards prevents water seepage, which is often overlooked but essential for longevity. These subtle details make the difference between a floor that lasts and one that needs replacing prematurely.
Curated Recommendations for Flooring Success
First, invest in a high-quality level, like the Bosch Self-Leveling Cross Line Laser — it ensures your surface is perfectly flat, saving headaches later. Second, check out the Expert Flooring Installation Masterclass for in-depth techniques that elevate your skills. Third, use a good moisture meter such as the Wagner Meters Orion 920 — avoiding moisture issues is critical for hardwood and laminate floors. Lastly, consider the latest baseboard trends to give your project a polished, modern look that protects edges and adds style.
Your Turn to Shine with Flooring
Taking on flooring installation is both challenging and rewarding. With the right knowledge and tools, you can create a durable, beautiful space that lasts for years. Don’t let common mistakes hold you back — embrace the details and enjoy the transformation. Are you ready to start your flooring project? Share your plans or questions below — I’d love to hear your experience and help you succeed!

2 thoughts on “Expert Flooring Installation Tips for Lasting Home Results”
Emily Carter
January 23, 2026 at 8:20 pmReading through this post really hit home for me, especially the part about surface preparation. I learned that lesson the hard way when I skipped leveling out my subfloor before installing laminate flooring. A few months in, I noticed some sections starting to warp and squeak, which was pretty frustrating. Ever since, I make sure to spend extra time on these prep steps, and the difference is noticeable — my floors are much more stable and look better. I also appreciate the tip about using spacers for expansion gaps, as I’ve seen how ignoring this can lead to buckling over time. Has anyone found a particular underlayment brand or type that works best for soundproofing while also enhancing durability? I’d love to hear about your experiences, especially if you’ve tried innovative solutions or new products that really made a difference in your DIY projects.
Michael Anderson
March 11, 2026 at 7:00 amThis post really hits the nail on the head about surface prep and choosing the right underlayment. From my own experience, I’ve found that a high-quality, soundproofing underlayment made a huge difference, especially in creating a quieter, more comfortable space in my upstairs bedroom. I used a cork underlayment, which not only reduces noise significantly but also adds to the thermal insulation, making the room warmer in winter. It’s amazing how these small details can extend the life of your flooring and improve living comfort.
Regarding soundproofing, has anyone experimented with eco-friendly or innovative underlayments lately? I’m curious if there are newer products out there that combine durability, soundproofing, and sustainability. Also, I’d love to hear from others about the brands they trust for these purposes. Combining quality prep work with the right underlayment truly makes a lasting difference. Would love to hear if anyone has tried different brands or materials—what worked well or didn’t in your projects?