I remember the first time I tackled a flooring project, eager to add value and style to my home. But within months, those sleek new carpets frayed at the edges, and the baseboards mysteriously chipped or warped. It was a frustrating cycle—initial excitement giving way to disappointment. That lightbulb moment led me to realize that many of us overlook the little secrets that ensure a flawless, lasting finish.
Why Cutting Corners Won’t Save You in Home Renovations
Every homeowner wants a beautiful, durable result. But the truth is, the devil is in the details. Skipping proper surface preparation or rushing through installation can cause ongoing issues—uneven carpets, loose baseboards, gaps, and deterioration over time. These problems are often preventable with the right techniques and insider knowledge.
Don’t you wish there was a way to avoid costly fixes down the line? Well, good news—there is. Since I started paying closer attention to the finer points of installation, my projects not only look better but truly stand the test of time. Today, I’ll share some of these secrets, rooted in my experience and the expert advice from professionals. For example, mastering the perfect seam technique can elevate your space instantly. Check out some [top baseboard trends in 2025](https://tilecraftsmens.com/baseboard-trends-in-2025-fresh-styles-for-every-room) to see how your finishing touches can make or break the entire look.
Is The Ultimate Installation Technique Overhyped or Essential?
Many skeptics ask whether investing in expert tips really makes a difference. Early in my journey, I made the mistake of rushing the finishing phase—cutting corners on measurement and not waiting for adhesives to cure properly. Unsurprisingly, my work didn’t last. It wasn’t until I embraced a meticulous approach, like ensuring the subfloor is perfectly level, that my results improved dramatically. If you’re curious about nail patterns, seam alignment, or sealing strategies, I recommend exploring [flawless carpet and baseboard tips](https://tilecraftsmens.com/expert-carpet-installation-baseboards-tips-for-lasting-elegance). Just remember, a little extra effort upfront saves you headaches later.
Are you tired of redoing your flooring every few years? Or perhaps your carpets and baseboards are falling apart sooner than expected? If so, you’re not alone. Let’s dive into how mastering these key aspects can provide the durable, professional finish you desire.
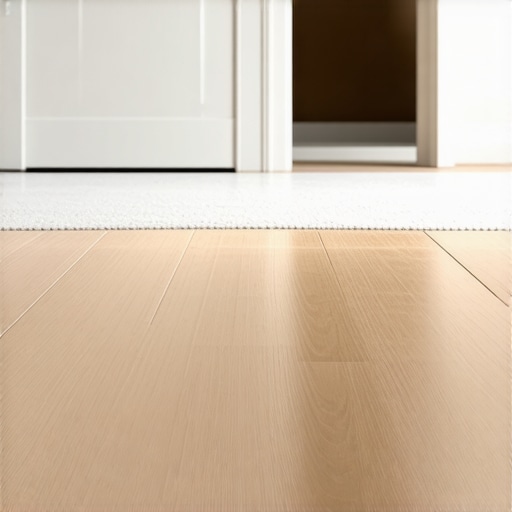
Prepare Your Surface for Success
Start by meticulously cleaning and leveling your subfloor. Remove all debris, dust, and old adhesive residues. Use a self-leveling compound to fill in dips and uneven areas—think of it as smoothing out ripples in a pond before casting your stone. When I tackled my hardwood install, skipping this step led to squeaks and gaps that persisted despite multiple fixes; taking the time initially saved me headaches later. Learn more about durable flooring prep.
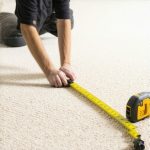
Measure and Plan with Precision
Accurate measurements prevent material waste and prevent seams from misaligning. Use a tape measure and chalk line to mark reference points, and double-check before cutting. Visualize laying out the pattern—imagine fitting puzzle pieces together. I once misjudged my room’s width, causing a crucial cut to be off by half an inch; redoing the piece was a hassle that could’ve been avoided with careful planning. Remember, small measurement errors compound and show up in the final look.
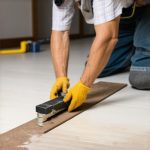
Master the Art of Cutting
Invest in a sharp, high-quality saw—whether a miter saw for perfect angled cuts or a utility knife for carpet edges. Always measure twice, cut once, and consider using painters tape along your cut lines to prevent splintering. During my first carpet installation, I attempted rough cuts without tape, which resulted in frayed edges that looked unprofessional. Using tape and a good saw, I achieved clean, tight seams that transformed the room’s appearance.
Sew Seam Edges Tightly
When aligning seams, lay the edges side by side, check for misalignment, then use seam tape or adhesive to meld them seamlessly. Think of it as joining two streams into one—smooth and unstoppable. I once rushed through a seam, which eventually split apart—a costly fix. Taking extra time to ensure seamless bonding adds strength and a cleaner look. For guidance, see expert seam techniques.
Secure Properly for Longevity
Use nails or staples at regular intervals—typically every 8-12 inches—avoiding overdriving, which can crack baseboards or dent flooring. Think of it as anchoring a boat; too loose, and it drifts; too tight, and it may crack. During my first baseboard install, I over-sanded and applied nails haphazardly, leading to gaps and warping. Now, I pre-drill holes to prevent splitting and employ a pneumatic nailer for consistent fastening. This not only holds firm but speeds up the process.
Finish with Expert Painting and Caulking
For a professional look, fill nail holes and caulk edges before painting. Use a high-quality primer and paint suitable for flooring or woodwork. Smooth it out with a sponge or brush, and feather the edges for a seamless transition. I once painted over uncaulked gaps, which collected dust and looked shabby. Applying a thin, even bead of caulk and neatly sanding the edges creates a refined appearance that lasts.
Seal and Protect
Finish with a durable sealant or topcoat—especially for high-traffic areas—to defend against moisture and wear. Think of it as your finishing armor. When I sealed my new laminate flooring, I used a water-based polyurethane, which dried clear and resistant to scratches, keeping my investment pristine longer. Regular maintenance, like gentle cleaning and timely inspections, prolongs the life of your installation. For more insights into protecting your floors, browse expert maintenance tips.
Even seasoned DIYers often fall prey to misconceptions that can sabotage their projects. One prevalent myth is that a quick, inexpensive underlayment guarantees a perfect finish. In reality, skimping on quality or proper preparation can lead to squeaks, uneven surfaces, and early damage. Cutting corners here might save money upfront but costs more in repairs later. Mastering the nuances of subfloor prep and understanding the importance of quality materials is crucial for long-lasting results. For detailed strategies, exploring our comprehensive flooring guide can provide clarity.
A common misconception about baseboards is that they are purely decorative. However, they play a vital role in hiding gaps, protecting walls from impacts, and elevating the room’s aesthetic. Many underestimate the importance of precise measurements and proper fastening techniques here. Failing to account for seasonal expansion or contraction can cause warping or gaps over time. Want to elevate your interior? Check out simple baseboard upgrades that make a lasting impact.
When it comes to carpet installation, a widespread myth is that all carpets are equally forgiving. But the truth is, selecting the right padding, precisely measuring, and understanding seam strategy are critical for a seamless look and durability. Rushing this process often results in shifting, uneven seams, or premature wear. Learning the intricacies, like proper stretching techniques, can make a difference. For insider tips, visiting our carpet installation insights is invaluable.
Showers deserve special attention, yet many assume that waterproofing is a simple step. Missing or improperly applying membranes can lead to leaks, mold, and costly renovations. The nuance lies in understanding the layered approach—combining waterproof membranes with proper sealing and ventilation. Overlooking these details is a common mistake that undermines the entire project. For advanced shower renovation ideas, our luxury shower tips can guide you to success.
What advanced mistake are homeowners most prone to with flooring and showers?
The most overlooked issue is the importance of moisture management and thermal expansion control. Without proper expansion gaps, flooring can buckle, and grout lines may crack over time. In showers, neglecting to install effective waterproof barriers results in hidden leaks that damage substructures. Recent studies highlight that thermal and moisture-related issues are responsible for over 60% of post-installation failures in these areas. For comprehensive strategies to avoid this, consider exploring expert installation tips.
Have you ever fallen into this trap? Let me know in the comments to share your experiences and learn from others in our community.Maintaining your home improvement projects, from flooring to showers, requires more than just initial effort; it demands the right tools and techniques for long-term success. Over time, even the most durable installations can suffer from wear, misalignment, or damage if not properly cared for. That’s why investing in quality equipment and adopting proven methods is essential to keep everything functioning flawlessly.
Invest in Precision Tools for Lasting Results
My go-to device for ensuring perfect cuts and seams is the **Festool Kapex Miter Saw**. Its laser guide and micro-adjustment features allow me to make precise angled cuts critical for baseboards and flooring planks. Using a high-quality saw like this minimizes errors that can lead to gaps or uneven edges, which are obvious telltale signs of DIY slip-ups. For carpet installations, I rely on the **Clover Knee Kicker**—a staple that stretches carpets evenly without damaging the fibers. This tool is indispensable for creating smooth seams and preventing ripples that turn a neat job into an eyesore.
The Software That Keeps My Home Projects On Track
Beyond physical tools, digital solutions have transformed how I plan and maintain my installations. I recommend **MeasureSquare**, a flooring layout software that helps visualize custom designs and calculate material needs accurately. By creating detailed templates, I avoid waste and ensure perfect fitment—all critical for professional results. Additionally, monitoring your home’s moisture levels and environmental conditions with a **Extech MO55** moisture meter prevents issues like mold growth or warping—common problems in showers and water-prone areas. Personally, I check my bathroom’s humidity regularly to catch potential leaks early, extending the life of the tile and grout.
Routine Maintenance Methods for Durability
Cleanliness is fundamental. For flooring, regular sweeping and gentle mopping with pH-neutral cleaners preserve the finish. I schedule quarterly checks using a **Dremel Multi-Tool** with various attachments to gently sand and smooth out minor imperfections in baseboards or scuff marks on tiles. For showers, inspecting the grout lines and sealing them annually prevents water infiltration that can cause long-term damage. Proper ventilation also plays a crucial role; installing an efficient exhaust fan reduces moisture buildup, keeping everything dry and in working order.
How Do I Maintain My Flooring and Showers Over Time?
Keeping your surfaces pristine involves a combination of the right tools, regular inspections, and timely interventions. Applying a high-quality sealant such as **MarineGrade** epoxy for grout lines or polishing your hardwood floors annually can provide extra protection against wear. Upgrading your bathroom’s shower doors with durable, easy-to-clean materials not only improves appearance but reduces maintenance efforts. For a modern update, explore [shower renovation ideas](https://tilecraftsmens.com/shower-renovation-ideas-modern-designs-for-a-luxury-feel) to enhance both functionality and style.
Don’t overlook the value of specialized equipment—using a **Schluter-DITRA** membrane for shower waterproofing ensures long-term dryness and structural integrity. Try integrating a moisture barrier into your next project, and see how it prolongs the lifespan of your installation. Consistent maintenance, paired with these specific tools, can save you from costly repairs down the line, ensuring your home stays beautiful and functional for years to come.
Lessons I Wish I Knew When Starting Out
- Never underestimate the power of proper surface preparation; skipping this can cause long-term issues that aren’t worth saving time on.
- Measuring twice and cutting once saved me from costly rework and improved the seamless look I was aiming for.
- Investing in quality tools, like a sharp miter saw, made a huge difference in achieving professional-grade results easily.
- Understanding the importance of moisture management and expansion gaps in flooring and showers prevented future buckling and leaks.
Tools and Resources That Changed My Approach
My essential toolkit includes tools like the pneumatic nailer for fast and secure fastening, and a moisture meter to monitor humidity levels. These tools, trusted through countless projects, help me achieve durable results that stand the test of time. Additionally, my go-to book, Transform Your Home, offers detailed insights that fill in any gaps in my knowledge, guiding me through complex decisions.
Take Action—Your Home Deserves Better
Remember, every successful flooring and shower project stems from attention to detail and a willingness to learn. With consistency and the right techniques, you can elevate your home from good to stunning. Don’t let mistakes hold you back—embrace the journey of mastering these skills and enjoy the lasting beauty you create. Ready to start your next project? Share your thoughts or ask questions below—your journey to a flawless finish begins now!
,
2 thoughts on “Top Carpet & Baseboards Installation Secrets for Lasting Results”
Emily Rodriguez
February 24, 2026 at 3:40 amReading through this post really resonated with my own experiences in DIY home upgrades. I used to rush through surface prep and measurement, often ending up with uneven seams or gaps that needed fixing later. What really made a difference for me was investing in quality tools like a good miter saw and a moisture meter. These not only improved my results but also minimized errors and rework, saving me time and frustration in the long run. I especially appreciate the tips on seam tightness and proper fastening—it’s amazing how small details can drastically impact the durability of a project.
I’m curious, how do other DIY enthusiasts manage moisture and expansion gaps in their flooring or shower installations, especially in colder or more humid climates? Have you found particular strategies or materials that work best? I believe sharing these insights could help others avoid common pitfalls and achieve professional results without the high price tag of hiring a pro.
Benjamin Carter
March 18, 2026 at 11:10 amThis post really hits close to home for me, especially the part about surface preparation. I’ve learned that rushing this step often leads to problems down the line, like squeaks in wood floors or gaps in baseboards. Investing in quality tools like a sharp miter saw has made my projects much more precise and professional-looking. I also found that keeping an eye on moisture levels with a good meter helps prevent warping, especially in humid environments.
One thing I struggled with was understanding how to properly manage expansion gaps in colder months, since wood can contract and expand significantly. Do others have tips on how to predict and accommodate for these changes? I’m curious if using flexible sealants or specific materials makes a real difference in avoiding cracking or buckling over time. Sharing these practical tips could save DIYers a lot of frustration and costly repairs. Would love to hear how everyone approaches moisture and temperature considerations in their projects.