Ever stood in a freshly renovated room, only to notice that unsightly crack or uneven seam marring what should have been a perfect finish? I remember my early days in home improvement; I thought I knew enough until I watched my hard-earned work start to warp and loosen within just a few months. It was a frustrating moment, but it taught me a valuable lesson about the importance of proper flooring installation — a detail that can make or break the durability and beauty of your space.
Why Proper Flooring Installation Changes Everything
In my experience, the secret to long-lasting, stunning floors isn’t just about choosing the right materials — though that’s a big part of it. It’s about the installation process itself. A botched job might save you a few bucks upfront, but it will likely cost you dearly down the road in repairs and re-dos. When I first started out, I made the mistake of rushing through the prep work, not realizing that a solid foundation is everything. That mistake cost me time and money, and I learned the hard way that attention to detail from the very beginning is crucial.
Feeling Skeptical About the Hype Around Professional Tips?
Honestly, I used to think that DIY tricks and shortcuts could replace expert techniques. But the truth is, overlooking key steps can lead to issues like uneven surfaces, creaking, or even mold problems. Did you know that according to the National Association of Home Builders, improper installation can reduce flooring lifespan by as much as 30%? That’s a staggering statistic that underscores why investing in proper methods pays off in the long run. Early in my journey, I mistakenly believed that glossing over certain steps wouldn’t matter — a mistake I wouldn’t wish on anyone.
If you’ve ever felt overwhelmed by all the advice out there or wondered whether paying for professional installation is really worth it, stick around. I’ll share practical tips and proven strategies that have helped me create floors that last, look fantastic, and save me from future headaches. Ready to dive into the nuts and bolts of durable flooring? Let’s get started on making your home both beautiful and resilient.
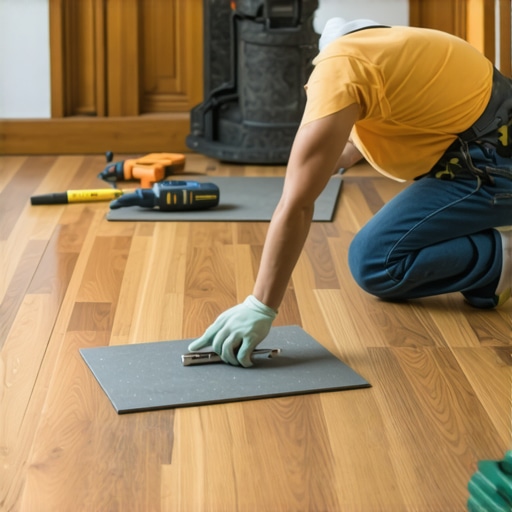
Prepare the Subfloor with Precision
Before laying any flooring, ensure the subfloor is clean, dry, and level. I once encountered a basement where I skipped thorough cleaning, which led to enduring squeaks and uneven spots. To avoid this, remove debris, repair cracks, and use a level to check surface flatness. If uneven, use a self-leveling compound, spreading it with a trowel and allowing proper curing time. This step forms the foundation for all subsequent layers, much like setting a strong base when building a house.
Acclimate Materials for Stability
Store your flooring materials in the installation room for at least 48 hours. I learned this the hard way when installing hardwood directly from a warehouse during a cold snap, which caused warping later. Proper acclimation involves keeping materials in the environment they’ll be installed in, preventing expansion or contraction after laying. For example, carpets should sit flat for a few days to avoid buckling, much like letting dough rest before baking.
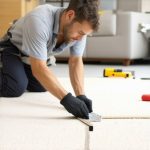
Lay Down the Flooring with Care
Follow the Manufacturer’s Instructions
Different materials require specific adhesives, nails, or click-lock systems. I once tried to install vinyl planks without reading the instructions, resulting in gaps and loose boards. Always read and follow each step meticulously. For click-lock floors, clip each piece firmly, working from one corner outward, ensuring tight fits. This process is akin to puzzle assembly—patience and precision prevent gaps and ensure durability.
Use Proper Tools and Techniques
Invest in quality tools like tapping blocks, pull bars, and spacers. During my first hardwood installation, I used a makeshift hammer and end up damaging planks. For neat edges, use spacers to maintain expansion gaps—this prevents buckling as the floor adjusts to temperature changes. Similar to carpentry, these techniques preserve the integrity of the installation over time.
Focus on Seamless Finishing
Cutting around doorways, vents, or corners demands precise measurements. I vividly remember trimming a tile too short and having to redo the entire row. Employ a sharp utility knife for tiles or a fine-tooth saw for hardwood, and double-check dimensions before cutting. When installing baseboards, leave a gap about 1/4 inch to accommodate natural expansion and contraction. These finishing touches create a polished look and prolong lifespan, much like tailoring a suit for an impeccable fit.
Secure Baseboards and Transition Strips
Attach baseboards after flooring is complete, nailing them into wall studs rather than drywall. I once nailed into drywall, which caused damage and loose fittings. Use a nail gun or hammer, and conceal nail holes with caulk or paint. Transition strips between different flooring types or rooms hide uneven edges and provide a drainage or expansion gap, especially important in kitchens or bathrooms. For stylish updates, consider the latest trends in baseboard design under 2025 styles.
Inspect and Finalize Carefully
Once installation is complete, walk the surface to identify any loose boards or tiles. Secure loose pieces immediately and fill gaps or cracks with suitable sealants. Clean the surface thoroughly to remove dust and debris. I remember finishing a bathroom remodel where neglecting this step led to early staining and damage. Proper inspection and maintenance ensure your investment lasts and continues to look great over time, much like regular vehicle tune-ups keep cars running smoothly.
Implementing these practical steps, rooted in my personal experience and proven techniques, guarantees a durable and beautiful flooring result. For more advanced tips, check out expert flooring guides and stay ahead with the latest trends in home upgrades.
Many homeowners assume that a straightforward installation process guarantees perfect results, but lurking beneath the surface are nuances that can derail even the most careful projects. For example, a common myth is that all adhesives are universally suitable for every flooring type. In reality, using the wrong adhesive—like employing a standard glue for hardwood—can lead to early buckling or detachment. Experts emphasize selecting the appropriate bonding agents tailored to specific materials, a little-known secret that significantly extends the lifespan of your flooring. Proper adhesive choice is often overlooked but crucial.
Why do so many installers neglect the subfloor’s moisture levels?
This oversight is a sneaky culprit behind mold growth and warping, especially in climate-variable areas. While some believe that a dry subfloor is self-evident, studies show that moisture trapped below the surface can remain undetected for months—only to cause expensive damage later. Investing in reliable moisture meters can prevent such issues, but many skip this step, risking future headaches. This nuance highlights the importance of thorough testing and the misconception that ‘dry’ means ‘safe.’
Looking beyond basic techniques, paying attention to minor details elevates your installation quality. For instance, many underestimate the critical need for proper expansion gaps, which accommodate material expansion due to temperature changes. Failing to leave the right space—usually about 1/4 inch—results in buckling or cracking over time. Such subtle errors are surprisingly common but easily avoidable with careful measurement and adherence to manufacturer instructions. You can explore detailed guides on installation nuances to refine your skills.
What advanced mistake can undermine a shower renovation’s success?
Many DIY enthusiasts focus on selecting beautiful tiles but forget that waterproofing is the backbone of a durable shower. Skipping the use of proper membrane systems or applying insufficient sealant can lead to leaks and mold development beneath the surface—a costly misstep. Even with high-end tiles, neglecting proper sealing creates vulnerabilities. A seasoned installer meticulously checks waterproof barriers and ensures proper slope for drainage, which many overlook, thinking aesthetics are enough. Read about shower waterproofing strategies for a deeper understanding.
Similarly, when it comes to baseboards, the common error is installing them directly onto the wall surface without accounting for flooring height and expansion. This can cause cracking or loose fittings over time, especially with hardwood floors that expand and contract. The ideal approach involves leaving a slight gap or using flexible fasteners, a nuanced technique often missed by amateurs. For fresh ideas, check baseboard update tips.
By digging into these subtleties—like choosing the right adhesives, understanding moisture, or accommodating expansion—you can vastly improve your project’s durability and aesthetic. Have you ever fallen into this trap? Let me know in the comments, and remember, mastery comes from attention to these finer points. For comprehensive insights, explore our cornerstone content on expert flooring tips and elevate your home renovation game.
Keeping It Working: Essential Tools and Maintenance Strategies
The longevity and beauty of your flooring, shower assemblies, and baseboards depend heavily on using the right tools and adhering to proper maintenance practices. Over the years, I’ve refined my toolkit to include specific equipment that ensures precision, efficiency, and durability. Investing in quality tools not only saves time but also enhances the quality of your work, resulting in long-term satisfaction.
Must-Have Equipment for Installation and Upkeep
One of my top tools is a high-accuracy digital moisture meter, which I use to periodically check subfloor and wall moisture levels. This device helps prevent future issues like mold or warping, especially in climates with high humidity. I prefer models like the Protimeter Surveymaster because of their reliability and ease of use. Additionally, a pneumatic nailer for flooring and baseboards reduces user fatigue and ensures consistent fastening, critical for flawless finishes.
For detailed work, I rely on a quality oscillating multi-tool. Its versatility allows me to make precise cuts around tricky corners or fixtures, which is crucial when fitting baseboards or custom shower niches. The Fein MultiMaster is my choice here, due to its durability and wide accessory compatibility.
Regarding cleaning and prep, a professional-grade vacuum with HEPA filtration keeps dust and debris at bay, maintaining a safe workspace and preventing dirt from compromising adhesive bonds. Regular maintenance of these tools, including blade sharpening and calibration, keeps them functioning optimally.
Best Practices for Long-Term Maintenance and Scaling
Keeping your installations in prime condition involves more than just the initial setup. I recommend establishing a routine inspection schedule—checking for loose tiles, cracks, or gaps at least biannually. For sealing and cleaning, use gentle, non-abrasive solutions compatible with your materials. For example, a pH-balanced cleaner preserves the integrity of natural stone and grout, prolonging their lifespan.
As your project scales up or evolves—perhaps expanding a shower area or installing new flooring—these tools and habits become invaluable. For instance, when expanding on an existing floor, re-evaluate subfloor stability and moisture levels before proceeding. Using a laser level and a straightedge toolkit ensures your new additions align perfectly, maintaining visual harmony and structural integrity.
How do I maintain my flooring and trims over time?
Regular cleaning with appropriate products and prompt repair of minor damages is key. For hardwood and laminate floors, I suggest lightly sanding and applying a fresh coat of finish every few years to restore shine and protect against scratches. For shower and baseboards, sealing grout lines and replacing caulk as needed prevents moisture seepage and mold growth. Incorporating smart technology, such as moisture sensors that sync with your smartphone, can give early alerts about potential problems, enabling proactive maintenance.
Looking ahead, the trend is moving toward integrated smart systems that monitor environmental conditions and contact maintenance services automatically. Embracing these innovations now will future-proof your renovation efforts. For detailed guidance, check out our expert flooring installation tips.
Incorporate a dedicated maintenance schedule and invest in high-quality, reliable tools; doing so will significantly extend your renovation’s lifespan. Don’t hesitate—try using a moisture meter regularly or schedule biannual inspections for your floors and fixtures. Small, consistent actions lead to lasting results and keep your home looking fresh and polished for years to come. Prepare to elevate your property’s durability by integrating these tools and habits into your routine!
Lessons That Changed My Approach to Flooring and Showers
- One of my biggest lightbulb moments was realizing that precision in preparing the subfloor can save countless headaches later. Cutting corners here almost always led to squeaks or uneven surfaces, reminding me that meticulous groundwork pays dividends.
- I used to underestimate the importance of acclimating materials. Moving flooring straight from the warehouse to the installation site without proper conditioning made me learn the hard way about warping and gaps. Now, I always give my materials time to settle, ensuring a smoother finish.
- Skipping waterproofing in shower renovations seemed minor until I faced the costly consequences of leaks and mold. Investing in high-quality membranes and sealants is indispensable—it’s an upfront cost that saves a lot of trouble down the line.
- I discovered that small details, like leaving expansion gaps or aligning baseboards perfectly, significantly affect the final look and durability. These nuances can be the difference between a good job and a truly professional one.
- Finally, using the right tools, like moisture meters and precision cutters, elevates the quality of work and dramatically reduces errors. Over time, building a toolkit of reliable gear becomes as essential as the techniques themselves.
Tools and Resources That Elevate Your Renovation Game
- My top recommendation is a high-accuracy moisture meter, such as the Protimeter Surveymaster. It’s invaluable for detecting hidden moisture issues that can sabotage your project—trust me, knowing moisture levels before installation is a game-changer.
- The Fein MultiMaster oscillating tool has become my go-to for cutting tricky angles and delicate adjustments—its versatility makes complex jobs much more manageable.
- For expert guidance, I highly recommend exploring our comprehensive flooring installation tips. It consolidates years of experience into actionable advice that elevates your craftsmanship.
- Additionally, books like “The Complete Guide to Bathroom Remodeling” have boosted my understanding of waterproofing and layout planning, leading to more confident decisions.
Your Next Step Begins Today
Remember, the journey to beautiful and durable flooring or bathroom renovations is paved with attention to detail and a willingness to learn. Embrace the nuances—these are what transform a simple project into a lasting masterpiece. Every smart choice you make today builds the foundation for a resilient, stunning space tomorrow.
What’s the one step in your renovation process you’ve been hesitant to take? Drop your thoughts below—I love hearing about your experiences and challenges!
**
2 thoughts on “Top Flooring Installation Tips for Durable Results in 2024”
Emily Carter
February 11, 2026 at 3:20 amI completely agree with the emphasis on proper subfloor preparation. Skipping this step can seem like a minor detail but often leads to squeaks and uneven surfaces down the line, which can be tricky to fix later. I remember once rushing through the prep for a hardwood floor, thinking I’d save some time, only to end up with cracks and creaking after just a few months. The extra effort to thoroughly clean, repair, and level the surface really makes a noticeable difference. Has anyone here used self-leveling compounds effectively, or are there better alternatives? I’d love to hear about your experiences, especially if you’ve dealt with tricky subfloor issues in older homes, as they tend to have more quirks.
Jason Miller
March 27, 2026 at 6:00 amReading through this article, I can’t emphasize enough how critical the initial steps of flooring installation are for the longevity of the finished product. I’ve personally made the mistake of rushing through subfloor prep once, and it cost me dearly with squeaky floors and minor cracking within months. The little detail of ensuring the surface is perfectly flat and debris-free makes an enormous difference—almost like setting the stage properly for a performance. I particularly appreciated the mention of using a moisture meter, as high humidity areas often hide moisture problems that can cause long-term issues.
One thing I’ve found helpful is applying a primer or sealant on susceptible subfloors before laying down the actual flooring, especially in basements or crawl spaces. Has anyone experimented with different types of primers or additives to improve adhesion and moisture resistance? Would love to hear tips on this, or any products that have worked well for you when dealing with tricky, older subfloors.