Ever stepped into a bathroom and felt the frustration of a shower that just isn’t up to modern standards? Maybe it dripped constantly, or the water pressure made you feel like you were rinsing with a garden hose. I remember my own lightbulb moment—after months of battling leaks and inconsistent spray, I realized my old shower wasn’t just outdated; it was causing real headaches. That’s when I decided enough was enough. Now, I want to share what I’ve learned so you can avoid the same pitfalls.
Why Getting Your Shower Installation Right Matters More Than You Think
There’s more at stake than just aesthetics. A poorly installed shower can lead to leaks, mold, and even structural damage—costing you time, money, and stress. I used to think that a quick fix here and there would suffice, but early on, I made a critical mistake: ignoring proper waterproofing. It seemed minor at first, but it turned into a major nightmare. Proper shower installation isn’t just about the look; it’s about creating a durable, safe space that stands the test of time. According to the National Kitchen & Bath Association, meticulous planning and execution are key to a successful shower renovation, saving homeowners from costly repairs later on.
Is a DIY Shower Installation Actually Worth the Hype?
I’ll be honest—like many, I was tempted to take the DIY route to save some cash. But my inexperience showed, especially when it came to sealing and waterproofing. The result? A leak behind the wall that took months to fix. The mistake taught me a vital lesson: investing in professional tips and proper techniques makes all the difference. If you’re considering your own renovation, know that mastering the basics of shower installation can make your project smoother and more long-lasting. Need some expert guidance? Check out this comprehensive guide for essential tips that could save you hours—and headaches.
Preparing Your Base for Success
Start by removing the old fixture and cleaning the area thoroughly. Use a pry bar to gently take out any drywall or tile remnants, making sure the surface is level and free of debris. Think of this step as laying a solid foundation for a building; if it’s uneven, everything built atop will be shaky.
Creating a Waterproof Barrier
Apply a high-quality waterproof membrane directly onto the subfloor and walls where the shower will be installed. Use a roller or brush to ensure even coverage, especially in corners and seams. I once missed a corner and rushed through sealing it; weeks later, I faced a leak that soaked my wall. Precise waterproofing is your best defense against mold and costly repairs. For detailed tips, visit this guide.
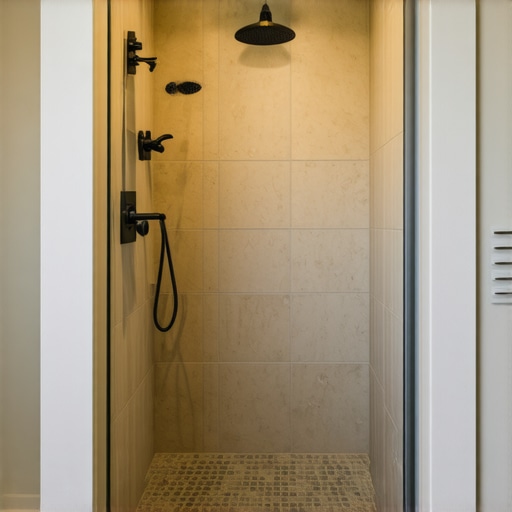
Constructing the Shower Pan
Build or install the shower pan carefully, ensuring it slopes slightly towards the drain—about 1/4 inch per foot. This slope directs water away efficiently. I used a level to double-check the slope; a miscalculation would have caused standing water, leading to issues down the line. Proper slope makes your shower self-draining, preventing water pooling and potential damage.
Plumbing and Drain Installation
Connect the shower drain to your plumbing, ensuring all connections are tight and sealed with plumber’s tape or silicone. Use a test bucket of water to verify no leaks. I once neglected to test the drain before sealing the walls, only to find a leak after tiling—costly to fix. Always test early and often to catch issues before they become headaches.
Wall and Floor Tiling
Lay out tiles precisely, starting from the center to ensure symmetry. Use spacers for consistent grout lines. Think of tiling like piecing together a puzzle; each piece needs to fit perfectly. I started tiling without planning, leading to uneven lines that I had to fix mid-project. To streamline this, mark your layout beforehand and double-check measurements.
Sealing and Finishing Touches
Apply grout carefully, filling all joints completely. Once dried, seal the grout with a quality waterproof sealant to prevent water infiltration. Attach fixtures securely and check their operation. I once skipped sealing the grout, and water seeped through over time, causing discoloration. Proper sealing preserves your work and ensures durability. For decorating ideas, see this article.
While many homeowners focus on the visible aspects of bathroom and flooring projects, the real experts understand that attention to nuance makes all the difference. A common misconception is that choosing high-quality materials alone guarantees longevity, but in my experience, installation techniques are equally crucial. For instance, common myths suggest that waterproof membranes are optional or that sealing grout isn’t necessary if you use premium products. In reality, improper application of membranes can lead to leaks and mold issues years down the line, regardless of material quality. According to the National Association of Home Builders, meticulous surface preparation and adherence to manufacturer instructions in waterproofing are essential to prevent costly repairs later.
What Do Advanced Installers Know That Beginners Overlook
One often-overlooked detail is the importance of substrate preparation. Failing to properly level or clean surfaces before installing flooring or tiles can cause uneven wear, cracking, or peeling prematurely. For example, skipping a moisture test on concrete slabs can result in trapped moisture, which leads to discoloration and delamination of floorings like vinyl or laminate. Additionally, many underestimate the significance of consistent grout lines and precise level checks during tile installation, which are vital for professional-looking results. A study by flooring industry experts indicates that neglecting these nuances can reduce the lifespan of your installation by up to 30%.
Another tricky aspect is the integration of baseboards and trim with flooring. Many homeowners assume that attaching baseboards is as simple as nailing them to the wall, but a pro understands that allowing for expansion gaps and proper sealing against moisture ensures a seamless, durable finish. For comprehensive style updates, I recommend exploring the latest baseboard design trends, which can elevate your space.
Similarly, misconceptions around carpet installation can lead to foundation issues or uneven edges. A skilled installer pays close attention to pad placement, seam alignment, and stretching techniques to ensure the carpet remains smooth and secure over time. For those eager to master this craft or avoid common pitfalls, I suggest checking out these expert carpet installation secrets.
In summary, understanding the subtle nuances—from substrate prep to sealing techniques—can dramatically improve the durability and aesthetics of your renovations. Don’t fall for the trap of thinking materials are enough; meticulous installation is the key to lasting beauty. Have you ever fallen into this trap? Let me know in the comments.
Keep It Working: Tools and Techniques for Longevity
Maintaining your bathroom and flooring installations isn’t just about addressing issues as they arise; it’s about proactive care that ensures durability and beauty over time. Having the right tools on hand makes all the difference. I personally rely on a few specialized items that have saved me from costly repairs and maintenance headaches.
Power Scrapers: Gentle, Yet Effective
A power scraper, like the EcoClean Electric Scraper, is invaluable for removing stubborn grout haze or old sealant without damaging surrounding surfaces. I use mine to refresh my shower surrounds and baseboards, maintaining their pristine appearance. This tool saves time and reduces the risk of scratches on delicate tiles or wood trims.
Digital Moisture Meters: Detect Hidden Moisture Before It’s Too Late
Moisture meters are essential for early detection of leaks or trapped moisture behind walls and under floors. I recommend models like the Wagner Meters Orion 950 because they provide accurate readings and are easy to use. Regularly testing moisture levels helps prevent mold growth and structural issues, prolonging your home’s lifespan.
Quality Sealant and Caulk Guns
Invest in a premium caulk gun, such as the Dewalt Heavy Duty Caulk Gun, which offers smooth application and jam-free performance. A good caulk gun ensures even sealing around shower fixtures, baseboards, and flooring edges, vital for preventing water infiltration. Precise application can significantly extend the time between maintenance sessions.
Sanding and Refinishing Tools for Baseboards and Floors
Over years, baseboards and floors may need touch-ups. I swear by a random orbit sander with variable speed, like the Bosch ROS20VSC, to sand down imperfections gently. A quality sander provides smoother results and reduces labor time, making future touch-ups more manageable. Keeping these areas looking fresh is a simple way to maintain your home’s aesthetic appeal.
Future Trends: Smarter Maintenance with Tech
Looking ahead, IoT-enabled leak detectors and humidity sensors will likely become standard, alerting homeowners remotely about potential issues before they escalate. Investing in smart sensors now can save thousands by catching problems early. For more on how technology is transforming home maintenance, visit this guide.
How do I keep my renovations performing over time?
The key is consistent monitoring and using the best tools for specific tasks. Regularly inspecting grout lines, sealants, and moisture levels ensures early detection of wear or leaks. Additionally, applying the correct maintenance products—like high-quality waterproof sealants—can double the lifespan of your installations. Remember, the goal isn’t just fixing problems but preventing them before they happen. Try incorporating a digital moisture meter into your routine to detect issues early and save money in the long run. Sources like the OSHA guidelines emphasize that early detection of structural issues can prevent costly repairs later—so don’t overlook the importance of the right tools in your maintenance arsenal.
Uncovering Hidden Pitfalls That Can Sabotage Your Home Upgrades
One of the most eye-opening lessons I learned is that simplicity often masks complexity. I used to believe that choosing premium materials was enough, but I overlooked the critical importance of meticulous installation techniques. That oversight led to avoidable problems like leaks and uneven surfaces, which took months and extra costs to fix. The real secret is that dedication to each step—no matter how small—is what separates a successful renovation from a costly mistake. Remember, even the best materials can’t compensate for poor application or lack of preparation.
Tools and Resources That Make All the Difference
Over the years, I’ve discovered that having the right tools can drastically reduce errors and improve results. For example, a high-quality moisture meter like the Wagner Orion 950 helps detect unseen water issues early, saving you headaches down the line. I also rely on a professional-grade caulk gun, such as Dewalt’s, for smooth, consistent sealant application. When it comes to learning, I swear by dedicated guides and industry tips. The ultimate shower renovation guide offers insights that transformed my approach and can help you avoid rookie mistakes. These resources have been game-changers for me, and I believe they can empower you, too.
Your Next Step Starts Today
Renovations might seem daunting at first, but each successful project builds your confidence and skills. The more you understand about proper installation nuances, the better your results will be—and the longer they’ll last. Don’t wait for a leak or an unsightly flaw to motivate you; start today with small improvements and keep learning along the way. Remember, your home’s beauty and functionality depend on your willingness to invest in knowledge and quality tools. Are you ready to tackle your next shower or flooring project with newfound confidence? Let me know your plans or questions below, and let’s make your dream space a reality!


One thought on “Shower Installation Tips for a Modern Bathroom Makeover”
Rachel Martin
March 31, 2026 at 1:50 amThis post really resonated with me because I had a similar experience when I tried to DIY my bathroom remodel a couple of years ago. I underestimated the importance of proper waterproofing and ended up with mold behind the walls—an expensive and frustrating fix. After that, I learned that investing in professional help or thorough tutorials can make all the difference. I especially appreciated the detailed tips on creating a waterproof barrier and slope in the shower pan; those are often overlooked but critical steps.
One challenge I faced was measuring and maintaining consistent grout lines, which impacted the overall look and longevity. Do others have tips for keeping tile even and aligned, especially for small or irregular spaces? I’ve heard that dry-laying tiles and using spacers before actually setting them can help, but would love to hear other practical suggestions. It’s clear that attention to detail and patience are essential for a durable, beautiful shower. Would love to hear about others’ experiences or recommendations for tools that make these tasks easier.