I remember the first time I tried installing a carpet in my living room. I was so excited—until I stepped back and saw those crooked edges and ripples running across the floor. That was a real lightbulb moment for me: Despite all the advice I’d read, I’d totally overlooked the secret to flawless results. If you’ve ever felt the frustration of uneven seams or unprofessional finishes, you’re not alone. Many DIY enthusiasts and even pros stumble over these issues because they simply don’t know the tricks that guarantee perfect results every time.
In this post, we’ll dive into the proven techniques that elevate your carpet installation from mediocre to masterful. Whether you’re tackling your first project or looking to refine your skills, mastering these secrets will save you time, money, and the embarrassment of an imperfect job.
Why Precision Matters in Carpet Installation
Proper carpet installation isn’t just about laying down material; it’s about creating a seamless, durable, and visually appealing finish. When done well, your floors become a luxurious foundation that elevates your entire home’s aesthetic. But get it wrong, and you’ll face buckling, wrinkling, or even safety hazards. Plus, an improperly installed carpet can reduce the lifespan of your flooring and even lead to costly repairs down the line.
I’ve learned that paying attention to detail early on makes all the difference. Early mistakes, like ignoring the importance of proper padding or underestimating the need for precise measurements, can haunt you later. For example, I once skipped the step of stretching the carpet adequately, which resulted in an unsightly ripple that I had to redo—an avoidable headache.
Research shows that a well-installed carpet can last up to 10 years longer, simply by following the right techniques. If you’re wondering whether investing in professional advice is worth it, consider this: even experienced homeowners have dramatically improved their results by learning expert tips—like those outlined on [Tile Craftsmens](https://tilecraftsmens.com/carpet-install-secrets-achieving-flawless-results-every-time).
So, have you faced the dilemma of uneven seams or lasting wrinkles after your last carpet project? If so, don’t worry—help is on the way. Next, we’ll explore how to avoid common pitfalls and achieve that perfect finish you’re aiming for.
Accurate Measurements Are Your Starting Point
Before laying down any carpet, measure the room meticulously. Use a tape measure to record the length and width of each area, then add 10% extra to account for seams and trimming. I once skipped this step in a small guest room, resulting in a shortage of carpet and wasted material. Double-check your measurements for precision—trust me, it saves headaches later.
Prepare Your Surface for Success
Ensure the subfloor is clean, dry, and level. Remove debris, nails, and high spots that could cause ripples or unevenness. Think of laying carpet like preparing a canvas; a smooth surface yields a better final look. I remember spending an afternoon sanding uneven patches in a basement before I could even think about installation, which made the project easier and the results more professional-looking.
Lay Down the Padding Correctly
Install padding that matches the room’s dimensions, cutting it slightly larger than the room itself. Overlap seams by 2-3 inches and secure with duct tape or staples. Proper padding acts like a mattress foundation—absorbent, supportive, and essential for comfort and durability. I once overlooked padding in a hallway, leading to a less soft feel and quicker wear. This step is crucial for long-term satisfaction and makes the carpet installation smoother.
Position the Carpet for a Seamless Look
Unroll the carpet with the pile facing the right direction—usually toward the main entrance or natural light. Let it acclimate in the room for 24 hours; this prevents buckling. Align the edges precisely, leaving a few extra inches along the walls for trimming. I vividly recall unrolling a large piece without acclimation, which caused it to buckle after installation. Giving the carpet time to relax reduces this risk significantly.
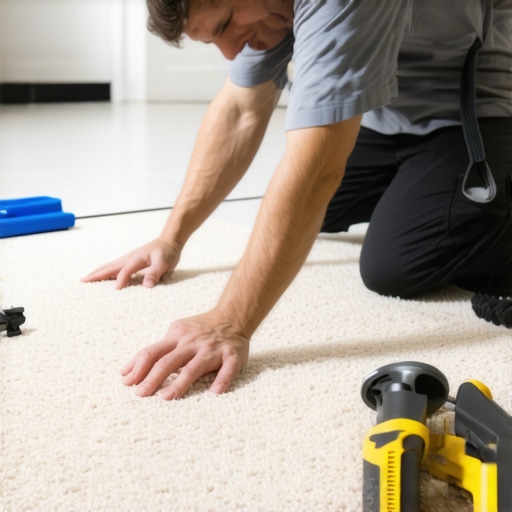
Stretch and Secure the Carpet Effectively
Use a power stretcher to pull the carpet tight from the center outwards. Start from the center and work towards the edges, anchoring the edges with tack strips nailed into the subfloor. Imagine stretching a trampoline—tightens the surface and eliminates ripples. In my first attempt, I didn’t stretch sufficiently, resulting in waves that I had to fix by re-stretching. Mastering this ensures a smooth, professional finish that lasts.
Make Precise Seams and Trimming
Join multiple pieces of carpet using a seaming tape and iron, then trim excess material along the baseboards using a sharp knife. Ensure the seams are aligned and pressed firmly for invisibility. Think of it as sewing two pieces of fabric seamlessly. I once mismatched seams, which became glaring flaws; perfect alignment takes patience but pays off visibly. Also, avoid over-trimming—measure twice, cut once to prevent gaps or overlaps.
Finish with Clean Edges and Baseboards
Trim excess carpet neatly, then securely fasten it under the baseboards for a clean look. Installing baseboards afterward conceals the edges and adds a polished touch. If you’re considering an update, check out easy baseboard upgrades. I’ve seen DIYers rush this final step, leading to uneven edges—taking the time here ensures a crisp, professional appearance.
Many homeowners and even experienced DIYers often believe that good results hinge solely on following basic instructions. However, the truth is that some misconceptions and overlooked details can significantly impact the longevity and appearance of your projects. One prevalent myth is that mirror-smooth transitions in flooring or perfectly aligned baseboards come naturally with patience—while patience is essential, understanding the subtle nuances like precise seam matching and thermal expansion gaps makes all the difference. Skipping these can lead to buckling, gaps, or uneven finishes over time. For instance, many underestimate how temperature fluctuations cause materials to expand or contract, which can cause seams to open or paint to crack if not properly accounted for. This oversight is common but costly, especially in large or temperature-variable environments.
Why does skipping expansion gaps lead to costly repairs in flooring?
Expert sources, such as studies on material behavior in construction, highlight that ignoring these small but crucial details accelerates wear and often results in needing earlier replacements or repairs. To truly master flawless results, pay attention to the advanced steps that most overlook, like using the right underlayment, applying seaming tape with precision, or sealing joints for water resistance. Moreover, many people overlook the importance of precise subfloor preparation; an uneven base can undermine your entire effort, leading to ripples or creases in your finished surface. Thoroughly leveling and cleaning your subfloor is an unsung hero for professional-looking results.
When it comes to shower installations, a common mistake is misjudging waterproofing layers or failing to slope surfaces correctly. Small errors here can cause leaks and water damage years later. Do not assume that sealing the surface is enough without proper slope and membrane integration—skimping on these detailed processes can turn a beautiful shower into a nightmare. For comprehensive insights into shower renovations, including waterproofing strategies, check out this guide.
Ultimately, the key to avoiding costly mistakes isn’t just about following steps but understanding the science and nuances behind each phase. A meticulous approach—accounting for environmental factors, material behaviors, and precise measurements—turns a good installation into a professional finish. Ready to elevate your projects? Dive into some of our in-depth resources like expert flooring installation tips for 2025 or baseboard makeover ideas. Remember, paying attention to these details can save you time, money, and frustration in the long run. Have you ever fallen into this trap? Let me know in the comments.Maintaining your flooring, baseboards, carpets, and showers is essential to preserve their beauty and durability over time. The right tools combined with consistent care can dramatically extend their lifespan and keep your home looking pristine. One of my favorite investments is a high-quality floor scraper and a microfiber mop set, which I personally use to remove debris from hardwood and tile surfaces without causing scratches. For deep cleaning, I rely on a steam cleaner, particularly for bathrooms, as it effectively breaks down soap scum and mildew without harsh chemicals, ensuring longevity and hygiene. Regularly inspecting grout lines and applying waterproof sealers every couple of years is crucial for showers; I recommend using a silicon-based sealant for its flexibility and water resistance. This proactive approach prevents leaks and water damage, saving significant repair costs. Looking ahead, the trend points toward smart maintenance solutions, such as IoT-connected sensors that monitor moisture levels and notify you of potential issues before they become serious. These advancements will empower homeowners to address problems early, maintaining their investments effortlessly.
### How do I keep my floors and showers performing over the years?
Implementing a routine cleaning schedule with the right tools is key. Use a damp microfiber cloth or mop for routine dusting and spills, and reserve deep cleaning for quarterly sessions. For carpets, professional steam cleaning not only refreshes fibers but also prolongs their appearance. For showers, sealing grout lines annually and inspecting for cracks keeps water out and preserves the tile.
Investing in quality tools is a small upfront cost that pays off long-term. For instance, a professional-grade grout sealer enhances water resistance and prevents staining. And don’t forget, maintaining proper ventilation reduces humidity and mold risk—an effective exhaust fan makes a big difference. As the industry evolves, embracing smart maintenance devices will become standard; these tools will offer real-time alerts and schedules tailored to your home’s specific needs. To delve deeper, explore expert insights on [transforming your home with the latest flooring tips for 2025](https://tilecraftsmens.com/transform-your-home-expert-flooring-installation-tips-for-2025).
If you’re ready to elevate your maintenance game, start by trying out a grout sealing kit this weekend. Regular upkeep using these recommended tools and methods ensures your home stays beautiful and functional for decades to come. Remember, a small investment in proper maintenance helps prevent costly repairs down the line and keeps your spaces fresh and inviting.
Most Overlooked Lessons That Transformed My Results
One of the biggest revelations was realizing how crucial environmental factors are—temperature, humidity, and even lighting—affecting materials post-installation. Ensuring proper acclimation and working conditions can prevent future ripples or buckles, saving you time and hassle.
Another insight came from understanding the importance of meticulous measurement; a small miscalculation can cascade into uneven seams or gaps, highlighting that precision at the start is essential.
The realization that patience during stretching and framing—taking the time to double-check every step—yields a professional-grade finish, is something I wish I’d embraced earlier. Rushing only leads to errors that are hard to fix later, especially with carpets and baseboards.
Lastly, I learned that embracing quality tools—like a reliable power stretcher or sharp knives—might seem costly upfront, but these investments are what truly differentiate amateur results from professional perfection. Mastering these nuanced techniques elevates your craftsmanship beyond basic DIY projects, ensuring durability and beauty for years to come.