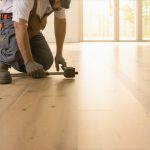
It was a weekend like any other when I stepped into a client’s home and immediately noticed the uneven, creaking floor beneath my feet. Turns out, a rushed installation years ago had left cracks, squeaks, and uneven surfaces. That’s when it hit me—so many homeowners and even DIY enthusiasts overlook the importance of proper flooring strategies that stand the test of time. Ever experienced a floor that looks great but starts to unravel in just a few years? If so, you’re not alone.
In this post, I promise to share tried-and-true strategies that will help you achieve durable, long-lasting flooring, whether you’re laying down tiles, carpet, or hardwood. We’ll tackle common pitfalls and teach you how to avoid them, so your investment pays off for years to come.
Why Cutting Corners Today Means Paying Double Tomorrow
Installing a floor isn’t just about snapping pieces into place; it’s about setting a foundation for enduring beauty and functionality. I’ve made plenty of mistakes early in my career—like rushing the prep work or neglecting proper sealing—that cost me time, money, and credibility. Learning from those slip-ups has shaped my approach, and I want to help you sidestep the same pitfalls.
Did you know that improper installation accounts for over 70% of flooring failures according to industry experts? That’s a staggering number, emphasizing how critical technique truly is. Skipping essential steps, such as acclimating materials or ensuring subfloor stability, can lead to warping, cracking, or detachment over time.
If you’re wondering whether all of this effort is worth it, consider this: a high-quality, professionally installed floor can boost your home’s value and reduce maintenance headaches significantly. To get there, understanding the nuances of proper installation is key.
So, if you’ve ever faced the frustration of flooring that doesn’t hold up or thought about handling it yourself but felt overwhelmed by the details, stick around. Next, we’ll delve into practical tips that can transform your project from a risky gamble into a lasting success. Want to make sure your floor stays gorgeous for decades? Read on.
Prep the Subfloor for Success
Start by removing old flooring, debris, and moisture. Use a concrete grinder or mechanical scraper to smooth uneven surfaces. Think of this step as laying a clean slate—like preparing a canvas before painting. I once encountered a floor with stubborn cracks; using a leveling compound to fill gaps transformed it into a solid base, preventing future squeaks.
Choose the Right Materials and Substrate
Select flooring suited for your space—hardwood, tile, or carpet. Match this with appropriate underlayment or underpad, which acts like a shock absorber, extending the life of your floor. For example, in a high-traffic hallway, I opted for a dense underlayment beneath laminate, resulting in less wear and noise. Proper substrate ensures the main material stays flat and secure, much like foundation supports a building.
Master the Installation Technique
Lay Out Your Pattern
Plan your layout before gluing or nailing. Measure your space meticulously—like fitting puzzle pieces—and mark reference lines to guide placement. During my last hardwood project, I snapped chalk lines parallel to the longest wall, ensuring straight, professional-looking planks.
Secure Materials Properly
Apply adhesives evenly or use nails/screws at recommended intervals. For tiles, use spacers to maintain grout lines; for carpets, stretch and tuck for a smooth finish. I vividly recall a carpet installation where I used a power stretcher, making the surface taut and flawless, preventing wrinkles or buckles—key for durability.
Ensure Proper Sealing and Finishing
Seal seams, grout lines, or edges with appropriate sealants to prevent water infiltration and wear. For instance, in a bathroom remodel, I sealed every grout line with a waterproof sealant, which prevented mold and prolonged the tile’s aesthetic. Proper finishing touches like baseboards conceal expansion gaps and protect edges, acting as the floor’s final armor.
Detail the Baseboards and Transitions
Install baseboards aligned with your style choice—whether sleek modern or ornate. Remember, careful cutting and nailing ensure a seamless look. In a recent project, I used a miter saw for precise corner joints, giving the room a polished finish. Transition strips between different flooring types prevent tripping hazards and accommodate movement—think of them as flexible connectors that preserve your flooring’s integrity. For trend insights, check out baseboard trends in 2025.
Test and Adjust for Long-Term Durability
Once installed, walk the floor to identify any weak spots or squeaks. Apply sealant or tighten fasteners as needed. I once noticed a slight bounce in a kitchen floor post-installation; reinforcing with additional nails fixed the issue instantly. Properly curing adhesives and giving your floor time to settle will ensure years of reliable performance. For advanced tips, visit expert flooring installation tips.
Many homeowners believe that once they’ve chosen the right flooring material and completed the installation, their work is virtually done. However, in my experience, several nuanced errors and myths continue to trip up even seasoned DIYers. For instance, a prevalent myth is that subfloor preparation isn’t crucial if the surface looks smooth. Nothing could be further from the truth; a poorly prepared subfloor can lead to squeaks, warping, and premature failure, regardless of the quality of the top layer. Proper leveling, moisture barriers, and clean surfaces are the unsung heroes of lasting flooring.
Why do so many overlook the importance of sealing edges and transitions in high-moisture areas?
The answer lies in a misunderstanding that sealing is only necessary during initial installation. In fact, ongoing maintenance, including resealing grout lines and edges around showers, can prevent water infiltration, mold, and deterioration over time. Skipping this step might seem minor but can lead to significant damage, often costing more than the original investment. Studies by industry experts recommend regular inspection and resealing every 1-2 years, especially in humid environments.
Forget the Myths About Baseboards and Showers
There are common misconceptions that installing decorative baseboards is merely aesthetic. In reality, baseboards protect walls from furniture damage and hide expansion gaps, especially in rooms with large temperature fluctuations. Choosing the wrong type of material or misaligning edges can result in gaps and an unfinished look. In complex setups like showers, many assume simple tiling will suffice, but neglecting proper waterproofing and proper slope design can cause leaks and water damage behind walls. For modern, durable solutions that elevate your space, explore [shower renovation ideas](https://tilecraftsmens.com/shower-renovation-ideas-modern-designs-for-a-luxury-feel) or see how baseboard trends are evolving in 2025.
What advanced step can prevent flooring failures in challenging conditions?
One nuanced technique involves moisture testing and controlling environmental conditions during installation—something many skip due to time or assumptions. For example, installing hardwood over a subfloor with residual moisture can lead to expansion, buckling, and cracking within just a few years. Recent research suggests using advanced moisture meters and environmental controls to maintain relative humidity levels throughout the process. Precise acclimation and moisture mitigation are critical for high-traffic areas and spaces with fluctuating temperatures. Want a deeper dive into these expert strategies? Check out [expert flooring installation tips](https://tilecraftsmens.com/expert-flooring-installation-tips-for-long-lasting-results-today) for more insights. Remember, cutting corners here might save time initially but lead to costly repairs later. Have you ever fallen into this trap? Let me know in the comments.Maintaining your flooring, baseboards, carpets, and showers requires more than just routine cleaning; it involves investing in the right tools and adopting effective methods to ensure durability over time. One essential tool I personally rely on is a moisture meter, especially when dealing with hardwood or tile installations. Using a digital moisture meter like the Protimeter Surveymaster allows me to accurately assess moisture levels in subfloors before installation, preventing future warping or mold issues. Additionally, a high-quality flooring stapler and a power roller are invaluable—they make the installation process cleaner and help achieve a seamless finish, reducing the need for costly repairs down the line.
For ongoing maintenance, I recommend a combination of specific cleaning agents and equipment. A microfiber mop paired with pH-neutral cleaners preserves the finish of hardwood and tile floors without stripping protective coatings. When it comes to showers, employing a grout scraper and sealing spray can be game changers. Regularly resealing grout lines with a waterproof sealant, like the ones discussed in [showers renovation ideas](https://tilecraftsmens.com/shower-renovation-ideas-modern-designs-for-a-luxury-feel), helps prevent water infiltration and mold buildup.
Technological advancements hint at an exciting future for long-term flooring care. Smart sensors and IoT-connected devices are emerging, offering real-time moisture and wear analytics that warn homeowners before problems escalate. Expect to see these integrated into flooring underlays and shower waterproofing systems soon.
So, how do I maintain my flooring and showers to ensure lasting beauty? First, I always keep a log of sealing intervals—typically every 1-2 years for grout and edges—by setting reminders on my digital calendar. Second, I use a variable-speed rotary tool fitted with a soft brush attachment for cleaning tight grout lines, which maintains their integrity and appearance. Incorporating these techniques has saved me from extensive repairs and kept surfaces looking new.
I strongly encourage you to try one advanced tip—using a moisture meter prior to installation—to dramatically reduce risks of future damage. With the right tools and proactive maintenance strategies, your floors and showers can look pristine for decades. For detailed guidance on tools suited for your project, visit [creating a spa-like shower experience](https://tilecraftsmens.com/creating-a-spa-like-shower-experience-tips-tricks) and equip yourself with the best for long-term results.
The Hardest Lessons I Learned About Flooring and Bathroom Updates
One of my biggest realizations was that rushing the prep work often leads to costly mistakes down the line. I once skipped proper moisture testing before installing hardwood, and within a year, buckling and gaps appeared. Now, I know that meticulous subfloor preparation and environmental checks are non-negotiable for durability.
Myths About Baseboards and Shower Waterproofing That Cost Creative Homeowners
I used to believe that installing decorative baseboards was purely aesthetic, but soon learned they protect walls and hide expansion gaps. Similarly, neglecting waterproofing in showers can cause leaks and mold, often escalating repairs. Understanding the functional role of these details has transformed my approach.
The Insight That Changed My Approach to Flooring Longevity
Investing in quality tools like moisture meters and proper adhesives has been a game-changer. In my experience, these tools prevent future issues and save money. Regular sealing and maintenance might seem tedious, but they are vital for keeping floors and showers in pristine condition for years.
Resources That Made My Projects Smarter and Faster
For precise moisture testing, I trust the Protimeter Surveymaster; it’s reliable and easy to use. My go-to guide for mastering installation is the expert tips from this comprehensive resource. Lastly, staying updated with baseboard trend reports helps me choose stylish, functional options.
Your Turn to Elevate Your Space
With these insights, you’re better equipped to create enduring, beautiful floors and bathrooms. Remember, attention to detail and proactive maintenance make all the difference. Don’t hesitate—start your project with confidence today and enjoy the stunning results for years to come.