It was a typical Saturday when I finally decided to overhaul my living room. I was excited to add new plush carpeting and sleek top baseboards—until I saw the mess left behind. The seams weren’t flush, the corners looked sloppy, and I knew I’d have to redo my work. That lightbulb moment hit me hard: I’d rushed through the planning, skipping crucial installation strategies.
Since then, I’ve learned that the secret to a truly flawless finish isn’t just choosing the right materials but mastering the installation techniques that make all the difference. If you’re like I was, frustrated by uneven edges or visible gaps, then stick around. Today, I promise to share proven strategies that will help you achieve professional-looking results—no matter your skill level. From selecting the best top baseboards to laying carpet perfectly, I’ll guide you step-by-step.
Why Proper Installation Makes or Breaks Your Home’s Look
Have you ever walked into a room where everything seems just off—the baseboards are crooked, the carpet’s seams are visible, or the corners aren’t sharp? It’s enough to ruin what might otherwise be a beautiful space. Good news is, these issues are usually caused by installation mistakes, which are easier to fix than you might think. Properly installed baseboards and carpet can add a polished, cohesive look that transforms your entire home.
But here’s the kicker: rushing or skipping essential steps can turn your DIY project into a reminder of what not to do. Early on, I made the mistake of ignoring detailed measuring and planning, leading to gaps and uneven cuts. Trust me, a small mistake here can lead to big headaches later. To avoid this, I recommend following tried-and-true strategies, such as securing proper tools, understanding joint cuts, and ensuring your subfloor is level. If you want your home to look professionally finished, don’t skip the prep work or the details.
To get inspired and learn more about current trends, check out https://tilecraftsmens.com/baseboard-trends-in-2025-fresh-styles-for-every-room. Now, let’s dive into the core techniques that will elevate your installation game and give your home that impeccable finish you’re striving for.
Measure Twice, Cut Once
Before any tools touch your materials, take precise measurements of the room. Use a tape measure to mark where cuts are needed, adding an extra inch for safety. Remember, a small miscalculation can lead to gaps or uneven edges. I once hurried through measurements, only to realize my baseboard pieces were too short, forcing me to redo the cuts. Always double-check your measurements to avoid this hassle.
Preparing the Space Like a Pro
Clear the area of furniture and debris. Ensure the subfloor or surface is clean, dry, and level. An uneven surface is like trying to lay a blanket over a wrinkled mattress—you’re setting yourself up for trouble. Use a leveling compound if necessary, and run a straightedge across the floor to spot dips. This foundation determines how perfect your finish will look, so don’t skip this step.
Choosing the Right Tools and Materials
Equip yourself with a quality miter saw, measuring tape, carpenter’s square, and adhesive if needed. For flooring, select the appropriate underlayment and ensure the materials are acclimated to the room’s humidity for at least 24 hours. I learned this the hard way—materials expanded or contracted, causing gaps later. Proper tools and materials make installation smoother and results more professional.
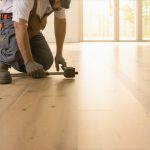
Installing Floor with Precision
Start from a corner, aligning the first plank or tile with the wall. Use spacers for tiles to maintain consistent gaps for grout. When laying floors like hardwood or vinyl, alternate plank seams for stability, and apply adhesive evenly with a trowel. Keep tools handy for quick adjustments. I once pressed a plank down without aligning it properly, resulting in an unsightly offset—immediately correcting alignment with a tapping block kept me on track.
Seamlessly Glue or Fit Carpet
Cut the carpet slightly larger than the room, then stretch and secure it with a knee kicker. Use a carpet stretcher to ensure it’s tight across the space—imagine tugging a tight rubber band. Be cautious of wrinkles or bubbles, smoothing them out as you go. I once skipped the stretching step, and the carpet developed ripples, which I fixed by re-stretching properly. Proper tension ensures durability and a clean look.
Applying Baseboards the Right Way
Measure and cut baseboard pieces accurately at 45-degree angles where corners meet. Use a miter saw for clean cuts. When installing, align the baseboards with the wall, anchoring with finishing nails. For uneven walls, shim the baseboards to sit flush. Use a level to confirm straightness. I remember hammering in nails haphazardly—taking time to shim and level resulted in a sleek, professional appearance. For modern styles, check out current trends.
Finishing Touches
Fill nail holes with wood filler, sand smooth, and paint or stain to match your decor. Caulk along edges to cover gaps and create a seamless transition between flooring and baseboards. Patience in finishing saves you from touch-ups later. Once, I hurried through caulking, leaving visible gaps—not ideal, but a quick redo fixed the look.
Many DIY enthusiasts believe that meticulous planning and quality materials are enough for perfect installations, but that’s only part of the story. The real game-changer lies in understanding the often-overlooked nuances that experts live by. For example, when installing showers, many assume sealing every seam suffices, yet the choice of waterproofing membranes and their correct application are critical to prevent long-term leaks, as emphasized by industry experts on [shower renovation](https://tilecraftsmens.com/shower-renovation-ideas-modern-designs-for-a-luxury-feel).
A common myth in flooring installation is that the subfloor’s levelness can be ignored if the surface appears smooth. Reality check: even minor dips can cause noticeable buckling or gaps in hardwood or vinyl floors. Advanced installers use precise leveling compounds and laser levels to ensure absolute flatness, a detail that significantly impacts durability and appearance. This tip is backed by research from flooring durability studies, which show that poorly prepared subfloors reduce the lifespan of the installed flooring.
When it comes to carpeting, many believe that stretching alone guarantees a wrinkle-free surface. However, the type of stretching mechanism, the quality of the tack strips, and correct tensioning are vital. Improper stretching can lead to ripples over time, especially in high-traffic areas. Professional stretchers apply specific tensions, and knowing when to re-stretch during wear is crucial, as covered in [carpet installation strategies](https://tilecraftsmens.com/expert-carpet-baseboards-installation-secrets-for-a-flawless-finish-today).
Baseboards seem simple: measure, cut, nail. But, a subtle nuance is in the mitering technique at corners. A perfect 45-degree cut makes or breaks the seamless appearance. Advanced tricks include using a coping saw for inside corners and shimming for uneven walls. These details ensure a refined look that often escapes amateur eyes but makes a striking difference in finished interiors.
Why does all this matter? Because these lesser-known details prevent recurring mistakes and costly rework, ultimately elevating your DIY game from amateurish to professional quality. Mastering these nuances turns a good project into a stellar one and saves you frustration and expense in the long run. If you’re eager to learn more about expert techniques, I recommend checking out the [ultimate guide to baseboards and carpet installation](https://tilecraftsmens.com/ultimate-guide-to-baseboards-carpet-installation-for-perfect-finish).
Have you ever fallen into this trap? Let me know in the comments and share your experience with overlooked details that made or broke your project.
Keeping Your Installation in Top Shape: Tools and Maintenance Tips
Achieving a flawless flooring or baseboard setup is just the beginning; maintaining it over time ensures your hard work continues to impress. The right tools and proactive care are essential for long-lasting results. I personally rely on a few specialized tools that make upkeep both easier and more effective, starting with a high-quality microfiber mop and a gentle cleaner formulated for your specific flooring material. Regular sweeping keeps debris from scratching surfaces, especially in high-traffic areas, while damp mopping prevents dirt buildup.
For carpeted areas, monthly professional-grade vacuum cleaners with HEPA filters help maintain fiber integrity and improve indoor air quality. I recommend a machine with adjustable height settings to adapt to different pile heights and ensure thorough cleaning. Don’t forget to rotate your furniture periodically to prevent uneven wear patterns.
When it comes to baseboards, inspecting for gaps or damage every few months allows you to catch issues early. A small putty knife and wood filler can be your best friends here. I keep a multi-tool with various blades handy to make detailed touch-ups a breeze. For larger repairs or repainting, invest in a high-quality sprayer or a fine brush for precise application.
Incorporating simple maintenance routines, like sealing gaps with weatherproof caulk, extends the lifespan of your installation. For example, in moist areas like bathrooms or showers, maintaining waterproof seals is critical, as outlined by industry standards in [shower renovation](https://tilecraftsmens.com/shower-renovation-ideas-modern-designs-for-a-luxury-feel). Doing so prevents water intrusion that can lead to mold and structural damage.
Looking ahead, I believe that smart home sensors—capable of monitoring humidity and detecting leaks—will become increasingly popular for maintenance automation. Integrating these devices with your regular routine can catch leaks or humidity spikes early, saving you money and stress.
How do I keep my floors and baseboards looking new over time? Aside from the tools I mentioned, adopting a scheduled routine of gentle cleaning and inspections helps preserve your investment. I also suggest applying a protective coating or polish specific to your flooring type once or twice a year to add an extra layer of defense against wear. For tips on choosing the right products, check out our detailed guides on [long-lasting flooring](https://tilecraftsmens.com/your-guide-to-durable-flooring-installation-for-a-stylish-home).
Don’t wait until wear becomes obvious—start your maintenance today with one of these techniques, and enjoy the beauty of your home for years to come.In my journey of perfecting home upgrades, I learned that the true magic lies beyond just selecting quality materials—it depends on the fine details of installation. The biggest lightbulb moments came when I realized that meticulous measuring, preparing the space properly, and understanding the nuances of seam and corner work can turn a DIY project into a professional showcase. For example, mastering mitered corners and ensuring subfloors are level transformed my results from average to outstanding. These lessons aren’t just theories—they’re proven techniques that save time, money, and frustration, making your home truly shine. If you want to elevate your project, explore comprehensive guides like our ultimate guide to baseboards and carpet installation which distills expert tips into actionable steps. Remember, the devil is in the details, and paying attention to these small but critical aspects is what elevates your home from good to extraordinary.