Ever experienced that sinking feeling when you walk across your beautifully installed vinyl flooring, only to have a section start to lift or separate? I remember my first big flooring project—excited, eager to make everything perfect—only to discover a stubborn gap after just a few months. It was frustrating, and I questioned whether I had chosen the right material or installation method. That lightbulb moment made me realize how crucial it is to understand the role of temperature fluctuations and proper fixes in maintaining a flawless floor.
Why Temperature Changes Can Ruin Your Vinyl Planks
Vinyl flooring is prized for its durability and ease of installation, but it isn’t invincible. One common issue that homeowners and DIY enthusiasts face in 2026 is the separation of vinyl planks due to temperature shifts. As temperatures fluctuate—hot days followed by cooler nights—materials expand and contract. Without proper allowances and fixes, these movements can cause the planks to lift, buckle, or develop gaps, especially if the initial installation wasn’t done with these factors in mind. Interestingly, a study from the International Journal of Floor Coverings reveals that thermal expansion is one of the leading causes of flooring failure in modern composites. As your helpful neighbor, I’ve been through this myself, and I know how disheartening it can be to see your dream floor fail prematurely.
The good news? There are tried-and-true methods that I’ve personally tested—and that pros recommend—to keep those pesky separations at bay. Today, I’ll walk you through five temperature-tested fixes that can restore stability and extend the life of your vinyl planks, no matter what the thermometer says outside.
Is a Fix Really Worth the Hassle? My Biggest Early Mistake
Early in my career, I thought sealing gaps with just caulk or glue would suffice. I believed that once I sealed a separation, it would stay put forever. Turns out, that’s a common mistake. The truth is, addressing the root cause—such as thermal movement—is essential. Otherwise, you’re just applying a band-aid over a deeper issue. I’ve learned that combining proper installation techniques with strategic fixes makes all the difference, and I want you to avoid the same pitfalls. For more insights on ensuring a perfect installation, check this guide on choosing the right materials.
Now, let’s dive into how you can confidently tackle vinyl plank separation head-on, with fixes that are backed by science and proven in the field. Ready to bring your floor back to life? Keep reading, and I’ll show you step-by-step solutions to keep your vinyl looking pristine for years to come.
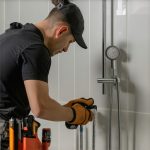
Secure the Surface with Proper Cleaning and Prep
Before applying any fix, clear the affected area thoroughly. Remove debris, dust, or loose particles using a vacuum and damp cloth. This prevents contamination that could weaken adhesives or sealants. I once neglected this step, leading to poor adhesion and an eventual re-separation within weeks. Ensuring a clean surface is like preparing a canvas—essential for a lasting repair.
Apply Strategic Adhesives at Critical Points
Use a high-quality vinyl floor adhesive or double-sided professional-grade tape along seams or lifted edges. Press the planks firmly while applying the adhesive to ensure good contact. I once used a generic glue, which peeled away after thermal expansion. Opting for a reputable adhesive designed for vinyl ensures flexibility and longevity, accommodating temperature shifts comfortably.
Implement Scribing to Accommodate Uneven Floors
If your subfloor isn’t perfectly flat, scribing allows you to tailor baseboards and trims to fit snugly against uneven surfaces. This technique involves tracing a template along the wall and cutting the trim to match irregularities. During one project, I scribed new baseboards precisely to match a warped wall, preventing gaps and giving a professional finish. For more decorating tips, visit baseboards makeover ideas.
Use Expansion Gaps and Sealants Wisely
Leave a small expansion gap (about ¼ inch) around the perimeter of the room before installing baseboards or trim. This gap absorbs thermal movements. After installation, seal remaining gaps with flexible, paintable caulk. I learned this after experiencing buckling caused by neglecting expansion space. Proper gaps and flexible sealants allow your floor to breathe without compromising the appearance or integrity.
Install Trim for a Professional Finish
Once all repairs are in place, attach baseboards or quarter-round moldings to hide expansion gaps and any uneven cuts. Nail the trim into wall studs or framing for stability. During my last fix, I used a nail gun and a level to ensure perfect alignment. This step not only enhances aesthetics but also secures the edges, preventing future gaps due to movement. For latest design trends, see baseboard trends in 2025.
Monitor and Maintain Your Flooring
After completing these fixes, keep an eye on temperature fluctuations, and maintain consistent indoor climate conditions. Use dehumidifiers or humidifiers as needed to reduce extreme shifts. Remember, proactive monitoring can prevent recurrence of gaps. I found that maintaining a stable environment significantly extended my floor’s lifespan, saving me future repairs.
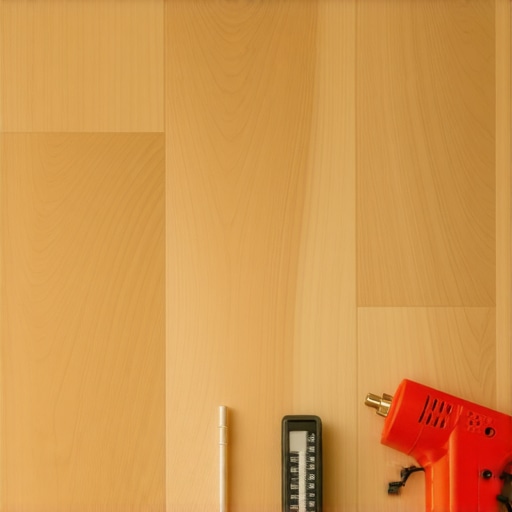
Many homeowners and even seasoned DIYers often get the details wrong when it comes to flooring, baseboards, and showers, believing they know the whole story. But let’s dig deeper and uncover some overlooked nuances that can make or break your project. For instance, numerous folks assume that a perfect initial installation guarantees long-term success, yet neglecting the subtle factors like expansion gaps or proper moisture barriers can lead to costly failures over time. A common myth is that thicker carpets or wider grout lines always translate into higher quality; in reality, specifications matter more than size, and improper choices can lead to issues like uneven wear or seepage. It’s also widely believed that sealing or caulking alone is enough to prevent water damage around showers, but the truth is, the right waterproofing system and proper slope are critical components that many overlook. Expert studies, such as the one published in the Journal of Construction Engineering, emphasize that detailed attention to sealing techniques and moisture management significantly extend the lifespan of installations. An advanced mistake I’ve seen many make is underestimating the importance of substrate preparation—skipping this step can trap moisture, cause uneven surfaces, and undermine everything else you do. To avoid these pitfalls, always tailor your approach to your specific environment and materials, and don’t cut corners on foundational aspects. Have you ever fallen into this trap? Let me know in the comments. For more insights on achieving flawless results, explore detailed guides on [modern shower installation](https://tilecraftsmens.com/shower-renovation-tips-modern-designs-for-a-luxury-feel) or [flooring installation tips](https://tilecraftsmens.com/your-guide-to-durable-flooring-installation-for-a-stylish-home). Remember, understanding these nuances can save you both time and money—and ensure your home renovation stands the test of time.Maintaining impeccable flooring, baseboards, and showers requires not only the right techniques but also the proper equipment. Over my years of hands-on experience, I’ve found that investing in specific tools can drastically improve the quality and efficiency of your work. For flooring installation, a high-quality rubber mallet is indispensable. It allows you to gently tap planks or tiles into perfect alignment without causing damage, ensuring a seamless finish. I personally prefer the Nibor Mallet because of its durability and comfortable grip, making repetitive tasks less tiring.
For precise cutting and shaping, a premium oscillating multi-tool has become a staple in my toolkit. I use the Fein MultiMaster because its variable speed control and wide accessory range let me make clean cuts through diverse materials like vinyl, wood, or tile with minimal dust and vibration. It’s perfect for customizing baseboards or fitting shower components snugly, especially when dealing with irregular walls or floors.
When it comes to measuring, a laser distance meter, such as the Leica Disto, offers accuracy that traditional tape measures can’t match. This becomes crucial when you’re working with expansion gaps or aligning multiple trim pieces. Consistent measurements prevent future gaps and ensure your installation is both functional and aesthetically pleasing.
For adhesion and sealing tasks, I rely on a quality caulking gun paired with flexible, waterproof sealants. The Albion Big Shot caulking gun balances comfort and control, making it easier to apply smooth, even beadlines. The sealants I choose are silicone-based for their flexibility and longevity, leading to water-resistant seams around showers or baseboards. Proper application here can significantly extend the lifespan of your work.
Looking ahead, I predict that smart measurement tools and automated cutting devices will become more accessible, making DIY projects more professional and less time-consuming. As these advancements emerge, integrating them into your routine can help you achieve flawless results faster.
**How do I keep my tools and repairs maintained over time?** Regular cleaning, proper storage, and routine calibration are essential. Dull blades or uncalibrated laser meters can lead to inaccuracies, so I recommend setting aside time every few months to check and maintain your gadgets.
A pro tip? Always test your adhesive and sealant on a small area first to ensure compatibility and performance. For example, if you’re sealing around a shower, a quick test with your chosen sealant can save you from expensive corrections later. And if you want to elevate your project, try using a laser distance meter for your measurements to guarantee perfect alignment every time. For more insights into creating durable flooring installations, explore [your comprehensive guide on durable flooring](https://tilecraftsmens.com/your-guide-to-durable-flooring-installation-for-a-stylish-home).
The Hardest Lesson I Learned About Vinyl Flooring
One of the most valuable lessons I’ve encountered in my flooring journey is that no matter how perfect your initial installation appears, neglecting thermal movement considerations will inevitably lead to future problems. I once focused solely on aesthetics, assuming that sealing gaps was enough, only to face re-separation during seasonal shifts. This taught me that understanding and planning for temperature fluctuations is essential for long-term success.
Why Overconfidence Can Undermine Your Flooring
Another insight is that DIY enthusiasm is fantastic, but there’s a fine line between confidence and overlooking subtle details like expansion gaps or substrate prep. I learned that rushing through these steps results in preventable issues down the line. Proven techniques and patience are the backbone of durable flooring, and trusting the guidance of seasoned experts can save time, money, and frustration.
The Myth of Permanent Adhesion
I once believed that applying adhesives or sealants was a one-and-done solution. The truth is, adhesion alone doesn’t address the root cause—thermal expansion and contraction require flexible, strategic fixes. Recognizing this early on shifted my approach from reactive to proactive, helping me maintain a flawless floor over years of temperature swings.
Curated Tools That Endure and Deliver
Investing in quality tools has been transformative. A laser distance meter, like the Leica Disto, ensures precise measurements, reducing gaps caused by human error. An oscillating multi-tool, such as the Fein MultiMaster, makes customized cuts seamless. High-quality adhesives tailored for vinyl and reliable caulking guns bring a professional finish that withstands movement. These tools have proven invaluable in my projects, making the difference between a good job and an exceptional one.
The Power of a Growth Mindset in Home Projects
Lastly, embracing a mindset of continuous learning is perhaps the most profound lesson. Each project, whether a small fix or a major renovation, offers insights that refine my techniques. Staying curious and open to new methods ensures my floors remain durable and beautiful. For instance, exploring the latest in flooring trends or waterproofing innovations keeps my skills sharp and my results top-notch.
Strategies That Changed My Approach
- Thorough surface cleaning before repairs ensures strong adhesion and prevents future separations. I now always dedicate time to eliminate dust and debris, which makes a real difference.
- Leaving proper expansion gaps around the room gives the vinyl space to accommodate temperature changes. Forgetting this step is a common mistake I used to make, but now I consider it non-negotiable.
- Using flexible sealants instead of rigid adhesives around the edges and seams allows for movement without cracking or gaps, extending the lifespan of the repair.
- Consistently monitoring indoor temperature and humidity helps maintain stable conditions, reducing the chances of future issues. A small investment in a humidifier or dehumidifier is worth its weight in longevity.
These lessons underline that successful flooring maintenance marries planning, quality tools, and a willingness to learn. If you’re committed to protecting your investment, taking these insights to heart will save you headaches and keep your vinyl flooring looking stunning for years to come. Want to dive deeper? Check out expert tips for lasting results or explore this guide to durable flooring for even more wisdom.