I vividly remember the moment I stepped out of my shower, only to find a small puddle forming at the base. At first, I thought it was just splashed water, but then I noticed the water was seeping through the curb, risking mold and rot underneath. Frustrating, right? I realized that a tiny leak can turn into a big headache if not fixed properly. That lightbulb moment pushed me into the world of shower waterproofing, and I discovered how crucial a good drain seal is for a leak-free bathroom.
Why Stopleaks Matter More Than Ever in 2026
Leaks aren’t just about water wastage—they can severely damage your home’s foundation and lead to costly repairs. As homes become more airtight and energy-efficient, even minor leaks threaten to cause mold growth and decay behind walls. According to the Environmental Protection Agency, unresolved bathroom leaks can waste hundreds of gallons of water annually, inflating utility bills and increasing your carbon footprint. That’s why getting your shower curb sealed correctly is a smart investment. Whether you’re remodeling or just maintaining, understanding the latest drain-seal fixes can save you time, money, and stress.
Is Waterproofing a Weekend Project Worth the Hassle?
Early in my DIY adventure, I made the mistake of thinking waterproofing was simple—just apply a sealant and call it a day. Turns out, shortcuts like that often lead to leaks down the line. Proper sealing in 2026 involves understanding the nuances of drainage systems and using the right materials. If you’ve faced leaks before or fear making mistakes, you’re not alone. But the good news? I’ll guide you through three proven drain-seal fixes that are straightforward and proven to last. Ready to tighten up your shower and stay dry? Keep reading — the solutions are easier than you think, and they’ll make your bathroom safer and more functional.
Prepare Your Workspace and Tools
Before diving into sealing, gather essential tools: a utility knife, putty knife, silicone sealant specifically for bathrooms, a scraper, and a clean cloth. Clear the area around the drain and cover nearby surfaces to protect from excess sealant. I recall the time I underestimated this step, and a blob of sealant ended up on my tile, which I later had to clean off carefully to avoid staining. Proper prep ensures a smooth sealing process.
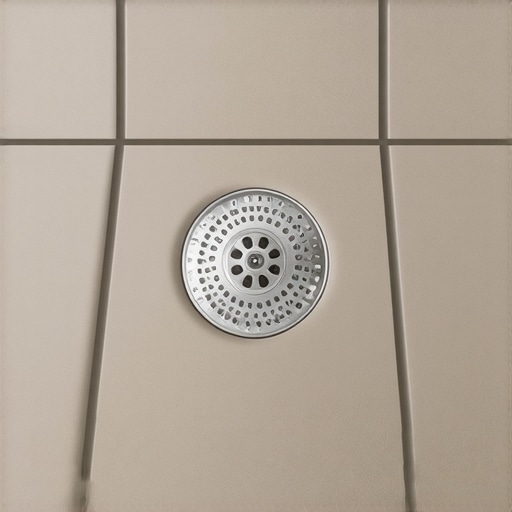
Remove the Old Sealant and Debris
Loosen and Clean Gasket or Old Sealant
Use the utility knife or scraper to carefully detach any existing silicone or gasket around the drain. Remove all debris, dirt, or mold buildup, as residual material can prevent a good seal. I once neglected this step and found my sealant peeling after a few weeks, leading to a mini flood on my bathroom floor. Clean thoroughly to ensure a solid base for the new sealant.
Apply New Sealant Effectively
Use the Right Sealant and Apply Evenly
Choose a high-quality, waterproof bathroom sealant. Cut the nozzle at a 45-degree angle to control the flow. Squeeze a continuous bead of sealant around the drain’s perimeter, maintaining steady pressure. Think of it like icing a cake—smooth, even layers prevent gaps. During my first attempt, I applied too thick a bead, which took longer to cure and was messy to clean. Practice patience and apply in one steady movement.
Ensure Proper Edge Coverage
Make sure the sealant bead contacts both the drain and the surrounding surface adequately. Use a damp finger or a silicone tool to smooth out the bead, pressing the sealant into any slight gaps. This creates a tight, waterproof seal. I remember smoothing out the bead and noticing gaps disappearing—this step is crucial for a leak-proof finish.
Cure and Test Your Seal
Allow Adequate Drying Time
Follow the sealant manufacturer’s instructions for curing time, usually 24 hours. Do not use the shower during this period to avoid disrupting the seal. I kept my bathroom off-limits for a day and checked for touch-dryness before testing, ensuring the sealant adhered well.
Test for Leaks Effectively
Once cured, run water gently around the drain. Observe for any signs of seepage or drips. If you notice leaks, reapply the sealant in that area, repeating the curing process. This step saved me from future damage when I found my initial seal was imperfect and fixed it promptly.
Follow Up Maintenance
Regular inspections can prolong the effectiveness of your sealant. Clean the area with non-abrasive cleaners and reapply sealant every few years or if you notice cracks. Remember, proactive maintenance prevents small issues from turning into costly repairs, just like I learned during my DIY project—being attentive keeps your bathroom waterproof and safe.
For more ideas on bathroom upgrades or waterproofing tricks, visit our shower renovation tips page. That site offers detailed advice to help you achieve professional results with confidence.
 When it comes to home improvement, most DIY enthusiasts and even seasoned homeowners often latch onto surface-level advice, overlooking critical nuances that determine long-term success. One common misconception is that a perfect flooring installation simply requires choosing the right material and following basic steps. However, experienced installers understand that proper subfloor prep, moisture management, and door clearance are essential details that can make or break your project. Skipping these can lead to warping, buckling, or gaps over time. For insights on expert flooring techniques, visit our flooring installation tips for 2025.
Many assume that shower waterproofing is just about applying sealant and waiting. But the real mastery lies in understanding how to properly slope the shower floor, select the correct waterproof membrane, and ensure seamless transitions with the walls. Overlooking these can cause costly leaks down the line. For advanced waterproofing strategies, check out luxury shower renovation ideas.
The truth about baseboards often gets simplified to aesthetic purposes, but seasoned contractors see them as functional elements that conceal gaps, accommodate wall irregularities, and protect your walls from impacts. Improper scribing and mitering can lead to unsightly gaps or uneven connections. Mastering these details elevates your interior design and ensures durability. Explore the latest styles and techniques at baseboard trends for 2025.
A frequent mistake that trips up many is underestimating the importance of acclimating materials before installation. For example, flooring and baseboards need to be conditioned to the room’s humidity to prevent later expansion or contraction. Neglecting this step may result in buckling or gaps—issues that are often blamed on the material but are actually due to improper handling. To avoid these pitfalls, review our guide to durable flooring.
Have you ever fallen into this trap? Let me know in the comments. Remember, achieving professional results isn’t just about following steps but understanding the subtle details that differentiate amateur work from expert craftsmanship.
Keep Your Installations in Top Shape with the Right Tools
Maintaining your flooring, showers, and baseboards over time requires more than just occasional cleaning; it depends on the right tools and a proactive approach. I personally recommend investing in a high-quality oscillating tool, like the Fein MULTIMASTER, because its precise blades allow for gentle sanding and detailed repair work without damaging delicate surfaces. This is particularly useful when re-scribing baseboards to fit uneven walls, ensuring a seamless finish that withstands daily wear. For waterproofing and sealing, a professional-grade caulking gun paired with silicone sealant specifically designed for bathrooms ensures airtight and waterproof joints, preventing leaks and mold growth. Also, keep a good microfiber cloth on hand—it’s gentle enough to clean delicate finishes without scratching but effective at removing dust and grime that can accelerate deterioration.
In my experience, automated solutions like moisture meters are invaluable when checking underfloors or behind tiles, especially in older homes where hidden leaks can cause significant damage over time. Using a non-contact moisture meter guarantees you’re aware of potential issues before they escalate—saving you costly repairs later. As I see it trending, smart home devices that monitor humidity and detect leaks are becoming more affordable and sophisticated, promising to redefine how we perform long-term maintenance.
Best Practices for Systematic Maintenance
Regularly inspecting your installations is key. For flooring, look out for loose tiles or creaking wood; catch these early by wielding a pry bar to gently lift loose sections and reattach or replace as needed. For showers, routinely check grout lines and sealant; a quick touch-up with a quality silicone can prevent water ingress that damages substructures. Baseboards should be checked for gaps or gaps, which often occur with seasonal humidity changes—re-scribing them with a scribing tool like the Trim Clincher ensures a perfect fit despite wall irregularities. A step I’ve found effective is scheduling biannual inspections—this routine can help catch issues before they become expensive repairs.
Looking ahead, integrating IoT sensors into bathroom walls and floors to continually monitor for water leaks or moisture buildup could revolutionize maintenance routines. Imagine receiving alerts on your smartphone the moment a leak occurs—giving you the chance to respond proactively.
How do I maintain flooring, showers, and baseboards over time?
Consistent, preventative care is the secret. Use specialized cleaning agents suited for your flooring type to avoid damage—avoid harsh chemicals on natural wood or stone. Reapply sealants and caulks every few years, especially in high-moisture areas, to maintain their effectiveness. For flooring, consider adding underlayment adjustments or reinforcements if you notice unevenness or squeaking, which often signal underlying issues. Keeping a set of basic repair tools, such as a cordless screwdriver, miter saw, and caulk smoothing tools, allows for quick fixes before problems worsen. Remember, detailed attention to these elements not only prolongs their lifespan but also preserves your home’s value. To deepen your understanding, I recommend reviewing this expert resource on flooring maintenance: your guide to durable flooring.
Don’t shy away from trying advanced techniques like re-scribing baseboards with a power sander or sealing grout lines with epoxy grout, which resists staining and cracking better than traditional cement-based formulas. These small investments in proper maintenance tools and knowledge will pay off with beautiful, long-lasting results that keep your home looking great for years to come.
Ready to elevate your maintenance game? Start by picking up a moisture meter or re-scribing tool—the difference they make is remarkable. And for ongoing tips, don’t hesitate to reach out via our contact page.
What I Wish I Knew Before Starting My Bathroom Renovation
- Never underestimate the power of surface preparation: Skipping thorough cleaning and removing old sealant can lead to premature leaks. My first attempt faltered because I didn’t clean enough, and I paid the price with a minuscule leak that turned into a big headache. Remember, a clean surface is the foundation of a lasting seal.
- Choosing the right sealant makes all the difference: Not all bathroom sealants are created equal. I found that high-quality, mold-resistant silicone combined with proper curing practices provided the best waterproof barrier. Invest in good materials — your future self will thank you.
- Patience is crucial when curing: Rushing the drying process only invites problems. Giving sealant and grout ample time to cure ensures maximum adhesion and leak prevention. My mistake was using the shower before complete curing; the result was a small gap that I had to fix later.
- Pay attention to detail in transitions: Seams between the shower and walls or flooring are vulnerable spots. Using techniques like re-scribing baseboards or properly sealing corners prevents water ingress and keeps your bathroom pristine longer. I learned that quick fixes often cost more in the long run.
- Regular maintenance saves future headaches: Periodic inspections and reapplications of sealant keep your waterproofing in top shape. A little effort now can prevent costly repairs down the line. Incorporate routines like inspecting grout lines and re-sealing annually for peace of mind.
Tools and Resources That Changed the Game
- Professional-grade silicone sealant: Trusted for its durability and mold resistance; it’s essential for a long-lasting finish. I recommend brands available at local hardware stores that specialize in bathroom fixtures.
- Moisture meters: These trusty devices help detect hidden leaks behind tiles or under floors before they escalate. I use a non-contact moisture meter from a reputable supplier—it’s an investment in peace of mind.
- Re-scribing tools: Perfect for smoothing out uneven surfaces or gaps in baseboards to create seamless transitions. They’re affordable and make finishing touches look professional even for DIYers.
- Online tutorials and guides: I found invaluable advice on expert flooring and waterproofing tips that demystified complex steps and boosted my confidence.
Your Next Water-Resistant Achievement
Remember, mastering bathroom waterproofing and finishing is about paying attention to the small details that ensure long-term durability. Take your time, use the right tools, and embrace the learning process. With persistence, your bathroom will not only look stunning but stay dry and safe for years to come. So, what aspect of your bathroom renovation are you most excited to improve? Share your plans below — I’d love to hear your journey to a leak-proof space!
,


One thought on “Stop Leaky Shower Curbs: 3 Drain-Seal Fixes for 2026”
Emily Johnson
April 13, 2026 at 12:40 pmThis post really hits home for me because I recently experienced a small leak that I initially thought was just splashing water, but it turned out to be a seepage through the curb. It’s surprising how tiny issues like that can escalate into bigger problems such as mold or structural damage if not addressed promptly. I agree that proper sealing techniques are essential, especially with the increasing emphasis on energy efficiency, which can trap moisture behind walls and under floors.
One thing I’ve learned from my own DIY waterproofing attempts is the importance of thorough surface prep and using high-quality sealants. Rushing the drying time or skipping cleaning can compromise the entire seal, leading to leaks down the road. I’d love to hear from others about the most effective tools or brands they’ve used for sealing. Also, how often do you all inspect your shower seals? I’m considering setting a regular schedule to prevent future issues. Thanks for sharing such detailed steps; it’s encouraging to know that with the right approach, those leak-proof upgrades are quite manageable.