Picture this: you’re rushing through a flooring project, eager to finish before dinner, only to step back and notice that unsightly gap between the carpet and the baseboard. It’s a small detail, but it screams amateur. I used to think little gaps like these were inevitable—just part of the DIY journey. That was until I discovered the magic of scribing and the secret weapon for 2026 baseboard installations: the stop carpet gap technique.
Why It’s Time to Say Goodbye to Gaps Once and For All
In the world of home finishing, the devil truly is in the details. Gaps between carpet and baseboards can lead to drafts, dust infiltration, and a look so unfinished it undermines your entire effort. Early in my career, I overlooked this tiny flaw, thinking caulk or a bit of paint could hide it. Spoiler alert: they can’t. I learned this the hard way when a client pointed out the uneven finish that I thought was unnoticeable—a mistake that cost me credibility. But here’s the good news: mastering the art of scribing can eliminate these gaps entirely, saving your reputation and your sanity.
Is the Scribing Technique Overhyped or Actually Worth It?
Initially, I was skeptical. I wondered if a few extra minutes of precise scribing would really make a difference. Trust me, I made the same mistake early on—thinking I could fudge my way through by mitering blindly. But once I adopted the stop carpet gap method, everything changed. The process is quick to learn, and the results are striking. Proper scribing adapts the baseboard to uneven walls and flooring, resulting in a seamless, professional finish. And with the upcoming trends in baseboard styles for 2025, it’s more critical than ever to nail that perfect fit. Don’t just take my word for it—studies show that meticulous finishing techniques significantly boost the value and appeal of a home, making it stand out in a crowded market (National Association of Realtors, 2023).
Now, you’re probably wondering how to tackle those tricky corners and uneven walls without pulling your hair out. That’s exactly what I’ll walk you through next. If you’re tired of inspecting lopsided trims or feeling unsure about your cuts, keep reading. The simple, effective scribing method I swear by will change your install game and leave your projects looking truly polished.
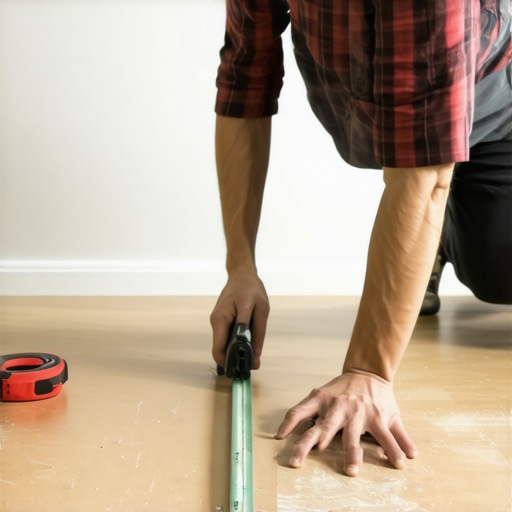
Prepare Your Tools and Materials
Before you start scribing, gather your essential tools: a high-quality coping saw, a measuring tape, a pencil, a level, and a scribing tool. Think of setting up for scribing like preparing a chef’s knife—precision and quality matter. I remember a time when I rushed to the job without the right saw, leading to uneven cuts and frustration. That day, I learned that investing in a sharp, fine-toothed coping saw simplifies the process and yields cleaner edges.
Understand the Stop Carpet Gap Concept
The core idea is to create a seamless transition where the baseboard meets the irregular wall or flooring. Instead of mitering blindly, you cut the baseboard to match the wall’s natural contour. It’s like tailoring a suit to fit an uneven shoulder—precision ensures a perfect look. I once worked on a project with wavy walls, and attempting to miter the baseboards resulted in gaps and uneven lines. Switching to scribing transformed those imperfections into a flawlessly fitted baseboard.
Mark the High and Low Points
Start by placing the baseboard against the wall where it will be installed. Use a level to identify high and low points along the wall. Mark these with your pencil. Imagine tracing the natural curves of a winding river—this lays the foundation for a custom cut. I once used a laser level for this task; it dramatically increased accuracy, saving time on adjustments later. This step ensures your cuts will follow the actual wall profile, preventing gaps.
Transfer the Wall Profile to the Baseboard
Hold the baseboard in place and trace around the irregularities, capturing the wall’s contours. Use a scribing tool or your coping saw to carefully transfer this pattern onto the material. Think of it like sketching a custom pattern for tailoring—each curve matters. I vividly remember how I struggled initially, trying to freehand the curves, which led to over-cutting. Practicing slow, deliberate scribing made the difference between a sloppy fit and a professional finish.
Make the Precise Cut
Cut along the marked lines with your coping saw, keeping steady and following the traced profile. It’s like carving a wooden sculpture—patience and control are key. I once attempted to rush through this step, resulting in a jagged edge that required filling. Consistent, slow strokes produce smooth cuts, markedly improving the final fit. Test the cut against the wall and make minor adjustments if necessary.
Install the Baseboard and Evaluate
Position the scribed baseboard against the wall. Check for gaps; they should be minimal or nonexistent. If minor gaps remain, use a flexible caulk or wood filler to fill them. Remember, the goal is to achieve a flush, seamless look—even in the most uneven corners. I recall a project where perfection was achieved through iterative adjustments, each time trimming a tiny bit more until the fit was impeccable. This detail work elevates your installation, making it indistinguishable from professional jobs.
Final Touches for a Flawless Finish
Secure the baseboard with finishing nails, countersink, and fill the nail holes with matching wood filler. Then, sand lightly for smoothness. For the best look, paint or stain after installation, ensuring a uniform appearance. Incorporating this scribing method not only hides imperfections but also enhances your craftsmanship’s overall impression, especially as trending styles in baseboard styles for 2025 emphasize clean, customized finishes.
Many DIY enthusiasts and even seasoned homeowners tend to focus on the visible aspects of renovation, but there are critical nuances often overlooked that can lead to costly mistakes or subpar results. Let’s dig deeper into some misconceptions and hidden pitfalls that can sabotage your project success.
One widespread myth is that standard miter cuts for baseboards are sufficient to tackle uneven walls or floors. In reality, relying solely on mitered corners without proper scribing can result in gaps and misalignments, especially in older homes where walls are rarely perfectly plumb. Mastering advanced techniques like siding or scribing your baseboards is essential for a flawless finish. Additionally, many assume caulking is a catch-all solution for gaps around showers or baseboards. While it provides a seal, it doesn’t compensate for poor cuts or uneven surfaces. For imperative waterproofing and aesthetic quality, precise cutting and fitting take precedence over quick fixes.
Another common trap is neglecting proper waterproofing in shower renovations, particularly in curbless designs. Installing tiles without thorough water management can lead to leaks, mold, and structural damage over time. The misconception that using waterproof membrane alone suffices often results in water infiltration. A comprehensive waterproofing approach that includes slope, sealing, and drainage considerations is vital for long-term durability. For expert insights on creating a safe, leak-proof shower, visit our guide on modern shower renovation ideas.
Advanced installers know that flooring and carpet installation require not just measuring and cutting, but understanding the underlying subfloor’s condition. For example, many believe that leveling the subfloor is optional unless there’s a noticeable height difference. However, uneven subfloors can cause squeaks, uneven wear, and ripples, especially with luxury vinyl or plush carpets. A crucial step is inspecting and addressing these issues beforehand, as outlined in flooring installation tips for 2025.
A sneaky mistake is overlooking the importance of proper floor transitions. When floors of different heights meet, an unaddressed gap can cause tripping hazards or damage to the edges. Installing transition strips or using floating techniques can save you headaches down the line. This is particularly relevant when transitioning from carpet to hardwood or tile.
Now, you might be wondering: what’s the most overlooked advanced trick in ensuring these finishes last? It’s the meticulous attention to detail in the preparation phase, including accurate wall measurements, proper material handling, and understanding material-specific behaviors—like expansion in wood or contraction in vinyl. Recognizing these nuances prevents pitfalls like buckling or gaps, which are costly to fix later.
Finally, let’s confront a question often posed by advanced DIYers and pros alike:
How can I anticipate and counteract the effects of seasonal humidity changes on my installations?
Seasonal shifts can cause materials to expand or contract, leading to gaps, buckling, or cracking. For example, wood-based baseboards might shift during dry seasons, creating visible gaps or warping. Using flexible adhesives, employing expansion gaps, and selecting materials rated for your climate are proactive measures. Experts recommend consulting studies such as the one from the home durable installation guide for in-depth strategies.
Stop neglecting these nuances, and your projects will not only look professional but will stand the test of time. Have you ever fallen into this trap? Let me know in the comments.
Keeping Your Installations Reliable Over Time
Achieving a beautiful, durable finish isn’t a one-and-done effort; it requires the right tools combined with consistent maintenance practices. I personally rely on a set of specialized equipment and methods that ensure the longevity of projects like baseboard installations and carpet laying. These tools not only improve initial results but also make long-term maintenance much more manageable.
For precise cuts around uneven walls or complex corners, I swear by a high-quality oscillating multi-tool equipped with fine-tooth blades. Its versatility allows me to make delicate scribing cuts in tight spaces, particularly when dealing with intricate molding or custom flooring profiles. Unlike standard saws, this tool provides controlled, detailed cuts that fit perfectly, reducing gaps and the need for frequent adjustments.
Maintaining smooth, professional finishes also depends heavily on reliable measuring and alignment tools. I trust a digital distance meter combined with a laser level—these gadgets cut down errors during installation and help me verify alignment after fitting. For example, when installing baseboards, I frequently double-check with a laser line to ensure the top edge remains even across the entire wall, preventing unsightly dips or slopes that detract from the overall look.
Additionally, I employ specialized adhesives tailored to each material. For flooring, I prefer flexible, waterproof adhesives that accommodate expansion and contraction — critical for long-term durability, especially in areas prone to moisture or temperature fluctuations. Regularly inspecting and reapplying sealants and adhesives as part of maintenance extends the life of your work and prevents unforeseen issues, such as gaps or loosened baseboards.
When considering the future of home finishing, I predict that automation and smart tools will play an increasing role. Devices that sync with your smartphone to provide data on humidity levels or wall irregularities could revolutionize how we approach installation and maintenance. Staying updated on innovations like these, as discussed in industry reports such as our guide to durable flooring, empowers you to adapt and refine your techniques consistently.
How do I keep my finish work looking good over time?
Routine checks are essential. Regularly inspect baseboards, trims, and carpets for signs of shifting, cracking, or wear. Promptly re-secure loose edges with appropriate fasteners and reapply sealants or paint when needed to prevent moisture ingress. Implementing preventive maintenance after initial installation minimizes costly repairs later and preserves your craftsmanship’s integrity.
Remember, using the right tools makes all the difference. For example, investing in a quality pneumatic nailer for baseboards ensures fast, clean fastening, reducing the risk of nail pops or loose edges. Similarly, a steam carpet cleaner is invaluable for refreshing and maintaining carpet fibers, especially in high-traffic areas. Combining these tools with proper cleaning routines keeps your finishing work looking sharp and professional for years to come.
Don’t forget to document your maintenance and watch for seasonal changes that can affect your installations. For instance, in humid climates, expanding materials might require re-adjustment or re-sealing, which is a proactive approach endorsed by industry experts. As technology advances, integrating smart sensors that monitor environmental conditions can enable you to address issues before they become visible problems. Incorporate these practices, and you’ll ensure your craftsmanship remains impeccable long-term.

Illustration of a modern toolkit for flooring and finish maintenance, including laser levels, oscillating multi-tool, and digital measuring devices, emphasizing precision and longevity.
Throughout my journey in home finishing, few lessons stood out as vividly as the importance of embracing meticulous techniques like scribing over relying on assumptions or shortcuts. One of the biggest eye-openers was realizing that the tiny gaps I once dismissed as inevitable were actually reflections of my approach—whether I took the time to adapt or hurried through. Embracing the stop carpet gap method transformed my work, making me realize that precision isn’t just about aesthetics but about respect for the craft and your clients’ trust. Learning to see imperfections as opportunities to improve rather than failures empowered me to push for perfection every time. Overcoming the temptation to cut corners taught me that mastery involves patience, practice, and the humility to accept that the best results are often achieved through small, deliberate adjustments rather than big fixes. This mindset shift—favoring detailed scribing over quick miter cuts—continues to elevate my projects and personal satisfaction in my craft.