I’ll never forget the first time I tried fitting baseboards over a brand new 2026 shag carpet, only to realize after hours of painstaking work that everything looked off—gaps, crooked lines, and a sense that I had somehow missed the mark entirely. It was a lightbulb moment that revealed just how tricky finishing touches can be when it comes to high-pile carpets and detailed trim work. If you’ve ever wrestled with baseboards that refuse to sit flush or looked at your freshly installed trim and wondered if you’re doing something wrong, you’re not alone. Many homeowners and DIY enthusiasts face the same frustration, but there’s good news: there’s a proven method that makes it easier and delivers professional results—it’s called the Tucking Method. Today, I’ll walk you through how to master this technique so you can achieve a beautiful, gap-free finish even with the thickest shag carpets setting the scene for your flooring or renovation project.
The Secret to Seamless Baseboards on Thick Carpet
Dealing with high-pile carpets like 2026 shag can feel like an uphill battle because traditional baseboard installation often assumes a flat, even flooring surface. When the carpet is thick, it pushes the baseboard out of alignment, creating unsightly gaps and an uneven look. Early in my experience, I made the mistake of simply trying to nail the baseboards down flush to the wall—big mistake. Not only did this result in gaps, but it also damaged the carpet’s plush pile, making it look worse over time. I learned the hard way that adapting your technique to the carpet’s thickness is essential for a clean, lasting finish.
What I needed was a way to ‘tuck’ the carpet behind the baseboard without damaging it or creating gaps. That’s when I discovered the Tucking Method, a simple yet effective technique that involves gently shifting the carpet pile behind the trim and securing the baseboard just above the carpet surface. This approach ensures a snug fit that looks neat and professional. It’s tricky at first, but once you get the hang of it, you’ll appreciate how much cleaner your finish looks, and you’ll save yourself headaches down the line.
If you’re tired of fighting with thick carpets and baseboards that just don’t sit right, stick with me. We’ll go beyond the basics with detailed steps, so you can confidently tackle this in your own home. Plus, I’ll share some common pitfalls to avoid that I’ve personally stumbled over, so you don’t have to repeat my mistakes. To get inspired, check out some of the latest baseboard trends that can elevate your space.
Are you ready to turn your baseboard install from a frustrating task into a proud DIY moment? Let’s dive into how this clever technique works and transform your project today.
Preparing for the Tucking
Start by measuring the height of your carpet pile from the wall to the top of the carpet. Use a ruler or a tape measure, and note this measurement. When I did this in my last project, I noticed my shag was almost an inch thick, so I planned my baseboard height accordingly to allow enough space to tuck the carpet behind without leaving gaps or causing bulges.
Cutting and Positioning the Baseboard
Cut your baseboard to the desired length, ensuring mitered corners are clean. Hold it against the wall at the intended height, slightly above the carpet’s pile height. This small elevation is crucial; it keeps the baseboard from pressing down on the carpet and creating gaps. I always double-check with a level to ensure the line is straight, then mark the wall accordingly.
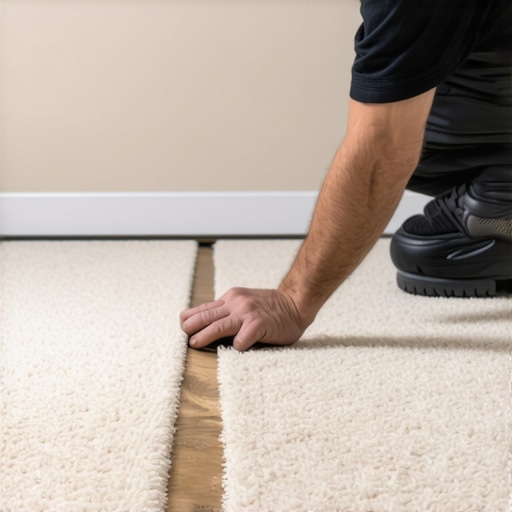
Creating the Tuck
This is the core step. Gently lift the carpet’s edge near the wall, using a putty knife or a pry bar if needed. Carefully push or slide the carpet pile behind the baseboard, ensuring you don’t compress or damage the fibers. Think of it as threading a ribbon behind a frame without tearing it. When I did this, I took my time, adjusting the carpet to sit neatly behind the trim. Insert shims or small spacers if necessary to keep the baseboard at the correct height, avoiding accidental compression of the carpet.
Securing the Baseboard
Once the carpet is tucked and aligned, fasten the baseboard to the wall using finishing nails. Drive the nails just above the carpet line to prevent damaging the fiber. As I nailed along the level line, I made sure not to overdrive, which could crack the trim or push the carpet out of place. Fill the nail holes with wood filler, then sand smooth for a seamless look.
Final Adjustments and Finishing
Inspect your work, ensuring the carpet neatly sits behind the trim without bulges or gaps. If needed, trim any excess carpet fibers or adjust the tuck. Caulking along the top of the baseboard can seal small gaps, but avoid caulking directly over the carpet. This step requires patience; I once rushed and ended up with a bulge that I had to redo. Take your time for a professional-looking finish.
Remember, this method works best with carpets that have a manageable pile height. For extremely plush or thick carpets, additional techniques, such as installing a shoe molding or reducing the baseboard height, may be necessary. To explore style options that complement this technique, check out baseboard trends.
Many homeowners and even seasoned DIYers believe they know the basics of flooring installation, but a closer look reveals some often overlooked nuances that can make or break your project. For instance, a prevalent myth is that perfect, gap-free baseboards can be installed without regard to the underlying subfloor or wall irregularities. In reality, inconsistencies in the wall surface or uneven flooring can lead to visible gaps or crooked lines, no matter how carefully you measure. The key is to address these hidden variables early, such as inspecting walls for levelness or patching imperfections before installation. Skipping these steps may seem minor but often results in costly rework or a less-than-professional look, which is why I always emphasize thorough prep work.
Another common mistake involves the misconception that high-quality materials alone guarantee a flawless result. While premium flooring and carpets are certainly worth investing in, the installer’s technique is equally critical. For example, many assume that stretching a carpet tightly over tack strips is sufficient. However, without proper tensioning techniques like using a power stretcher or ensuring correct tack strip placement, the carpet may ripple or develop ridges over time. It’s a subtle skill that experts have honed, and neglecting it can lead to visible imperfections that diminish the overall aesthetic. You can learn more about avoiding such pitfalls in my carpet installation tips.
When it comes to showers, a critical misconception involves waterproofing practices. Many assume that applying a single coat of sealant or thin mortar layer is enough to prevent leaks. But water infiltration isn’t always visible initially, and small gaps or improperly sealed joints can cause long-term damage. The reality is that comprehensive waterproofing, including multiple layers of membrane, proper slope installation, and detailed sealing around niches and drains, is essential. For example, neglecting to waterproof the shower niche properly can lead to mold and structural damage. Professionals recommend following rigorous waterproofing steps outlined by experts, such as those discussed here. Testing the durability of your waterproofing before use is equally important, as overlooked details can be costly later.
How does understanding wall irregularities influence your flooring and baseboard success?
Recognizing that walls are seldom perfectly straight can significantly impact your installation outcomes. Small deviations, if ignored, will become glaring flaws once the finishings are complete. Incorporating flexible techniques like scribing the baseboards or using shims can accommodate these imperfections, creating a more seamless appearance. For comprehensive strategies, my guide on minimizing baseboard gaps delves into advanced methods of wall adaptation. Remember, attention to these details elevates your work from amateurish to professional-grade.
Ultimately, mastering the finer points of installation requires awareness of these hidden nuances. The difference between a good-looking room and a professional finish often comes down to these subtle, expert-level techniques. Have you ever fallen into this trap? Let me know in the comments. To further refine your skills, check out my expert flooring tips for 2025.
Staying on Top of Maintenance to Preserve Your Installation
Once you’ve completed your flooring, carpet, or shower project, the real work begins—maintaining it to ensure longevity and sustained beauty. Regular upkeep is not just about appearance; it preserves the integrity of your materials and saves you from costly repairs down the line. For example, keeping your shower’s waterproofing layers intact involves routine inspections for grout cracks or sealant deterioration. A simple tool I recommend is a disposable grout refill kit, which allows for quick touch-ups without removing entire sections of your grout. Additionally, using a specialized shower cleaner that maintains sealant and prevents mold build-up helps prolong the lifespan of your waterproofing layers.
Tools I Recommend for Ongoing Care
Investing in quality tools makes maintenance more manageable. For flooring, a microfiber dust mop paired with a gentle, pH-neutral cleaner is my go-to. It efficiently lifts dirt without damaging surface finishes. When it comes to shower maintenance, I rely on silicone removal and reapplication tools. These allow precise resealing around niches or joints, preventing leaks before they start. For carpets, a handheld upright vacuum with adjustable height settings ensures thorough cleaning, especially in high-traffic areas. These tools not only ease routine cleaning but also help spot wear early, prompting timely repairs that extend the life of your installation.
Predicting Future Trends in Maintenance
The future of maintaining flooring and showers appears increasingly automated. Smart sensors embedded in shower seals or underlayment systems might alert homeowners to early signs of moisture intrusion or seal failure, making proactive intervention possible. For floors, robotic cleaning devices are evolving to handle textured surfaces like high-pile carpets or textured vinyl, reducing manual labor and ensuring consistent upkeep. Staying ahead with these innovations can make home maintenance more efficient and less time-consuming.
How Do I Keep My Shower Water-tight Over Time?
Maintaining waterproofing layers such as membrane liners or sealants requires diligent, scheduled inspections. Regularly check grout lines and caulk for signs of cracking or deterioration. If you notice any issues, quick patching with high-quality sealants can prevent leaks and mold growth. Remember, a detailed waterproofing review every couple of years, as emphasized in professional guidelines, can save you thousands in repairs later. To explore the latest in shower waterproofing techniques, visit shower renovation trends for ideas on enhancing your setup.
Adapting Tools for Uneven Walls and Floors
Walls and floors are rarely perfectly level, which can complicate maintenance tasks. Using flexible scribing tools or adjustable shims helps in aligning baseboards and maintaining a flush surface over time. For instance, a quality scribing kit, like the one discussed in baseboard gap solutions, allows for precise adjustments even on uneven surfaces. Regularly inspecting these areas and making small tweaks can significantly extend the professional appearance of your installations.
Incorporating these tools and maintenance routines into your regular home care regimen maximizes your investment. I encourage you to try the advanced tip of resealing grout lines with a high-quality, color-matched sealant annually—it’s a simple step that pays dividends by preventing costly water damage. Better yet, schedule a semi-annual checkup to stay ahead of potential problems, ensuring your flooring and shower systems remain beautiful and functional for years to come. For comprehensive insights on protecting your floors, see durable flooring maintenance.
The Hard Lessons That Shaped My Craftsmanship
Early in my journey, I underestimated the importance of wall and floor irregularities, thinking perfect alignment was solely about tools and materials. I quickly learned that even minor imperfections could derail an entire project, teaching me to embrace flexibility and patience. The hardest lesson was realizing that rushing through prep work often leads to setbacks later—attention to detail from the start is invaluable.
Unspoken Secrets Pros Keep Close
While tutorials offer a solid foundation, many professionals rely on nuanced techniques like scribing baseboards for uneven walls or using specific nail patterns to avoid cracks. Trustworthy resources like expert flooring tips have been game-changers, revealing subtleties that elevate quality and efficiency in every project I undertake.
The Emotional Power of Seeing Progress
There’s an unmatched satisfaction in transforming a space through skilled craftsmanship. Each successful tuck behind a baseboard or sealed corner reinforces confidence and passion for the work. Don’t let setbacks discourage you—mastering these techniques can turn daunting tasks into rewarding achievements, inspiring you to push your boundaries and create stunning results that stand the test of time.

One thought on “Fitting Baseboards to 2026 Shag Carpet: Use the Tucking Method”
Emily Carter
March 5, 2026 at 4:00 amI really appreciate the detailed steps and insights in this post. I recently faced a similar challenge when installing baseboards over a thick shag carpet, and I found that taking the time to measure the pile height accurately made a huge difference. I also learned that using shims behind the baseboards helps prevent pressing down on the carpet, maintaining a neat appearance. Sharing my experience, I’d suggest that homeowners be patient during the tuck-in process, as rushing can create bulges or uneven lines. Has anyone experimented with different types of adhesives or sealants to improve the tuck’s hold without damaging the fibers? It would be interesting to hear what others have tried, especially in rooms with especially plush carpets. Overall, mastering this technique seems like a game-changer for DIY projects wanting a polished finish without professional tools.