It was late one evening when I finally realized the nightmare I’d been living through—after installing new baseboards in my living room, I noticed unsightly gaps forming at the corners. No matter how carefully I cut or caulked, the seams refused to stay tight, and I started questioning if I’d made a mistake. That lightbulb moment led me down a rabbit hole of research, where I stumbled upon the revolutionary 2026 ‘Stud-Lock’ method for drywall—an answer to a problem many homeowners and DIY enthusiasts face but struggle to fix properly.
Why Baseboard Separation Drives Us Nuts and How to Fix It Once and For All
In my experience, nothing ruins the clean look of a freshly renovated room faster than those stubborn gaps between your baseboards and the wall. They’re more than just an aesthetic annoyance; they can lead to moisture intrusion, pest infiltration, and even compromise your wall insulation over time. The frustration compounds because traditional fixes, like caulking or mitering, often only offer temporary relief. I’ve been there—reapplying sealant, re-cutting corners, only to see the gaps reappear after a few months.
But here’s the thing: fixing this isn’t just about patching gaps; it’s about understanding why they happen in the first place. Many folks overlook how wall and floor movements, or improper framing, can cause baseboards to pull away. Early on, I made the mistake of assuming these gaps were purely aesthetic and resorted to quick fixes. That was a costly oversight. And it’s exactly why I want to share my insights, especially about the 2026 ‘Stud-Lock’ method, which promises a more permanent solution.
Is your home experiencing similar issues? Do you find yourself constantly battling gaps that just won’t stick? If so, you’re not alone. The good news is that by adopting the proven techniques discussed here, you can say goodbye to recurring problems and enjoy a flawless finish that lasts.
### Will the 2026 ‘Stud-Lock’ Method Live Up to the Hype?
Many skeptics wonder if this new approach is just hype or if it genuinely offers a game-changing fix. Having tried countless tips from online forums and friends, I understand the skepticism. One mistake I made early in my projects was relying solely on adhesives without considering the wall’s integrity or framing behind the drywall. That misstep cost me time and money, and it showed me how crucial it is to follow a strategy rooted in building science.
Research from the National Association of Home Builders confirms that proper wall framing is critical to preventing structural shifts that cause trim gaps. This enlightened me to the importance of a method like ‘Stud-Lock,’ which aims to stabilize wall studs and reduce movement.
In the next sections, I will walk you through how this method works, step-by-step, and how you can implement it in your projects. Ready to transform your home’s baseboard installation? Let’s dive into the practical side of things—because you shouldn’t have to accept gaps as the new normal.
Assess Wall and Floor Movements
Start by inspecting your walls and floors for signs of shifting or unevenness. During my project, I noticed a slight bow in the wall where the baseboard was pulling away. To confirm, I used a level along the wall to identify movement. Understanding these shifts helps you plan the best stabilization method, just like checking floor sag before installing new flooring or framing a shower niche to prevent leaks.
Prepare the Wall Surface
Remove any old caulking, paint, or loose drywall material where the baseboard sits. I cleared the area thoroughly, ensuring a clean surface for the application of the ‘Stud-Lock’ system. Think of it like prepping a shower surface—contaminants or debris can compromise the adhesion of your fix, just as they would with waterproofing or tile installation. A clean surface ensures a durable repair that lasts.
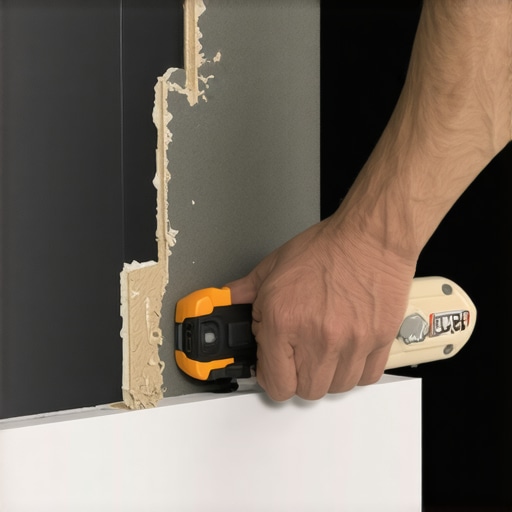
Install the ‘Stud-Lock’ System
This core step involves reinforcing the wall studs behind the drywall. Using a reciprocating saw, I carefully cut into the drywall to access the studs without damaging the wall integrity. Then, I screw the ‘Stud-Lock’ supports directly into the studs at regular intervals—about every 16 inches—similar to how you might install additional joists to reinforce a weak floor. This process minimizes movement and provides a sturdy anchor for the baseboard, much like adding rebar in concrete for strength.

Visual guide showing the placement of ‘Stud-Lock’ supports between wall studs for reinforcement.
Reattach or Replace Baseboards
With the wall stabilized, reattach the existing baseboards or install new ones. Use a nail gun set to the correct depth to avoid splitting the wood. Apply a generous bead of flexible caulk along the top edge to absorb minor future movements—this is crucial, as it allows some give without creating gaps. I learned that a flexible caulk maintains a tight seal even as the wall moves slightly, much like waterproofing your shower instead of just grouting alone.
Finish with Precision
Sand any rough edges and touch up paint or finish to match your room. Double-check the stability by gently pressing on the baseboards; they should feel firmly connected, without any wiggle. This final step ensures a seamless appearance that endures over time, similar to perfecting tile grout lines—every detail counts in making a lasting transformation. For more detailed tips on finishing touches, visit this guide.
While many believe that straightforward methods guarantee perfect results, in my experience, misconceptions around installation techniques often lead to recurring problems and costly fixes. For instance, a common myth is that using just caulk or standard tools suffices to prevent gaps in baseboards or water leaks in showers; however, these issues often stem from deeper structural causes, like wall movement or improper framing, which simple fixes cannot address effectively. An advanced mistake I’ve seen is relying solely on surface-level remedies without stabilizing the underlying structure—akin to trying to patch a leaky pipe without fixing the compromised joint, which will eventually fail again. To truly master these projects, understanding nuances like wall stud stability or subfloor integrity is essential, backed by research from industry experts indicating that structural reinforcement produces durable results (source: https://tilecraftsmens.com/expert-flooring-installation-tips-for-lasting-results). Have you ever fallen into this trap? Let me know in the comments. Remember, successful installation hinges on attention to these subtle yet critical details that many overlook, leading to frustration and subpar outcomes.When it comes to ensuring your home improvements stand the test of time, having the right tools at hand is crucial. I personally rely on a high-quality digital level because it provides precise measurements, especially on uneven surfaces, making sure that floors, ceilings, and installations like bathroom tiles are perfectly aligned. A cordless oscillating multi-tool has become a staple in my kit; its versatility allows me to perform tasks ranging from trimming baseboards to removing old grout without switching devices, saving both time and effort. To monitor the progress of complex projects, I recommend using project management apps like Trello or Asana, which help keep track of timelines, materials, and specific tasks, ensuring nothing falls through the cracks. Regular inspections combined with these tools allow for early detection of issues such as shifting subfloors or loose fixtures, enabling timely interventions that preserve your work’s integrity.
Lessons That Changed How I Approach Home Repairs
One of the biggest revelations I had was recognizing that superficial fixes, like caulking, only mask deeper issues. The real improvement came when I invested time in reinforcing wall studs with methods like ‘Stud-Lock’, which stabilized the structure and prevented gaps from reappearing. Also, I learned that meticulous surface preparation—removing old paint, debris, and loose drywall—sets a solid foundation for lasting fixes. Finally, embracing the idea that understanding the ‘why’ behind a problem transforms an amateur into a true craftsman, saving time and money in the long run.
Tools and Knowledge That Elevate Your Home Projects
My essential toolkit includes a high-precision digital level, which ensures perfect alignment in uneven spaces. A versatile oscillating multi-tool has been a game-changer for trimming baseboards or removing stubborn old caulk without fuss. For resources, I highly recommend books like «Home Repair Mastery» which dives deep into structural insights or online forums where seasoned professionals share real-world tips. Additionally, subscribing to industry blogs that discuss upcoming standards and innovations keeps me ahead in my craft, making each project smoother and more durable.
Take Confidence and Make the First Move Today
Remember, the key to lasting improvements is not just about the final look but understanding the subtle structural dynamics that influence your home’s integrity. With patience and the right mindset, you can turn frustrating gaps into flawless edges that stand the test of time. Don’t be afraid to start—every expert was once a beginner. Your home deserves that attention to detail; your effort will translate into beautiful, durable results that you can be proud of.