I remember the first time I installed vinyl planks in my living room. Everything seemed perfect—until I noticed those tiny gaps starting to show up between the planks. At first, I thought I could just ignore them, but as weeks went by, the gaps widened, dust and debris collected, and my beautiful floor started looking sloppy. It was frustrating, and honestly, I felt a bit overwhelmed. I knew there had to be a simple, quick fix—and that’s when I discovered the blue tape tactic that transformed my approach.
My Lightbulb Moment: The Blue Tape Trick to Fix Vinyl Plank Gaps
After hours of researching online and messing around with various DIY solutions, I stumbled upon a simple trick using blue painter’s tape. It’s surprisingly effective for sealing those pesky gaps—quick, clean, and inexpensive. In this post, I’m going to share exactly how I did it, along with some tips I picked up along the way. Trust me, if you’ve been battling gaps in your vinyl flooring, this might just become your go-to hack.
Will This Really Work for My Floors? Ask the Helpful Neighbor
Early on, I made the mistake of assuming this was only suitable for small gaps or minor imperfections. Spoiler alert: I was wrong—the blue tape method works wonders for gaps up to a quarter-inch wide, provided you apply it correctly. I once tried a sticky adhesive meant for floors, but it ended up damaging the planks. That taught me the importance of using proper materials—like painter’s tape—so I could fix the gaps without risking damage. Curious if this will work for your situation? I’ll guide you through the process step-by-step so you can see for yourself.
And if you’re wondering whether this solution is just a temporary fix or a DIY disaster waiting to happen, rest assured, I came through a few experiments and can tell you exactly what to do to get long-lasting results. Plus, I’ll share a few pro tips to prevent those gaps from forming again, so you can enjoy a flawlessly installed floor for years to come.
Now, let’s dive into why paying attention to gaps matters—and how this simple trick can save you a lot of hassle later.
Prepare Your Workspace and Materials
Start by clearing the area around the affected vinyl planks. Gather blue painter’s tape, a utility knife, a straight edge or ruler, and a clean cloth. I remember the first time I attempted this, I laid all tools out on a tarp to keep things organized. Ensuring a tidy space helps you work efficiently and prevents accidental damage.
Assess the Gaps and Plan Your Approach
Identify which gaps need sealing—measure their width with a ruler or tape measure. For gaps up to a quarter-inch wide, this method works best. During my first attempt, I found that larger gaps required a different approach, but for minor imperfections, tape was perfect. Mark the spots lightly with a pencil if necessary, but be sure to erase or clean the area afterward to avoid residue.
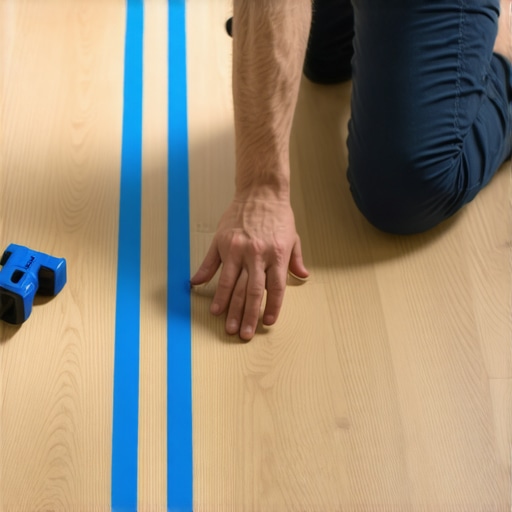
Apply Blue Tape Precisely Along the Gaps
Carefully lay the blue painter’s tape along the length of each gap, pressing firmly to ensure good adhesion. Use the straight edge as a guide to keep the tape straight, especially for longer runs. I once applied tape too haphazardly, which resulted in uneven sealing; now I always use a ruler to guide my straight lines. The tape acts as a barrier, preventing debris from falling into the gaps and making subsequent filling easier.
Fill the Gaps with Compatible Sealant or Caulk
If you choose to fill the gaps, use a matching vinyl or flooring-specific sealant. Apply a thin bead directly over the tape, squeezing gently to avoid excess. During one DIY project, I used a basic caulk, but it wasn’t flexible enough, causing it to crack over time. Follow the manufacturer’s instructions for curing time. Once the sealant sets, carefully peel away the tape, revealing clean, sealed gaps.
Finish and Protect Your Flooring
After removing the tape, inspect the sealed areas for any unevenness or leftover residue. Lightly wipe with a damp cloth to clean adhesive traces. To prevent future gaps, consider acclimating your flooring before installation and avoiding excessive moisture. This method has saved me repeated repairs, and I’ve found it’s especially effective when combined with proper subfloor preparation.
Additional Tips for Long-Lasting Results
For best results, regularly check your flooring, especially after seasonal changes, as expansion and contraction can cause new gaps. If gaps reappear frequently, you might want to explore more comprehensive solutions like a professional reflooring or consulting experts who specialize in flooring installation. For a variety of ideas to upgrade your home’s baseboards and enhance your interior style, check out this baseboard makeover guide. Staying proactive keeps your floors looking fresh and smart for years to come.Many homeowners and even some pros overlook critical details when it comes to installing carpets, showers, and baseboards. While the basics seem straightforward, misconceptions abound that can lead to costly mistakes. For example, it’s a common belief that simply choosing the right materials guarantees a perfect finish, but in reality, installation nuances determine long-term success. One such nuance is the importance of proper subfloor prep, which is often underestimated. Skipping this step can cause uneven flooring, squeaks, or gaps that compromise durability. A study by the National Wood Flooring Association emphasizes meticulous subfloor assessment to prevent misalignments and fissures over time.
What most people get wrong is assuming that adjusting just the surface will fix underlying issues. For instance, trying to hide a misaligned baseboard with caulk is a temporary fix at best. Instead, understanding the underlying cause—like wall bowing or framing issues—can save a lot of trouble. Similarly, with showers, many believe waterproofing is just about sealants, but advanced shower waterproofing requires a thorough approach. Neglecting shower pan slope or drainage design leads to leaks and mold, often only discovered after significant damage.
In the carpet world, the common myth is that stretching alone achieves a flawless look. However, improper stretching techniques can cause seams to pucker or ripple, especially in high-traffic areas. Pro tips include using power stretch methods and heat-seaming for high piles, which can be learned from expert guides. Have you ever fallen into this trap? Let me know in the comments.
Addressing such misconceptions and understanding the subtle details can mean the difference between a professionally finished space and one that requires frequent repairs. From perfecting the scribing technique for uneven walls to selecting the right adhesive for tile transitions, these hidden nuances can elevate your DIY projects or save time and money when working with professionals. If you’re ready to dive deeper into advanced installation techniques, check out more of our detailed guides, like how to create a spa-like shower experience or the latest baseboard trends for 2025.
How do I maintain my flooring and finishes over time?
Maintaining your installed flooring, baseboards, and shower fixtures is crucial for long-lasting beauty and performance. The right tools and routine care can prevent small issues from becoming costly repairs. I recommend investing in a high-quality oscillating multi-tool, such as the Fein MultiMaster, which I personally use for precision caulking removal and minor adjustments around baseboards and tile edges. Its versatility allows me to seamlessly cut back caulk, remove grout, or sand uneven surfaces without damaging surrounding materials.
For cleaning, a microfiber mop with a gentle, pH-balanced cleaner is essential. I avoid harsh chemicals, which can degrade finishes over time. Regularly inspecting grout lines with a handheld flashlight helps me catch early signs of mold or cracks, enabling quick repairs with epoxy grout — a reliable fix I swear by for durable sealing, as discussed in this in-depth guide.
Using a moisture meter, like the moisture prevention tools discussed in the professional guides, can help monitor humidity levels in bathrooms and prevent warping or mold growth, especially in showers. Additionally, I recommend implementing a regular sealing schedule for grout and silicone joints—this simple step drastically extends the lifespan of water-resistant areas.
Scaling your maintenance efforts effectively
If you’re looking to scale your maintenance, consider investing in a steam cleaner for deep cleaning of tiles and grout lines. It not only sanitizes surfaces but also enhances longevity. For larger projects or homes with multiple floor zones, creating a maintenance checklist helps stay organized and ensures nothing gets overlooked. Don’t forget to periodically service your tools, like lubricating oscillating tools and replacing blades, to keep your repair work efficient and precise. The future of flooring maintenance is pointing toward smart moisture sensors and automated cleaning systems, which I predict will become standard for proactive home care. To get inspired, explore the upcoming baseboard trends of 2025.
Try integrating these maintenance tools and routines today, and you’ll find that your flooring and fixtures stay in top shape longer, saving you time and money. Whether you’re a DIY enthusiast or working with a professional, mastering the upkeep process ensures your beautiful results last for decades.
What I Wish I Knew When I Started Installing Floors
One of the most eye-opening lessons I learned is that the finest materials mean little without proper preparation. Skipping subfloor assessment or neglecting acclimation can turn a smooth installation into a saga of gaps and warping. I also discovered that patience in measuring and precise scribing anchors the overall quality—rushing often leads to misaligned seams and annoying gaps. Furthermore, understanding the subtleties of expansion and contraction makes a difference; small adjustments during installation can prevent future issues. Finally, I realized that no DIY project is complete without ongoing maintenance—lifestyle and seasonal changes continually test our careful work, so scheduled inspections and quick repairs are essential to keep floors looking pristine for years.