Ever cracked open a can of paint or started a flooring project only to realize that your older carpet tack strip is sabotaging your entire day? I remember the first time I tried to replace my living room carpet, only to be met with stubborn nails and one badly split tack strip. That lightbulb moment hit me hard: if I want flawless floors in 2026, I need smarter tricks, not more brute force.
Why Tack Strips Are The Hidden Enemy in Modern Floor Installations
Modern flooring demands precision and patience, especially when renovating homes or upgrading from your tired carpets. Tack strips are a small but mighty component, often overlooked until they cause tension – gaps, uneven surfaces, or even damage to your new floor. The bottom line? Properly working with tack strips can significantly extend the lifespan of your flooring and avoid costly repairs down the line.
Is Tack Strip Trickery Actually Worth It?
Initially, I made the mistake of ignoring the importance of pre-planning my tack strip removal and installation. I thought, “How hard can it be?” That mistake cost me a lot of swear words and extra work. It turns out, there are proven tricks that make this step far less painful and more effective, especially with the innovations coming in 2026. For example, using specific tools and techniques can help you lift and re-set tack strips without damaging the subfloor or ruining your new carpet. If you’re curious about officially approved methods, the experts at [Carpet Install Secrets](https://tilecraftsmens.com/carpet-install-secrets-achieving-flawless-results-every-time) reveal some game-changing tactics.
So, whether you’re tackling a DIY project or hiring a pro, understanding the tricks for handling tack strips can be a game-changer. Ready to learn the top three tricks? Keep reading, because these tips will save you time, money, and stress in 2026 and beyond.
Prepare Your Tools and Environment
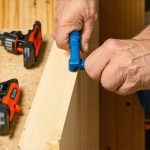
Start by gathering essential tools: a pry bar or 2-in-1 flooring tool, a hammer, a sturdy putty knife, safety glasses, and gloves. Clear the area of furniture and old carpet, and ventilate the room. I once tackled this project during a weekend, setting up a makeshift workbench with a heavy-duty tarp to catch debris, which kept the workspace clean and reduced frustration.
Carefully Remove the Old Tack Strip
Loosen the Nails and Pry Up
Position the pry bar beneath the tack strip’s edge, gently prying upwards while supporting the surrounding subfloor with your foot or a block of wood. Think of it like removing a stubborn nail without damaging the wood beneath. Apply steady pressure; avoid brute force to prevent splitting the subfloor. I once used a flat pry bar at a shallow angle, which minimized damage and made the process smoother.
Cut Through Adhesive or Residue
If the tack strip is glued or has adhesive residue, lightly score the area with a utility knife or a scraper before prying. This prevents peeling the subfloor or leaving debris that can interfere with the new install. A quick tip: using a heat gun can soften adhesive, making removal easier and less damaging.
Prepare for Reinstallation
Inspect the subfloor for damage or splinters, and sand down any rough edges. Decide whether to reuse or replace the tack strip—modern designs in 2026 favor thinner, more flexible strips that conform better to new flooring. For precise positioning, measure the width of your new carpet or floor material, and mark the desired line for the tack strip, ensuring it’s snug but not tight. I once misaligned the tack strip, causing uneven carpet tension, so double-check measurements before nailing it down.
Install the New Tack Strip
Position the tack strip along your marked line, ensuring the pins face into the room, and the narrow, sharp nails are angled downward and toward the wall. Use the hammer to lightly tap the strip into place, staggering nails for secure anchoring. For larger rooms, join multiple strips with precise overlaps, avoiding gaps. In my experience, lightly pre-drilling holes can prevent splitting, especially with dense subfloor materials.
Stretch and Secure the Carpet or Floor
With the tack strip installed, proceed to stretch your carpet, ensuring tacks grip firmly, or install your new flooring confidently. Properly aligned tack strips not only provide excellent hold but also prevent slippage or unsightly gaps. When replacing the carpet, use a power stretcher for a tight fit. For more advanced techniques, check out the latest tips on carpet installation secrets.
While many DIY enthusiasts believe they understand the essentials of home upgrades, there are subtle nuances and misconceptions that can derail even seasoned pros. A common myth is that replacing baseboards requires only a simple cut and nail — but in reality, mastering scribing to uneven walls and coping corners with precision can make or break the final look. Skipping these details often results in gaps or gaps that gape, undermining your craftsmanship. When it comes to showers, many assume that sealing the edges with standard caulk suffices; yet, without proper waterproofing behind tiles and careful inspection of niche waterproofing, hidden leaks can develop—causing costly damage over time. Advanced installers know that using epoxy grouts and flexible waterproof membranes in the correct areas prevents mold and rot, extending the life of your shower. Flooring installation is another realm rife with misconceptions. For example, laying vinyl planks directly over uneven subfloors seems harmless, but in truth, it leads to telegraphing, buckling, and a short-lived finish. Experts recommend thorough subfloor preparation, including moisture testing and leveling, to ensure longevity and stability. Here’s a question for the advanced reader: How can subtle subfloor movements undermine your flooring much faster than visible issues? Studies show that even minor shifts—less than a millimeter—can cause seams to separate and tiles to crack over years if not properly accounted for during installation. Avoiding these pitfalls means investing in proper prep work and understanding the dynamic stresses that building materials endure. Also, many overlook the importance of environmental factors—like humidity and temperature fluctuations—that affect everything from flooring to baseboards. Remember, the goal isn’t just a pretty finish, but durable, long-lasting results. Learn more about proper shower installation techniques or discover tips for durable flooring upgrades to elevate your project. Have you ever fallen into this trap? Let me know in the comments.
Keep It Working: Tools I Recommend for Home Upgrades
Achieving professional-quality results in projects like carpeting, shower upgrades, or flooring hinges on having the right tools and knowing how to use them effectively. My go-to equipment includes a high-quality oscillating multi-tool, which excels at precision cuts around baseboards and tight corners. The versatile blade attachments let me remove old caulk or make delicate trims without damaging surrounding surfaces. For larger demolition tasks, a heavy-duty Ramset nail gun is invaluable, especially when installing new tack strips or securing baseboards; it saves me time and ensures consistent depth and placement.
The importance of a magnetic stud finder cannot be overstated when you’re dealing with hidden wall obstructions or ensuring secure anchor points for new fixtures. I prefer models with deep scanning capabilities and live wire detection, like the Zircon MultiScanner, to prevent accidental hits during wall modifications. For leveling surfaces and ensuring accurate alignment, a laser level is a must. It dramatically reduces guesswork when aligning baseboards or installing shelving, leading to cleaner, straighter finishes. I often use the Bosch GLL3-330C, which offers a 360-degree line for multi-angle projects.
When tackling complex waterproofing or moisture prevention in showers, a digital moisture meter aids in verifying the dryness of surfaces before sealing or tiling. Consistent testing with the pinless Hygrometer helps me avoid interior damage caused by unseen dampness. Moreover, investing in a quality damp cloth or microfiber towels ensures clean, streak-free installation of sealants and adhesives, especially around shower niches and edge joints. Proper tools enable better craftsmanship, reduce frustration, and extend the lifespan of your upgrades.
Looking Ahead: The Future of Home Improvement Tools
Predictions suggest that smart tech will increasingly integrate into renovation tools. Imagine laser levels that automatically adjust for uneven surfaces or moisture meters connected to your smartphone app to track humidity trends over time. These innovations promise to make home upgrades more precise and durable, saving you time and money in the long run. For a sneak peek into upcoming trends, check out the latest insights at our guide to 2025 flooring tips.
How do I maintain tools over time?
Proper maintenance involves regular cleaning, especially after messy tasks like adhesive application or grout sealing. Lubricate moving parts periodically, check for worn-out blades or batteries, and store tools in a dry, organized space to prevent rust and damage. Using protective cases and following manufacturer instructions extend the life of your equipment, ensuring top performance project after project. I recommend scheduling quarterly check-ups with your tools to replace consumables before they cause issues. Investing a little time in upkeep now pays dividends by keeping your tools reliable for future projects.
Remember, choosing the right tools makes a significant difference in the outcome of your renovations. Don’t hesitate to experiment with some of these essentials—and try implementing a laser level or moisture meter on your next project for more precise results. For more advanced tips, visit our comprehensive renovation advice.
What I Wish I Knew About Tack Strips Before Starting
- Patience beats brute force every time: Rushing removal or installation can cause damage and add to your workload. Learning to work with delicate tools and proper techniques saves time and prevents costly mistakes.
- Preparation is everything: From selecting the right tools to inspecting the subfloor, thorough prep work creates a solid foundation for success. Skipping steps often leads to uneven surfaces or future gapping.
- Modern tack strips are game-changers: In 2026, new designs offer more flexibility and easier installation, which means less fuss and more professional results, even for DIY enthusiasts.
- Understanding the anatomy of tack strips improves outcomes: Knowing which side faces into the room and how nails are angled helps ensure your carpet stays taut and looks perfect for years.
- Careful removal preserves subfloor integrity: Using specific pry tools and scoring adhesive residues minimizes damage, making reinstallation smoother and more secure.
Tools and Resources That Elevate My Flooring Game
- Oscillating multi-tool: Its precision makes removing old adhesives and trimming underlayment effortless. I trust brands like Dremel for durability and versatility.
- Heavy-duty Ramset nail gun: Speeding up tack strip installation, it provides consistent depth control. The power reduces fatigue and ensures straight, secure placement.
- Magnetic stud finder: Ensuring nails hit the right spot and avoiding hidden wiring is crucial. Zircon’s models with deep scanning capabilities give me peace of mind.
- Laser level: Perfectly aligning tack strips and baseboards has never been easier. Bosch’s GLL3-330C offers 360-degree lines for comprehensive coverage.
- Digital moisture meter: Prevents future problems by confirming the subfloor’s dryness before proceeding. I rely on this to avoid costly repairs down the line.
Embrace Innovation, Elevate Your Craft
As technology advances, so do the tools that make flooring projects more accurate and less stressful. Future smart tools—like laser levels that auto-calibrate or moisture meters synced with apps—are already on the horizon, promising even higher success rates and durability. Staying curious and investing in quality tools now pays dividends for all your home upgrades. Remember, proper maintenance, like regular cleaning and storage, keeps your tools reliable for consistent, professional results.
Your Next Strong Step Forward
Mastering the subtle art of tack strip work is more than just a skill; it’s a pathway to achieving that flawless finish you desire for your home. Every successful project boosts your confidence, pushing you toward more ambitious renovations. So, why not start with the next room? Equip yourself with the right tools, learn the secrets of proper installation, and watch your floors transform in 2026 and beyond.
Have you ever faced challenges with tack strips that seemed insurmountable? Share your stories below—I’d love to hear how you tackled them!
,