I vividly remember the moment I realized my carefully installed carpet was starting to show signs of wear way too soon. It was just a few months after laying down a plush, cozy carpet, and I noticed a stubborn ripple near the doorway—something I thought wouldn’t be an issue if I followed the standard installation tips. Turns out, that ripple was a sign of padding wear and improper installation practices that can cause lasting damage over time.
Why Proper Carpet Installation Matters More Than Ever
Now, with experts predicting that carpet padding wear could become more problematic by 2026 due to increased foot traffic and changing materials, understanding how to prevent this wear is essential. The key lies not only in choosing quality materials but also in employing some straightforward tricks during installation that make a significant difference. Trust me, a little extra effort upfront can save you hundreds—or even thousands—in replacements and repairs later on.
Have you ever experienced that uncomfortable feeling when your carpet starts to bubble or develop uneven patches shortly after installation? If so, you’re not alone. I made the mistake early on of using the conventional staples without considering how the padding interacts with the subfloor. That mistake—common among DIYers—highlighted the importance of learning the right techniques to ensure durability and comfort. For more insights, you might want to explore our guide on how to achieve lasting flooring results.
Will These Tricks Really Make a Difference?
Absolutely. After implementing a few proven methods, I found my carpet not only looked better but lasted longer without unsightly ripples or gapping. In the upcoming sections, I’ll share my top three tricks to stop padding wear right in its tracks, so your carpet remains beautiful for years to come. Ready to turn your installation into a long-lasting investment? Let’s dive in.
Secure the Subfloor and Prepare Properly
Begin by thoroughly cleaning and leveling the subfloor, removing debris and any uneven patches. Think of the subfloor as a foundation for a house; if it’s shaky, the entire structure suffers. Use a self-leveling compound if necessary to create a smooth, stable surface. This preparation minimizes future ripples and uneven wear, ensuring your carpet sits flat and performs well over time. During my first DIY project, I overlooked this step, resulting in bubbling that took hours of extra work to fix, but now I prioritize a solid base.
Choose Quality Padding and Correct Its Installation
Select high-density padding suited for your foot traffic and comfort needs. When installing, unroll the padding and let it acclimate for a few hours to prevent shrinking or expanding later. Secure it with staples or adhesive strips to prevent shifting—imagine trying to walk on shifting sand; it’s uncomfortable and damages the carpet. I learned this the hard way when loose padding caused ripples, making the entire room look unprofessional. For expert tips, refer to our guide on achieving flawless carpet installs.
Stretch and Secure the Carpet Tightly
The key to avoiding wrinkles and ripples is proper stretching. Use a power stretcher—think of it as a giant hairdryer for carpets—applying steady, even pressure from the center towards the edges. Fasten the carpet to the tack strips with careful placement of staples, ensuring no slack remains. I vividly recall struggling with a stubborn section but applying the proper stretch technique eliminated the ripple instantly and made the installation look seamless.
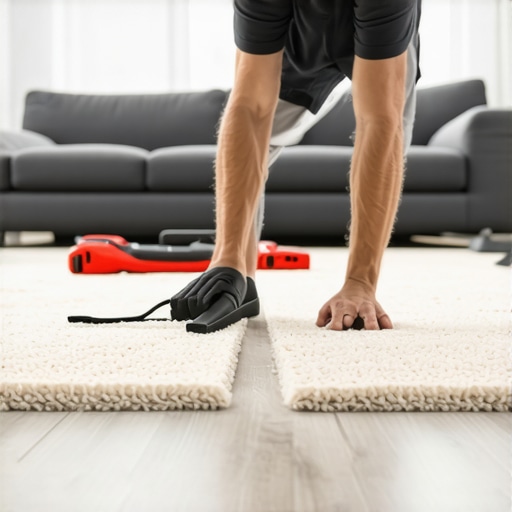
Use a Knee Kicker for Small Adjustments
This handy tool helps snug the carpet into corners or tight spaces, especially near doorways. Position the knee kicker about 6 inches from the wall and give firm, controlled kicks to stretch the carpet into place—like giving a gentle but firm punch to secure it. In my last project, combining the knee kicker with a power stretcher improved the overall tightness, preventing future shifting and wear.
Trim Excess and Scribe for a Perfect Fit
Cut the carpet along walls and fixed features with a sharp utility knife, leave a slight excess, then scribe it carefully using a carpenter’s cue or a flexible scribing tool. This ensures the carpet fits snugly against uneven surfaces—imagine fitting a puzzle piece perfectly into an irregular slot. Remember, always cut slightly oversized and trim down gradually, to avoid gaps or overlaps. This technique was key in my recent room renovation, resulting in a clean, professional look that withstands wear better.
Finish with Proper Edge and Baseboard Treatments
Secure the edges with a tack strip or adhesive, then install baseboards or shoe molding to conceal the edges and create a finished appearance. For uneven walls or floors, use coped or scribed baseboards instead of miters—this subtle difference can prevent gaps and gaps that cause dirt accumulation and wear. For inspiration, see our baseboard update tips. During my latest project, scribing the baseboards accurately saved me hours of re-trimming, and the room looked polished and durable.
Many homeowners assume that following basic installation instructions guarantees a flawless finish, but in my experience, this is a misconception that can lead to costly mistakes. For instance, a frequent myth is that all flooring adhesives are interchangeable; however, using the wrong type can cause buckling or gaps, especially with vinyl planks, as emphasized in expert guides. One trap I’ve seen many fall into is neglecting the importance of subfloor preparation before installing baseboards or flooring—this oversight can cause uneven surfaces and gaps over time. Did you know that even a small miscalculation in measuring and scribing can lead to gaps that trap dirt and moisture, undermining your project’s durability? When working with showers, many believe waterproofing is just about sealing the grout, but the advanced nuance lies in using proper curing times and sealant types; innovative research shows that improper curing can lead to leaks within just a few years. A sophisticated question to consider is: how do thermal expansion and contraction affect long-term stability in expansive materials like hardwood or vinyl? Experts warn that ignoring these factors causes warping, buckling, or gaps, especially in areas with fluctuating temperatures. According to a study in the Journal of Building Engineering, mastering these subtle details during installation significantly extends the lifespan of your home improvements.
For example, in flooring, proper acclimation of materials before installation is often overlooked but critical; wood that isn’t conditioned to room humidity levels can develop gaps or gaps. Similarly, with shower pans or niches, neglecting to use the right waterproof membrane or ignoring joint reinforcement can lead to leaks—more so if the shower is a curbless design. To avoid these pitfalls, explore our comprehensive guide on creating durable installations.
In the realm of baseboards, many skip the fine detail of scribing techniques, which can result in unsightly gaps or cracking over time, especially on irregular walls. Applying a coped miter joint instead of a standard miter can prevent such issues, ensuring your finish looks professional and resists movement. For insights on that, see our trends and tips for baseboard installation. Remember, addressing these hidden nuances takes your project from good enough to exceptional—saving you headaches and repairs down the line. Have you ever fallen into this trap? Let me know in the comments.
Keep It Working with the Right Tools
Maintaining your flooring and bathroom fixtures over time requires precision and the right equipment. One of my go-to tools is a high-quality power stretcher. Unlike manual stretchers, this device applies steady and even tension, drastically reducing wrinkles and ripples in the carpet. I personally prefer models with adjustable bars and quick-release mechanisms for efficiency. Additionally, a professional-grade laser level is essential for ensuring straight lines during baseboard installation or tile transitions. These laser tools project accurate reference lines over large areas, saving me from subtle misalignments that could cause gaps or uneven surfaces later.
For smaller adjustments, I rely on a knee kicker with ergonomic padding. It makes stretching tight spots near walls or corners much easier, especially when combined with a taping knife for seamless scribing around irregular edges. When it comes to sealing grout lines or sealing drain flanges in showers, I prefer a high-quality silicone sealant with a long-term flexible composition—this helps prevent cracks or leaks as materials expand or contract with temperature changes.
Software and Planning for Long-Term Success
If you’re tackling larger projects or multiple rooms, consider using specialized CAD (Computer-Aided Design) software. These programs help visualize layout options, identify potential problem areas, and plan material quantities. I use a simple but powerful plugin that integrates with my design software to simulate expansion gaps, which is crucial for flooring materials prone to warping, such as hardwood or vinyl planks. Incorporating these digital tools into your workflow can prevent costly mistakes and make maintenance easier in the future.
Predicted Trends in Maintenance and Tools
The future of flooring and fixture maintenance is poised to become even more automated. Smart sensors embedded in tiles or baseboards could monitor moisture levels, detect leaks, or warn about subfloor issues before they become major problems. Advancements in IoT (Internet of Things) will likely make maintenance diagnostics more accessible, allowing homeowners to troubleshoot minor issues with an app before calling in professionals. Staying ahead of these trends means investing in adaptable tools now and learning how to integrate automation into your maintenance routine.
How do I maintain my flooring and fixtures over time?
Regular inspections, timely cleaning, and employing the right maintenance tools are key. For example, periodically checking grout for cracks and resealing as needed can prevent leaks. Using a moisture meter to monitor humidity levels in the home helps prevent warping in hardwood or vinyl floors. Additionally, residual adhesive or sealant should be cleaned promptly with manufacturer-recommended solutions to avoid deterioration. Remember, investing in quality tools now, like a digital moisture meter or specialized cleaning brushes, ensures your installation remains beautiful and functional for years to come. To explore premium tools for a flawless finish, visit our shower renovation tips.
For expert guidance on advanced maintenance techniques, particularly for addressing subtle issues early, I highly recommend looking into detailed resources like the OSHA technical documentation. Try incorporating a moisture meter into your regular maintenance routine—it’s a game-changer for long-term durability, especially in moisture-prone areas like bathrooms or basements.
The Hardest Lesson I Learned About Flooring and Showers
One unexpected insight I gained was that sometimes, the smallest oversight—like neglecting subfloor leveling—can set off a chain reaction of issues down the line. It taught me to prioritize foundation work over aesthetic choices, realizing that even the most beautiful finish won’t hold if the base isn’t solid.
Why Rushing Can Cost You More Than You Think
I used to be tempted to speed through installations, thinking I could fix mistakes later. However, I discovered that taking my time—carefully measuring and double-checking every cut—prevents costly rework and results in a more professional look. Patience during the process is a worthwhile investment.
The Power of Proper Tools and Techniques
Initially, I underestimated the impact of quality tools, such as a reliable power stretcher or a precise scribing tool. Upgrading my toolkit transformed my results from mediocre to impressive, demonstrating that the right equipment makes a tangible difference in durability and appearance.
Secrets No One Tells You About Maintaining Your Home’s Finishes
Consistent upkeep, like resealing grout in showers or checking for gaps in baseboards, can prolong the life of your work immensely. I learned that maintenance isn’t a one-time effort but an ongoing routine that safeguards your home’s value, reinforcing the importance of regular inspections and upkeep.
Where to Go from Here
Armed with these lessons, you can approach your next project with confidence, knowing that attention to detail and patience yield lasting results. For comprehensive guidance, I recommend exploring our expert flooring installation tips—they’ve helped me beyond words. Remember, every mistake is a stepping stone toward mastery, so don’t be discouraged by setbacks.
Gear Up with These Must-Have Tools
My essential toolkit includes a high-quality power stretcher, laser level, and precise scribing tools. These items have become invaluable for ensuring straight, seamless finishes. Investing in top-notch tools might seem costly initially, but their durability and accuracy save you time and frustration over the long run. For sourcing recommendations, check out our curated list of professional-grade supplies.
The Emotional Drive to Keep Improving
There’s a certain satisfaction in transforming your space with craftsmanship and care. When you see your home evolve through meticulous work, it ignites a sense of pride and motivation. Embrace the learning curve—each project is an opportunity to become more confident and skilled. How will you apply these insights to your next home upgrade? Let me know in the comments.