
My First Encounter with Hardwood and Vinyl Floors
Growing up, I always admired the elegance of hardwood floors and the practicality of vinyl. When I decided to renovate my living space, I was eager to learn the secrets of expert flooring installation. I remember the first time I attempted to install vinyl flooring myself; it was a mix of excitement and a few missteps that taught me valuable lessons about patience and preparation.
Key Preparation Steps That Make All the Difference
From my experience, the foundation of a flawless flooring project begins long before the first plank is laid. Ensuring the subfloor is perfectly level and clean is crucial. I always recommend checking for moisture issues and using quality underlayments, which I discovered through reputable sources like expert flooring tips. Proper preparation saves time and prevents future problems.
Choosing the Right Tools and Materials for Success
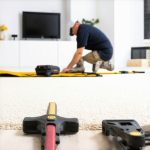
Over the years, I’ve learned that investing in the right tools, such as a quality tape measure, spacers, and a rubber mallet, really pays off. For hardwood, I prefer pre-finished options for a quicker installation, while vinyl planks with click-lock systems have made DIY projects more manageable. My advice? Don’t skimp on quality—your floors deserve the best.
My Personal Tips for a Flawless Finish
One trick I swear by is acclimating flooring materials in the room for at least 48 hours. This helps prevent expansion or contraction after installation. Also, I always double-check measurements before cutting, which saves me from costly mistakes. When it comes to finishing touches, I like to add baseboards, which I believe elevate any floor’s appearance. For a seamless look, I follow the latest baseboard trends.
How Can I Ensure Long-lasting Durability?
From my experience, choosing durable materials suited to your lifestyle is essential. For high-traffic areas, I opt for thicker vinyl planks or engineered hardwood. Regular maintenance, like gentle cleaning and avoiding excess water, also prolongs the life of your floors. I’ve found that applying a protective finish or sealant can help keep hardwood looking new for years.
Why is Proper Installation So Critical for Long-term Beauty?
I’ve realized that even the most beautiful flooring can fall short if not installed correctly. Proper installation not only enhances appearance but also prevents issues like gaps, buckling, or uneven surfaces. When I hired a professional for my last project, I was impressed by how their expertise produced a flawless finish that I couldn’t have achieved on my own. For detailed guidance, I recommend visiting expert installation tips.
If you’re considering a home upgrade, don’t hesitate to share your experiences or ask questions in the comments below. I love exchanging ideas and helping others achieve their dream floors!
What Are the Hidden Factors That Affect Your Floor’s Longevity?
Many homeowners focus on choosing the right materials, but the real secret lies in understanding the subtle yet critical factors influencing your floor’s durability. For instance, moisture management plays a pivotal role. Excess humidity can cause engineered hardwood to warp or vinyl planks to buckle, especially in areas like basements or bathrooms. This is why I always recommend comprehensive moisture testing before installation, as detailed in expert flooring tips. Proper ventilation and using moisture barriers can dramatically extend your floor’s lifespan.
How Can You Optimize the Installation Process for Flawless Results?
While many DIY enthusiasts attempt to install floors themselves, understanding the nuances of proper installation can make a significant difference. Subfloor preparation is often overlooked but is absolutely vital. I suggest leveling the subfloor meticulously and ensuring it’s clean and dry before laying down any flooring. Employing the right tools, such as a tapping block and spacers, ensures tight, even joints. Moreover, following manufacturer guidelines on acclimation—allowing materials to adjust to room temperature for 48-72 hours—can prevent future issues like expansion or contraction. For more detailed guidance, visit expert flooring installation tips.
What Are The Most Overlooked Maintenance Practices That Preserve Beauty?
Even after expert installation, ongoing maintenance is crucial. Regular cleaning with gentle, pH-neutral products prevents buildup of dirt and debris that can scratch surfaces. In high-traffic areas, consider applying a protective sealant or finish periodically—this acts as a barrier against spills and wear. For hardwood, using furniture pads and avoiding excessive water can prevent surface damage. Additionally, routine inspections help identify early signs of damage, allowing for timely repairs that save money and preserve the aesthetic. Want to learn more about maintaining your floors? Check out durable flooring maintenance tips.

How Do Emerging Trends Influence Long-term Flooring Strategies?
Staying ahead of trends can ensure your investment remains stylish and functional for years. For example, the rise of wider planks and matte finishes in hardwood flooring offers a modern look with practical benefits—wider planks require fewer seams, and matte finishes hide scratches better. Similarly, incorporating sustainable materials like bamboo or cork not only supports environmental goals but also provides excellent durability. Considering these trends in your planning phase can help you choose flooring that ages gracefully. For a glimpse into upcoming styles, visit baseboard trends or explore innovative flooring options that marry style with longevity.
Reflecting on My Flooring Journey: Beyond Basic Tips
As I’ve delved deeper into the world of flooring over the years, I’ve realized that the nuances of installation and maintenance often determine whether a floor ages gracefully or succumbs to premature wear. My personal experience has taught me that understanding the subtle interplay of materials, environment, and craftsmanship can elevate a simple flooring project into a lasting investment.
What Are the Hidden Factors That Influence Durability?
One aspect I initially underestimated was the importance of climate control during and after installation. Fluctuations in temperature and humidity can cause hardwood to expand or contract, leading to gaps or buckling. I learned that installing a humidifier or dehumidifier, depending on your climate, can stabilize these conditions. For vinyl, I found that proper acclimation—allowing planks to adjust in the room for 48 hours—prevents future issues like warping. These small steps, often overlooked, are vital for long-term success, as highlighted in expert installation guides.
How Can Advanced Maintenance Practices Extend Your Floor’s Life?
Beyond routine cleaning, I discovered that protective measures such as applying a high-quality sealant to hardwood or using furniture pads are game-changers. For high-traffic areas, I recommend periodic re-sealing or finishing to keep surfaces resistant to scratches and spills. Interestingly, I’ve also found that integrating modern cleaning technology, like microfiber mops and eco-friendly cleaners, helps preserve the material’s integrity. Regularly inspecting for early signs of damage, such as tiny scratches or loose planks, allows for prompt repairs, which can save you money and preserve the aesthetic for years. For comprehensive guidance, I turn to maintenance tips.
How Do Emerging Trends Shape My Long-Term Strategy?
Staying informed about trends has helped me choose flooring that remains stylish and durable over time. For example, wider planks and matte finishes have become my go-to choices—they hide imperfections better and give a modern, sophisticated look. Additionally, sustainable materials like bamboo offer not just eco-friendly benefits but also remarkable resilience. I’ve come to see that selecting materials with proven longevity and styling versatility ensures my floors will adapt to changing tastes and trends without needing frequent updates. For more on future-proofing your floors, explore trend insights.
What Are the Most Overlooked Aspects of Long-Term Flooring Success?
One overlooked factor is the importance of proper subfloor preparation—an area where I’ve seen many DIY projects falter. Ensuring the subfloor is perfectly level, dry, and free of debris is not just a step; it’s the foundation of durability. Skipping this step can lead to gaps, uneven surfaces, or even structural damage down the line. I’ve also learned that understanding the specific requirements of different flooring types—like the need for expansion gaps in hardwood or moisture barriers in vinyl—can prevent costly mistakes. For detailed strategies, I recommend visiting expert tips.
Inviting Your Insights and Experiences
Ultimately, every flooring journey is unique, shaped by individual environments, choices, and care routines. I’d love to hear about your experiences—what challenges have you faced, or what tips have worked best for you? Sharing our stories not only helps us grow as homeowners but also strengthens our community of enthusiasts committed to creating beautiful, durable spaces. Feel free to comment below or reach out through my contact page, and let’s continue this journey of learning together!
Unveiling the Secrets of Resilient Hardwood and Vinyl Floors
Over years of hands-on experience, I’ve come to appreciate that achieving longevity in flooring isn’t merely about selecting durable materials; it’s about understanding the complex interplay of environmental factors, installation techniques, and ongoing maintenance. For instance, I’ve observed that in regions with fluctuating humidity, using moisture barriers and climate control devices like humidifiers or dehumidifiers can prevent hardwood from warping—a lesson I learned after witnessing early signs of expansion in an unprotected dining room. Such nuanced approaches are documented in authoritative sources like expert flooring guides, emphasizing that proactive measures are essential for enduring beauty.
Innovative Techniques for Precision Installation and Long-term Performance
In my journey, I’ve discovered that meticulous subfloor preparation is often underestimated. Leveling, cleaning, and ensuring dryness are the backbone of a flawless finish. I’ve employed modern tools such as laser levels and moisture meters to enhance accuracy—investments that pay dividends in durability. Additionally, understanding the importance of expansion gaps, especially in large open spaces, helps prevent buckling over time. Following detailed instructions, like those in professional installation tips, has consistently resulted in seamless, resilient floors that withstand daily wear and tear.
Advanced Maintenance Practices for Preserving Aesthetic and Structural Integrity
My approach to maintenance has evolved to include proactive measures such as re-sealing hardwood surfaces periodically and employing microfiber cleaning tools that minimize scratches. High-traffic zones benefit from applying protective finishes, which act as barriers against spills and scratches—an insight I gained after experiencing minor surface damages that could have been prevented. Regular inspections reveal early signs of damage, allowing for cost-effective repairs. For comprehensive guidance, I recommend exploring durability-focused maintenance strategies.
Emerging Trends Shaping Future-Proof Flooring Choices
Staying ahead of trends is vital for long-term investment. I’ve incorporated wider planks and matte finishes into my projects, which not only offer a contemporary aesthetic but also hide scratches better—an advantage in busy households. Sustainable options like bamboo and cork have also gained popularity, combining environmental responsibility with impressive durability. These choices are supported by industry forecasts, such as those in trend reports, guiding me to select materials that will evolve gracefully with changing tastes.
Deepening My Expertise: The Nuances of Climate Control and Material Compatibility
One advanced aspect I’ve mastered is understanding how climate fluctuations influence material performance. For instance, in my renovation projects, installing a dedicated climate control system has minimized expansion and contraction issues, especially in environments prone to humidity swings. Additionally, selecting compatible accessories—such as the right underlayment for vinyl planks—has been crucial. This level of detail aligns with insights from expert installation strategies, which underscore that precision at every step ensures enduring results.
Engage and Share Your Flooring Experiences
In my ongoing quest for perfection, I invite you to share your challenges and successes. Have you encountered unexpected issues with moisture, or discovered innovative maintenance routines? Your insights enrich our community, helping others make informed decisions. Feel free to reach out through my contact page and join the conversation as we continue elevating our homes with resilient, beautiful floors.
Things I Wish I Knew Earlier (or You Might Find Surprising)
The Subtle Power of Proper Subfloor Prep
One of the biggest lessons I learned was how crucial meticulous subfloor preparation is. Initially, I underestimated its importance and faced issues like uneven surfaces and gaps. Once I started leveling and cleaning thoroughly, my floors looked flawless and stayed that way for years.
Climate Control Is a Game-Changer
In my experience, fluctuating humidity can cause hardwood to warp or vinyl to buckle. Installing a humidifier or dehumidifier has saved me from costly repairs. Embracing climate stability truly extends the lifespan of your floors.
Acclimating Materials Makes All the Difference
Allowing flooring materials to adjust to your room for at least 48 hours prevents future expansion or contraction issues. This simple step, often overlooked, has helped me avoid gaps and buckling.
The Power of Regular, Gentle Maintenance
Consistent cleaning with pH-neutral products and periodic resealing have kept my floors looking new. Using furniture pads and avoiding excess water also preserves their integrity over time.
Staying Ahead With Trends That Endure
Choosing wider planks and matte finishes has modernized my floors while hiding scratches. Sustainable options like bamboo not only look great but also hold up well in busy homes, proving that style and durability can go hand in hand.
Resources I’ve Come to Trust Over Time
- Expert Flooring Tips: This site offers comprehensive advice on installation and maintenance, which has deepened my understanding of durable flooring practices.
- Tilecraftsmen’s Guide: Their detailed guides on moisture barriers and climate control helped me protect my hardwood floors effectively.
- Industry Trend Reports: Following these has kept me informed about sustainable and resilient flooring options, ensuring my choices are future-proof.
Parting Thoughts from My Perspective
From my journey, I can say that achieving long-lasting hardwood and vinyl floors is about more than just selecting durable materials. It’s about understanding the nuanced environment, investing in proper installation, and committing to ongoing maintenance. These insights have transformed my approach from trial-and-error to confident decision-making. If this resonates with you, I’d love to hear your thoughts or experiences—sharing our stories can inspire others to create beautiful, resilient floors that last for years to come. Feel free to drop a comment below or reach out through my contact page. Remember, a little knowledge and effort today can lead to stunning results tomorrow.
4 thoughts on “Expert Flooring Installation Tips for Flawless Hardwood & Vinyl Floors”
Emily Carter
November 13, 2025 at 7:46 pmReading through this post really resonated with my own experience of installing hardwood in my living room. I completely agree that proper preparation is the foundation of a flawless finish. One thing I’ve found helpful is using a moisture meter during installation, especially in areas prone to humidity fluctuations. It’s incredible how much this can prevent buckling or warping over time. I also appreciate the emphasis on acclimating the flooring materials for at least 48 hours—this small step really made a difference in my project, preventing gaps after installation. I’ve also started adding a protective sealant every few years, which keeps my hardwood looking vibrant and resistant to everyday wear and tear. For those considering DIY projects, what other tips would you say are essential for beginners to ensure a professional-looking result? I’d love to hear different approaches from this community.
James Anderson
November 14, 2025 at 3:49 amI really appreciated this detailed walkthrough of the installation process. As someone who recently tackled a DIY vinyl flooring project in my basement, I can relate to the importance of a level and clean subfloor. I learned the hard way that rushing through subfloor prep can lead to uneven surfaces down the line. One thing I found particularly useful was employing a laser level to ensure consistency throughout the space, which significantly improved the final look and durability. Also, the tip about acclimating flooring materials resonates with me; I kept my vinyl planks in the room for a full 72 hours before installation, and I believe it made a noticeable difference in minimizing expansion-related issues later on. From your experience, what are some common mistakes beginners should avoid to prevent costly mistakes? I think even small oversights in the initial steps can have long-term impacts, so hearing other insights would be really helpful for those just starting out.
Linda Martinez
November 14, 2025 at 6:56 amThis post really hit home for me, especially the part about acclimating the flooring materials for at least 48 hours. I overlooked this step in my last project and ended up with some gaps that I couldn’t foresee until after installation. It’s eye-opening how such a simple process can affect the long-term appearance and stability of the floors. I also agree that thorough subfloor prep is crucial—skipping that can lead to uneven surfaces and future problems, no matter how high-quality the flooring is. I’ve found that investing in moisture barriers and using moisture meters has saved me from warping in humid months. For those who are considering DIY, what are your go-to tools for ensuring the subfloor is perfectly level? I’d love to gather more tips to improve my next installation. It’s inspiring to see how detailed planning and proper techniques can really make a difference in durability and look.
Michael Thompson
November 23, 2025 at 7:00 amReading this post really brought me back to when I first started tackling flooring upgrades in my home. One thing I learned early on is that the quality of your tools truly makes a difference—investing in a good taping tool and spacers can save a ton of frustration and time. I also found that acclimating hardwood or vinyl materials in the space for at least 48 hours helps prevent post-installation issues like gaps or buckling. Regarding moisture management, I installed moisture barriers in areas prone to humidity fluctuations, which has extended the lifespan of my floors significantly. Has anyone here experimented with eco-friendly or sustainable flooring options like bamboo or cork? I’m curious about the long-term performance and maintenance these materials require in different environments.