It was a typical Saturday morning when I finally looked around my living room and realized something was off—something missing. The walls felt plain, uninspired, and honestly, a little tired. I’d just finished a DIY project that had turned out great, but that empty wall space with plain, basic baseboards was bringing the whole room down. That lightbulb moment hit hard: the finishing touch wasn’t just about aesthetics; it’s about creating a space that truly feels like home. If you’ve ever felt that way, stuck staring at your walls thinking, “Something’s missing,” then you’re in the right place. Today, I’m going to share how a simple upgrade—adding decorative baseboards—changed my entire home vibe and how it can do the same for you.
Why baseboards are more than just a finishing touch
They might seem like small details, but believe me, they pack a punch. Upgrading your baseboards isn’t just about style; it’s a strategic move to elevate your entire interior design. When I first considered updating mine, I was worried about costs and whether it would really make a difference. Turns out, it’s a lot easier and more affordable than I imagined. Plus, [according to a recent study](https://tilecraftsmens.com/baseboard-trends-in-2025-fresh-styles-for-every-room), current trends point toward bold, decorative styles that can instantly refresh any space. Choosing the right baseboards can define your room’s personality—whether you prefer classic elegance or modern minimalism. Not to mention, well-chosen baseboards can actually protect walls from everyday scuffs and add a polished, cohesive look. If you’ve hesitated because of concerns about installation or style options, I get it. Early on, I made the mistake of choosing a generic design that didn’t match my aesthetic, and trust me, it stuck out like a sore thumb. But once I found the right style and proper installation techniques (which I learned from great resources like this [expert guide](https://tilecraftsmens.com/baseboards-makeover-elevate-your-interior-with-simple-updates)), everything changed. So, if you’re tired of gaps, scuffs, or just want to give your home a fresh new look, stick around. We’re about to dive into the practical steps for selecting and installing stunning, durable baseboards that elevate your entire space. Ready to transform your home? Let’s get started.
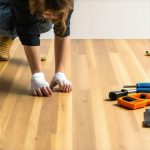
Prepare Your Workspace and Tools
Begin by clearing the room of furniture and decorations. Cover the floor with a drop cloth to protect it from dust and debris. Gather essential tools such as a miter saw, measuring tape, level, nail gun or hammer, finishing nails, caulk, and a pencil. I once neglected to tape the area and ended up with nail marks on the wall; sealing those took extra time, so now I double-check my setup before starting.
Measure and Cut the Baseboards Accurately
Calculate Lengths and Angles
Measure each wall segment carefully. Remember to add a little extra for complex corners. Use a tape measure and note down precise measurements. When cutting, set your miter saw to 45° for corner joints. I once mischecked my angle and had to re-cut a piece, which delayed the project but taught me the importance of double-checking measurements.
Join Pieces Seamlessly
Use coping or miter joints to connect baseboards neatly. Coping involves cutting the end of one piece to fit over the face of the adjoining board, creating a seamless corner. I prefer coping for its tight fit; however, it requires a steady hand and patience, especially when working with intricate corners.
Install the Baseboards with Precision
Position each piece against the wall, ensuring a snug fit. Use a level to confirm that the baseboards are straight. Nail into wall studs for secure attachment—if studs are missing, use appropriate anchors. When I first nailed my baseboards into drywall without studs, they came loose after a few months; now I always locate studs first.
Finishing Touches for a Professional Look
Apply caulk along the top edge and corners to fill gaps and create a smooth transition. After caulking, lightly sand any rough spots, then paint or stain your baseboards to match your decor. Once, I skipped sanding, resulting in a rough surface that detracted from the overall finish; I learned it’s worth the extra step for perfection.
Final Inspection and Adjustments
Step back and review your work. Look for uneven cuts or nail holes. Fill small gaps or nail holes with wood filler, then sand smoothly. These finishing details make the difference between a DIY look and professional quality. After fixing a crooked piece last time, I realized patience and attention to detail are essential for a flawless outcome.
Following these concrete steps ensures your baseboards not only look great but also last for years, elevating your home’s aesthetic significantly.
Many DIY enthusiasts and even seasoned homeowners often assume that flooring installation, baseboard finishing, carpet setup, and shower renovations are straightforward tasks, but the reality is much more nuanced. A prevalent misconception is that all flooring materials or installation methods are created equal—when in fact, choosing the wrong type or method can lead to costly mistakes down the line. For example, some believe that sticking to traditional nail-down wood flooring is always best, ignoring newer floating floors that offer easier installation and better moisture resistance, as highlighted in [expert flooring tips](https://tilecraftsmens.com/expert-flooring-installation-tips-for-lasting-results).
A common trap is neglecting the subfloor’s condition before installing new flooring or a shower base. Skipping proper assessment can result in uneven surfaces, squeaky floors, or water damage, which are often irreversible, emphasizing the importance of meticulous prep work.
When it comes to baseboards, many overlook the significance of precise measurements and seamless corner joints. A frequent mistake is cutting corners (quite literally) with miter angles, which leads to gaps and an unprofessional finish. Instead, coping joints or dedicated corner trims can elevate the look significantly. Interestingly, trends indicate that textured or multi-layered baseboards are gaining popularity and can dramatically transform a space—more on this in [trendy baseboard styles](https://tilecraftsmens.com/baseboard-trends-in-2025-fresh-styles-for-every-room).
In carpet installation, the myth of ‘one-size-fits-all’ persists. Different rooms and lifestyles demand tailored approaches. For instance, high-traffic areas benefit from dense, stain-resistant carpets, while bedrooms might favor plush, softer textures. Overlooking proper carpet stretching and seam sealing can cause wrinkling or unraveling over time, which is why professional techniques are essential. For comprehensive guidance, see [carpet installation secrets](https://tilecraftsmens.com/carpet-install-secrets-achieving-flawless-results-every-time).
Showers represent a niche where misconceptions can be particularly costly. Many assume that high-end materials alone ensure durability, neglecting proper slope, waterproof membranes, and sealing techniques. An overlooked nuance is the importance of sloped surfaces and adequate drainage, which prevent water pooling and mold—crucial for longevity. For advanced insights, check [shower renovation ideas](https://tilecraftsmens.com/expert-shower-flooring-installation-tips-for-lasting-results).
### How do mistakes in installation affect long-term durability?
Incorrectly installed flooring, baseboards, or showers can compromise your entire home’s integrity. Poorly cemented tiles can crack, misaligned baseboards may fall off, and water leaks from improperly sealed showers can cause mold and structural damage. These errors often stem from underestimating the importance of preparatory steps—like subfloor assessment or precise measurements—and ignoring nuanced installation practices.
Remember, ascendant DIY trends or DIY tutorials often oversimplify these complex tasks, leading beginners to make preventable errors. Prioritizing expert guidance and understanding the sophisticated nuances can save you a lot of trouble. For example, professional installers account for expansion gaps, moisture barriers, and structural shifts, ensuring lasting results—details covered in [transform your home with expert tips](https://tilecraftsmens.com/transform-your-home-expert-flooring-installation-tips-for-2025).
Have you ever fallen into this trap? Let me know in the comments.Maintaining your flooring, baseboards, carpets, and showers is essential to ensure their longevity and continued aesthetic appeal. The right tools and regular upkeep can transform a DIY project from a temporary fix into a durable, beautiful feature of your home. One of my favorite tools for maintaining baseboards is a high-quality detail sander. Its precision helps smooth out minor scratches or imperfections that can accumulate over time, especially in high-traffic areas. For broader cleaning, a steam cleaner like the Dupray One Plus is invaluable; it effectively sanitizes carpets and tiles without harsh chemicals, extending their lifespan. When it comes to sealing showers and preventing water damage, a professional-grade silicone sealant like GE Silicone II ensures a waterproof barrier that withstands mold and mildew—regular reapplication every 2-3 years keeps things in top shape.
How do I keep my floors and fixtures in prime condition over the years?
Incorporating maintenance routines with the right equipment can save money and headaches. For example, periodically inspecting grout lines and applying a penetrating sealer can prevent stains and deterioration. In shower renovations, sealing all edges and slopes properly during initial installation from [an expert source](https://tilecraftsmens.com/expert-shower-flooring-installation-tips-for-lasting-results) is critical; revisiting these areas annually makes a noticeable difference. I also recommend scheduling biannual deep cleans for carpets using a rotary extractor, which not only refreshes the look but also prolongs their life. For long-term results, documenting your maintenance schedule—perhaps with digital reminders—can keep you consistent. The trend is moving toward smart home integrations, where sensors monitor moisture levels or air quality and alert you when attention is needed, extending the life of your investments. Embrace these tools and routines, and you’ll find that your flooring and bathroom fixtures stay pristine for years to come. Start by trying out a high-quality detail sander on your baseboards this weekend—seeing the immediate results can motivate you to maintain your home’s beauty effortlessly.
What I Never Expected about Baseboards and Bathroom Updates
One of my biggest surprises was realizing that selecting the right baseboard style can dramatically influence your room’s ambiance—it’s like giving your space a personality upgrade without changing the walls. Also, I discovered that meticulous attention to detail—measuring corners twice, sealing edges thoroughly—is what turns a good DIY project into a professional-looking finish. Lastly, I learned that ongoing maintenance, like sealing grout or reapplying caulk, keeps your beautifully installed floors and shower areas looking pristine for years. These lessons remind me that patience, precision, and a willingness to learn are your best tools in home improvement.
Tools and Tips That Changed My Approach
Over time, I found that investing in a quality miter saw and a high-grit sander made a noticeable difference in the accuracy and smoothness of my work. The [expert guide on baseboard makeover](https://tilecraftsmens.com/baseboards-makeover-elevate-your-interior-with-simple-updates) became my go-to resource, helping me understand how small tweaks can elevate the whole room. Additionally, I rely on a moisture meter for flooring prep and a reliable sealant like GE Silicone II for showers, ensuring durability and peace of mind. These tools, coupled with trusted sources, are essential for anyone serious about lasting results.
Your Next Step to a Home That Reflects Your Effort
Now that you’ve explored the nuances of flooring, baseboards, and showers, it’s your turn to transform your space with confidence. Remember, the real magic happens when you combine your vision with the knowledge of tried-and-true techniques. Every cut, seal, and coat of paint you apply adds to a home that feels uniquely yours. So, why wait? Embrace the process, enjoy the journey, and soon you’ll marvel at the beautiful results. Your future self will thank you for starting today!
Have you ever struggled with measuring corner joins or sealing a shower properly? Share your experiences in the comments below—I’d love to hear your stories and tips!
,