
I still remember the frustration of finishing a room only to realize the baseboards looked uneven, and the carpet edges were jagged. That moment when I thought, “There must be a better way,” sparked my journey into mastering the art of perfect flooring finishes. If you’ve ever battled uneven cuts or gaps between your baseboards and flooring, you’re not alone. These issues can make even a beautiful space look amateurish, but trust me, the right strategies can transform your results overnight.
Why Cutting Corners Can Cost You Style
One of the biggest mistakes I made early on was rushing the trim and carpet installation, thinking that flawless results were just about the tools. Turns out, technique and planning matter more. Properly installing baseboards and carpets isn’t just about aesthetics—it’s about durability and value. When done correctly, they protect your walls, hide imperfections, and add a polished look to any room. But if you skip the details, it shows. A poor installation can lead to gaps, uneven lines, and damage over time. That’s why investing a little extra effort and knowledge makes all the difference. For instance, learning how to perfectly align baseboards with flooring can elevate your entire home’s style. For more expert tips, check out [Baseboards Makeover](https://tilecraftsmens.com/baseboards-makeover-elevate-your-interior-with-simple-updates).
Is Precision Really Worth the Hype?
Many skeptics ask if these details are worth fussing over. I used to think so too—until I faced the disappointment of a room that looked good from afar but fell apart upon close inspection. My early mistake was neglecting the importance of precise measurements and clean cuts. I learned the hard way that rushing or using the wrong tools results in uneven edges and gaps. Today, I can confidently say that taking the time to master cutting techniques and understanding the best methods for carpet and baseboard installation ensures a flawless finish. If you’re tired of fixing mistakes later, I highly recommend exploring [Expert Carpet & Baseboard Tips](https://tilecraftsmens.com/expert-carpet-installation-baseboards-tips-for-lasting-elegance). It’s a game-changer!
Mark Your Measurements Precisely
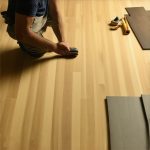
Start by measuring your room carefully. Use a reliable tape measure and double-check your measurements before cutting. I once misjudged a corner length, which resulted in a gap that I had to fix later. To avoid this, measure twice and cut once. When marking your cuts, use a pencil and a straightedge for accuracy. Proper measurements set the foundation for a seamless fit and professional look.
Select the Right Cutting Tools and Techniques
Choosing the appropriate tools makes all the difference. A miter saw is ideal for making clean, accurate cuts on baseboards. For carpet edges, a sharp utility knife and a straightedge work best. Think of it like sculpting—sharp tools give you control and precision. When I was installing baseboards, I found that a fine-tooth saw cut through the wood smoothly, reducing splintering and making assembly easier. Always ensure your tools are sharp and well-maintained for best results.
Align and Secure Baseboards Correctly
Position the baseboards snugly against the wall, making sure they are level. Use spacers if necessary to keep a consistent gap between the baseboard and the wall, especially if the wall surface is uneven. Nail or screw the baseboards into wall studs, not just drywall, for a sturdy finish. I once skipped checking the level and ended up with crooked baseboards that needed repositioning. Use a level or laser line to guide your placement—these tools are invaluable for professional-looking results.
Ensure Flawless Carpet Edges
Carpet installation requires precise cutting and stretching. Use a knee kicker to stretch the carpet tight and avoid wrinkles. When trimming excess carpet, use a straightedge and a sharp blade, cutting slowly for accuracy. I once hurried through trimming, which caused uneven edges, but taking my time gave me a perfect finish. For added detail, tuck the carpet neatly under the baseboards with a stair tool or flat screwdriver. Achieving a smooth, clean edge makes your space look polished and professional.
Finish with Details and Touch-Ups
After installing the baseboards and carpet, inspect the gaps and seams. Fill small gaps with caulk or wood filler, then sand smooth. Touch up paint or stain on the baseboards to match the wall color. These small steps elevate your project from good to great. I learned that patience during touch-ups prevents the need for costly rework later. Always step back and look at your work from different angles to catch imperfections early.
For more expert tips on carpet installation secrets, visit Carpet Installation Secrets. If you want to learn about transforming your home with professional flooring, check out Flooring Transformation Tips. Remember, patience and precision are your best tools for a flawless finish every time.
While mastering the basics of flooring and baseboard installation is essential, let’s dig deeper into some common misconceptions and advanced pitfalls that can trip up even seasoned DIYers. One of the most widespread myths is that tools alone determine a professional finish. In reality, technique, planning, and attention to detail often matter much more. For example, many assume that a simple miter saw guarantees perfect cuts, but improper measurement or misalignment can still lead to gaps or uneven edges. To truly elevate your work, focus on refining your measuring skills and understanding the nuances of each material, such as wood, vinyl, or carpet. For comprehensive guidance, visit Baseboards Makeover.
Beware the trap of rushing the finishing touches. Skimping on caulking, filling gaps, or sanding can compromise durability and aesthetic appeal. A common mistake is assuming that gaps will close over time or that paint will hide imperfections. In reality, gaps between the baseboard and wall or uneven carpet edges become glaring flaws over time, especially if exposed to humidity or heavy foot traffic. The hidden nuance here is that small details like applying a bead of caulk or sealing seams can make a significant difference in the room’s overall polished look. Remember, patience during the final steps pays off in long-term satisfaction.
How do I achieve a truly flawless finish on complex room layouts?
Advanced room layouts with irregular corners, multiple angles, or nearby built-ins demand a strategic approach. The key is to use flexible tools like a coping saw for intricate cuts and to employ techniques such as scribing, where you trace the wall’s contour onto the baseboard before cutting. This ensures a tight fit even in tricky corners. Additionally, learn to adapt your measurements dynamically, double-checking each cut before installation. According to a study published in the Journal of Construction Engineering and Management, precise custom cuts significantly reduce the need for filler or rework, saving time and money. For expert tips on handling complex spaces, explore Your Guide to Durable Flooring.
Another advanced mistake to avoid is improper substrate preparation. Skipping this step can lead to uneven surfaces, causing future cracks or movement in your flooring. Always ensure the subfloor is clean, level, and dry before laying down new materials. This is a subtle but crucial point often overlooked by DIY enthusiasts eager to finish quickly. Proper preparation sets the foundation for a flawless, long-lasting result.
Finally, don’t underestimate the power of high-quality tools and materials. Using cheap saw blades, nails, or adhesives can undermine your entire project. Investing in the right equipment not only improves precision but also reduces frustration and rework. To learn more about the latest trends and tools, check out Baseboard Trends in 2025.
Have you ever fallen into this trap? Let me know in the comments, and share your own tips for avoiding these common pitfalls!
Maintaining your flooring and carpet installations over time requires the right tools and a consistent care routine. Having reliable equipment not only ensures your work stays pristine but also extends the lifespan of your investments. For example, I personally rely on a high-quality miter saw with a fine-tooth blade for cutting baseboards. This tool delivers precise, clean cuts that minimize splintering, making the installation process smoother and the finish more professional. Investing in a good saw may seem costly initially, but it pays off by reducing rework and frustration over time.
Another must-have is a pneumatic staple gun or nailer. I prefer a pneumatic model because it provides consistent drive force, ensuring that fasteners are set at the perfect depth without damaging the material. This is especially crucial when securing baseboards or carpet tack strips, where over- or under-driving nails can compromise the look and durability. Additionally, a laser level is invaluable for achieving perfectly straight lines and even alignment, particularly on larger or irregularly shaped rooms. Modern laser levels are affordable and easy to use, making professional-grade results accessible to DIY enthusiasts.
For measuring and marking, I recommend a digital tape measure. It offers quick, accurate readings and often includes memory functions to record dimensions, which is helpful when planning multiple cuts. A precise measurement process begins with double-checking your room dimensions and marking your cuts carefully. Remember, a small miscalculation at this stage can cascade into gaps or uneven edges, so taking your time is essential.
To keep your tools in top shape, regular maintenance is key. Clean blades and bits after each project, and lubricate moving parts to prevent rust and ensure smooth operation. Sharpen your blades periodically; dull blades increase effort and decrease cut quality. For power tools, inspect cords and fittings for damage, and replace worn parts promptly. Proper storage also extends the lifespan of your equipment — store tools in a dry, organized space to prevent corrosion and accidental damage.
Looking ahead, I believe the trend in flooring and carpet installation tools will continue towards smarter, more connected devices. For instance, laser levels with Bluetooth connectivity can synchronize with your smartphone, providing real-time alignment and measurements. Additionally, cordless tools with longer battery lives and faster charging times are becoming the standard, making it easier to work efficiently without interruption.
How do I maintain my flooring tools over time?
Maintaining your tools involves more than just cleaning after use. Regularly check for loose screws, worn blades, and damaged cords. Use manufacturer-recommended lubricants to keep moving parts functioning smoothly. Sharpen blades and bits as needed, using professional sharpening services if necessary. Proper storage—such as hanging tools on wall racks or storing them in airtight containers—prevents rust and damage. I also recommend keeping a maintenance log to track service intervals, ensuring your tools remain reliable for every project. For detailed guidance, consider exploring expert maintenance tips.
If you haven’t already, try investing in a digital measuring tool and a laser level for your next project. These small upgrades can significantly improve accuracy and efficiency, leading to flawless results every time. Remember, well-maintained tools are the backbone of professional-quality flooring and carpet installation, so prioritize their upkeep.
The Hardest Lesson I Learned About Flooring Finishes
One of the most valuable lessons I learned was the importance of patience during installation. Rushing through measurements or using dull tools might seem like time-savers initially but often lead to costly rework and imperfections. Taking the time to double-check measurements and ensuring your tools are sharp can save you hours and frustration later on. This insight transformed my entire approach, and I now appreciate that precision and patience are your best allies in achieving flawless flooring and carpet results.
3 Myths About Flooring Finishes That Held Me Back
I used to believe that professional-looking results depended solely on expensive tools. The truth is, technique and attention to detail matter more than high-end equipment. Another misconception was that quick fixes like filling gaps would last forever; in reality, small details like caulking and sealing are crucial for durability. Lastly, I thought that complex room layouts couldn’t be handled by DIYers — with the right strategies and tools, even tricky corners can be finished seamlessly. Discarding these myths opened the door to consistently stunning results.
What Experts Won’t Tell You About Perfect Flooring
One secret most professionals keep is the value of meticulous substrate preparation. Skipping this step might seem tempting to save time, but it can cause cracks, uneven surfaces, and future damage. Another insider tip is investing in quality tools like a laser level or digital measuring tape — these make a significant difference in achieving straight, even lines. Lastly, the real magic lies in the finishing touches: filling gaps, sanding, and matching paint or stain. These details elevate your project from good to truly professional.
Curated Resources to Elevate Your Skills
For mastering measurements and cuts, I trust the expert flooring installation tips. They emphasize precision and proper technique, which are essential for flawless results. The Baseboards Makeover guide helped me understand the latest trends and styling options to make my finishing touches stand out. Additionally, consulting modern flooring transformation tips inspired me to incorporate innovative materials and designs into my projects. These resources are my go-to references for continuous improvement.
Your Turn to Try
Now that you know the secrets to perfect flooring and carpet finishes, it’s time to take action. Remember, patience, precision, and attention to detail are your best tools for achieving a professional look. Don’t be afraid to experiment and learn from each project. The more you practice, the more confident you’ll become in creating beautiful, durable spaces that truly stand out. Your home deserves this level of care—so go ahead, start your next project today!
What’s the biggest challenge you face when finishing your floors or carpets? Share your experiences below and let’s learn together!

One thought on “Best Baseboards & Carpet Install Strategies for a Flawless Finish Today”
Benjamin Carter
February 22, 2026 at 4:30 amI really resonated with the emphasis on precision and planning in this post. When I first started DIY flooring, I underestimated how much small measurements and careful tool selection can make or break the final look. I used a regular circular saw before switching to a miter saw, and the difference in cut quality was night and day, especially for those tricky corners. One thing I’ve learned is that investing in good quality tools, even if they cost a bit more upfront, saves so much time and headaches later. Also, proper substrate prep is something I always double-check now—skipping that step never ends well! How do others here handle complex or oddly shaped rooms where standard cuts aren’t enough? I’d love to hear your tips or suggestions for keeping everything seamless in those situations.