I remember the first time I tried to install my own carpet and baseboards. I was so proud—until I stepped back and saw the uneven edges, gaps, and crooked lines. It was a lightbulb moment, realizing that even small details can make or break the look of a room. That frustration fueled my quest to uncover the best secrets for achieving a flawless finish in just 05:42.
Why Proper Installation Matters More Than You Think
When I dove into this project, I underestimated how much precision really impacts the final appearance. A poorly installed carpet or baseboard can make a beautiful space look amateurish. Conversely, mastering the right techniques elevates your home’s aesthetic, boosts durability, and even increases property value. According to a recent study, homes with professionally finished floors and moldings tend to sell faster and at higher prices. So, if you’ve ever wondered whether investing time in learning these secrets is worth it, trust me—it’s worth every second.
Is It Really Possible to Get a Flawless Finish Without Professional Help?
Honestly, early on I made the mistake of rushing and skipping essential steps, like measuring twice or using the right tools. That resulted in uneven seams and gaps. It took me some trial and error, but I learned that patience and the right approach are key. Now, I want to share those insights with you so you can avoid my mistakes and get that perfect look in record time.
If you’re tired of seeing mismatched corners or loose edges, stay with me. The upcoming sections will reveal the top tips for flawless installation, backed by years of hands-on experience and expert advice. Ready to transform your space with confidence? Let’s dive into the secrets that will make your next project a resounding success.
Prepare Your Tools for Precision
Start by gathering all necessary tools—measure tape, level, miter saw, hammer, nails, and adhesive. Think of this step as setting your weapons before a battle; having everything ready ensures smooth execution and saves time. Once I laid out my tools on a clean workspace, I knew I was ready to tackle uneven edges and gaps with confidence.
Measure Twice, Cut Once to Avoid Mistakes
Accurate measurement is your best friend. Use a tape measure to mark where the carpet and baseboards will go. I once skipped this step and ended up with a baseboard too short, creating a visible gap. To prevent this, I measured multiple times and used a square to ensure perfect 90-degree angles. Precise cuts reduce the need for adjustments later, which can be messy and time-consuming.
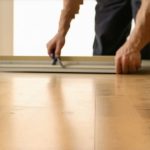
Cut with Confidence and Precision
Use a miter saw for clean, accurate cuts—especially at corners. I remember the first time I tried to cut baseboards freehand; the edges were jagged, making the joint look sloppy. When I switched to a miter saw and cut at a 45-degree angle, the pieces fit perfectly, creating seamless corners. Always double-check your measurements before cutting to avoid waste and frustration.
Install the Baseboards Step-by-Step
Secure with Nail Gun or Hammer
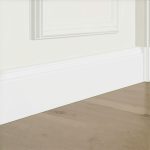
Position the baseboard against the wall, ensuring it aligns with your markings. Use a nail gun for speed or a hammer and finishing nails for control. I once hammered nails too deep, causing dents, which I then had to fill and sand. To avoid this, I used a nail set to sink nails flush with the surface, resulting in a clean, professional look.
Seal Gaps with Caulk
Fill any small gaps between the wall and baseboard with painter’s caulk. This step is crucial for a polished appearance. I once skipped caulking, and the gaps caught dust and looked unfinished. Applying a thin bead of caulk, then smoothing it with a damp finger, creates a seamless transition, enhancing the overall finish.
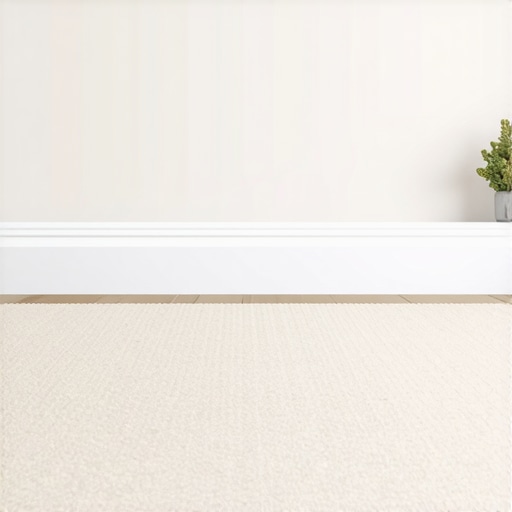
Attach the Carpet Correctly
Lay the carpet with precision, ensuring it overlaps the edges of the room. Use a knee kicker for tight stretches and trim excess with a utility knife. I once pulled the carpet too tight, causing ripples; loosening it and readjusting fixed the problem. Proper tension and trimming are key to a flawless look that lasts.
Finish with a Touch of Style
Finally, add decorative trim or paint the baseboards for added flair. I experimented with different colors, and a fresh coat of paint transformed the space instantly. For a modern look, check out the latest baseboard trends.
By following these concrete steps, you’ll achieve a professional-quality finish without the need for a costly contractor. Remember, patience and attention to detail are your best allies in making your home look flawless in record time.
Many DIY enthusiasts and even some seasoned homeowners often fall prey to misconceptions that can sabotage their efforts in creating a flawless finish when installing carpets and baseboards. Let’s dig deeper into what most people get wrong and how to avoid these pitfalls.
Why the Myth of Speed Over Precision Can Lead to Costly Mistakes
One widespread belief is that rushing through installation saves time and effort. However, this can lead to uneven cuts, gaps, and loose fittings that diminish the professional look you’re aiming for. Precision and patience are paramount; taking extra time to measure, mark, and double-check ensures a seamless result. Remember, rushing often results in having to redo work, which ultimately costs more in both time and materials. For advanced tips on avoiding common errors, check out this guide.
The Oops Factor: Overlooking the Role of Proper Adhesives and Tools
Many underestimate the importance of using the right adhesives, nails, or tools. For instance, using a standard hammer instead of a nail gun can cause dents and uneven nail placement, leading to gaps that need filling and sanding. Similarly, choosing the wrong adhesive for your specific flooring material might cause lifting or bubbling over time. A common mistake is failing to prepare surfaces properly—dirty or uneven walls and floors can prevent materials from adhering correctly, resulting in gaps and misalignments. Investing in quality tools and adhering to manufacturer instructions can elevate your finished product significantly. For more on tools and materials, visit this resource.
What Advanced Installers Know That Beginners Often Miss
One nuance often missed is the significance of accounting for expansion gaps and temperature changes, especially with baseboards and flooring. Without leaving adequate space, materials can buckle, crack, or warp over time. Professional installers also pay close attention to the grain direction of wood and the alignment of seams, which may seem trivial but greatly impact the visual flow. Additionally, mastering corner joints—like mitered or coped joints—can elevate the final look from good to excellent. These details, though subtle, require a keen eye and experience, which is why many rely on expert advice or professional services. To explore these nuances further, consider reviewing this comprehensive guide.
Have you ever fallen into this trap? Let me know in the comments. Remember, understanding these hidden nuances can make the difference between a decent DIY project and a stunning, professional finish that lasts for years.
Keeping your flooring projects in top shape requires more than just initial installation skills. Investing in the right tools and understanding proper maintenance practices can significantly extend the lifespan of your work, ensuring that your home continues to look professional and polished for years to come. I personally recommend a few specialized tools that have become indispensable in my toolkit, and I’ll share how to maintain them effectively over time.
Tools I Recommend for Long-Term Results
One of my go-to tools is the DeWalt Cordless Finish Nailer. It offers precision and ease of use when securing baseboards, reducing the risk of dents or uneven nail placement. Unlike traditional hammers, this tool allows for consistent, flush finishes, saving time and reducing fatigue. I also rely on a digital laser level from Bosch, which helps me ensure perfect alignment across large surfaces, especially when working with multiple sections of baseboards or flooring. Accurate leveling is crucial for a professional look, and a quality laser level provides reliable measurements that last.
For measuring and cutting, I prefer a Kreg Multi-Mark for quick, precise measurements, combined with a Makita Miter Saw for clean cuts at various angles. These tools help me avoid common mistakes like uneven joints or gaps. To maintain their accuracy, I regularly clean the blades, ensure batteries are charged, and store them in a dry, protected place. Proper care keeps these tools performing at their best, reducing the likelihood of costly errors.
Why Proper Maintenance Matters
Tools are an investment, and maintaining them properly ensures they work effectively over time. For example, regularly sharpening the blades of your miter saw prevents splintered cuts and preserves the integrity of your work. Lubricating moving parts, like nailer mechanisms, reduces wear and tear, preventing jams and misfires. I also recommend inspecting your tools for loose screws or damaged parts before each project — a simple check can save hours of frustration later.
How do I keep my tools working well over time?
Establish a routine maintenance schedule that includes cleaning, lubricating, and calibrating your tools. After each use, wipe down surfaces to remove dust and debris, which can cause mechanical issues. Store tools in a dry environment to prevent rust, and replace worn-out parts promptly. For power tools, periodic professional calibration ensures accuracy, especially if you notice inconsistent cuts or measurements. Following manufacturer guidelines for maintenance is always a good idea — most brands provide detailed instructions for optimal care.
Looking ahead, the trend in tool development points toward smarter, more connected equipment with built-in diagnostics and maintenance alerts. This technology will help DIYers and professionals alike catch issues early, reducing downtime and extending tool life. For now, the best approach is to treat your tools with respect and care — a well-maintained toolkit is the foundation of flawless results.
If you haven’t already, try setting up a weekly checkup for your primary tools. This small investment in maintenance can pay off by preventing costly repairs and ensuring your projects always turn out perfect. Remember, the key to lasting success in flooring installation is not just skill, but also the right tools maintained at their peak performance.
The Hardest Lesson I Learned About Perfect Flooring Finishes
One of my biggest lightbulb moments was realizing that rushing through carpet and baseboard installation often results in gaps, uneven edges, and a finish that looks amateurish. I learned the importance of patience, precise measurements, and the right tools, which transformed my projects from average to professional quality. Now, I always remind myself that taking the time to double-check every cut and every nail placement saves me hours of redo work and frustration in the long run.
My Essential Toolkit for Flawless Home Finishes
After experimenting with various tools, I trust the DeWalt Cordless Finish Nailer for its reliability and precision. The Bosch digital laser level helps me achieve perfect alignment across long walls, which is crucial for a seamless look. For measuring and cutting, the Kreg Multi-Mark and Makita Miter Saw are my go-to choices. These tools ensure accuracy and reduce material waste. Regular maintenance, like cleaning blades and calibrating laser levels, keeps my toolkit performing at its best, which directly impacts the quality of my work.
Take Action and Elevate Your Space Today
Now that you know the secrets to achieving a flawless finish in carpet and baseboard installation, it’s your turn to transform your home. Remember, patience, precision, and quality tools are your best allies in creating a space that looks professionally finished and lasts for years. Don’t let small mistakes hold you back—start your project with confidence and enjoy the satisfaction of a job well done.
Have you ever struggled with corner joints or gap filling? Let me know your experiences below and share your tips for success!