I remember the moment clearly—standing in my living room, looking down at a wrinkled, uneven carpet that I had hurriedly installed just days before. The seams were visible, the edges frayed, and I couldn’t shake the feeling that I had wasted money and effort. It was a lightbulb moment that pushed me to learn the right way to install carpets properly. If you’ve ever faced a similar frustration, you’re not alone.
Today, I want to share the most vital insights I’ve gathered to help you avoid those common pitfalls and achieve flawless results. Whether you’re planning a DIY project or hiring a professional, understanding the basics of carpet installation can save you time, money, and countless headaches. After all, a beautifully laid carpet isn’t just about appearance—it’s about durability, safety, and comfort that lasts for years.
Why Getting Your Carpet Installation Just Right Matters More Than You Think
Carpet flooring isn’t just a choice for aesthetics; it’s a fundamental part of your home’s comfort and safety. Proper installation ensures the carpet stays in place, resists wear and tear, and maintains a neat, inviting look. But here’s the kicker: many homeowners overlook or underestimate the importance of the installation process, leading to issues like bubbling, wrinkling, or uneven seams.
In my early days, I made a critical mistake—definitely a rookie error—that cost me dearly. I neglected to stretch the carpet properly, which resulted in those unsightly wrinkles I mentioned earlier. That experience taught me a valuable lesson: even the most beautiful carpet can look shabby if not installed correctly. Interestingly, according to flooring experts, improper installation can reduce a carpet’s lifespan by up to 50% (source: Tile Craftsmen). That’s a sobering fact that underscores the significance of doing it right.
Are you facing issues like uneven edges or creases? Do you worry your DIY attempt might not hold up? Rest assured, with the right guidance and a little patience, you can master this craft—or at least know what to ask your installer for. So, let’s dive deeper into what makes a flawless carpet installation possible and how you can achieve it.
Prep the Surface Like a Pro
Start by clearing the room entirely, removing furniture and any existing flooring debris. Sweep or vacuum thoroughly. Check the subfloor for bumps, cracks, or moisture issues; fix these before proceeding, as an uneven surface compromises the carpet’s appearance and longevity. Think of this step as laying a solid foundation—if it’s shaky, everything built on top will be unstable. I once rushed through this phase, skipping moisture tests, only to discover my newly installed carpet curled and wrinkled weeks later, costing me more time and money.
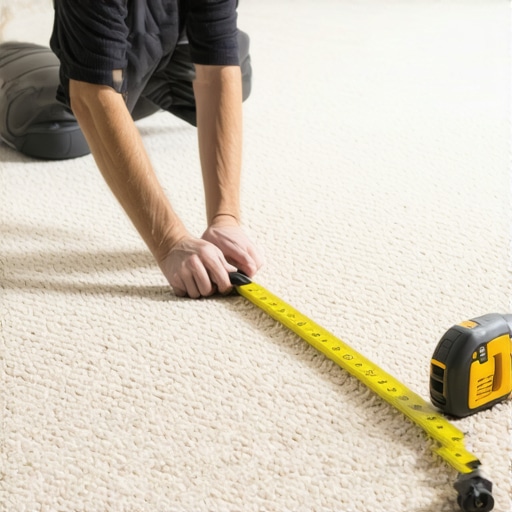
Accurate Measurements Are Your Best Friend
Measure the room’s length and width precisely, adding extra to account for stretch and seams—usually about 10%. Create a detailed plan mapping out where seams will fall. Using a chalk line or marker, outline the room’s boundaries on the floor to ensure perfect alignment. In my experience, skimping on measurements led to uneven seams that stuck out like sore thumbs, ruining the overall look. Double-check your figures before cutting is better than wasting material or having gaps later.
Cutting the Carpet Effectively
Lay the carpet on a clean, flat surface—preferably a large drop cloth or table—and cut it to size using a sharp utility knife and straightedge. Cut in straight lines, and remember to leave extra fabric around the edges for adjustment. When I cut my first piece, I used scissors—big mistake. The edges were jagged, which made aligning seams difficult. Using the right tools makes all the difference, giving you clean cuts that fit perfectly once installed.
Stretch and Secure for a Smooth Finish
Use a power stretcher or manual bar to stretch the carpet toward the walls, eliminating wrinkles and bubbles. Start from the center and work outward, attaching the carpet to tack strips along the perimeter. Imagine trying to stretch a rubber band—firm but controlled tension is key. I once neglected proper stretching, resulting in loose patches that looked unprofessional. Proper tension ensures a taut, wrinkle-free surface that lasts for years.
Manage Seams with Precision
Align carpet edges meticulously, matching the pile direction for a seamless look. Use seam tape or adhesive designed for carpets—apply it under the seams, then press edges together firmly. Use a seam roller to eliminate bubbles and ensure adhesive contact. I once overlooked seam alignment, and it was glaring once finished. Patience during this step prevents visible seams and maintains uniformity across the floor.
Finish with Baseboards and Edging
Once the carpet is secured, reinstall or install new baseboards to cover any edges. Use a nail gun or hammer to attach them from the wall into studs or drywall anchors, leaving slight gaps for expansion. Finish neatly with caulk or paint for a polished appearance. Proper baseboard installation not only looks good but protects the carpet edges from damage. For fresh interior accents or a modern look, consider exploring 2025 baseboard trends.
Inspect and Finalize
Walk through the room, checking for loose spots, wrinkles, or gaps. Make adjustments as needed by pulling the carpet or re-stretching small sections. Clean up any leftover debris or loose fibers. A thorough inspection guarantees your work looks professional and durable. Remember, patience during this last phase ensures your investment pays off with a stunning, long-lasting floor.
Many homeowners believe that selecting the right flooring or bathroom fixtures is purely a matter of style and budget, but there’s more beneath the surface. One widespread myth is that a DIY approach can match professional results if you follow generic tutorials. However, this overlooks the critical nuances of material prep, precise measurements, and timing that professionals meticulously manage. For example, improperly sealed subfloors can lead to moisture problems, causing flooring to warp or develop mold, a mistake often underestimated by DIY enthusiasts. According to flooring experts, ignoring subfloor conditions can halve the lifespan of your installation (source).Maintaining your flooring and related installations like baseboards and showers requires the right tools and a proactive approach. Personally, I swear by a quality knee-kicker and a seam roller when working on carpet seams. The knee-kicker allows for effortless stretching, preventing wrinkles over time, while the seam roller ensures adhesive bonds are firm, reducing seam visibility and prolonging durability. For flooring, I rely on a digital moisture meter such as the Tramex CM-EX, which provides instant readings of subfloor moisture levels, crucial for avoiding warping or mold issues—an often-overlooked step that can save costly repairs later. When it comes to cleaning and regular maintenance, a vacuum with a beater bar is indispensable; I use the Dyson Ball Animal 2, as it effectively lifts dirt and debris trapped in carpet fibers without damaging the surface.
Looking forward, I predict that smart cleaning devices equipped with sensors and IoT connectivity will dominate at-home maintenance routines. These tools can notify you of moisture problems or wear patterns early, making upkeep more efficient and less guesswork-based.
How do I maintain my flooring over time? Regular inspections are key—checking for wrinkles, loose seams, or chipped paint on baseboards helps catch issues before they escalate. Periodically, re-stretching carpet sections with a power stretcher can rejuvenate the look and longevity—it’s a game-changer I recommend trying at least once a year. For detailed guidance, expert advice suggests using a power stretcher instead of manual tools when working on larger rooms to ensure even tension and avoid creases, as highlighted in a comprehensive article on durable flooring (source). Incorporating these tools and routines helps maintain your investment, ensuring your floors stay stunning for years to come.
What I Wish I Had Known Before Starting
One of the most valuable lessons I learned is that patience and attention to detail are irreplaceable. Rushing through surface preparation or measuring can lead to costly mistakes that mar the final look and reduce durability. I once skipped moisture testing on my subfloor, only to face curling and bubbling weeks later—an experience that reinforced the importance of thorough prep and using reliable tools like a digital moisture meter.
Tools That Turn DIY Into Art
Investing in quality tools such as a power stretcher, seam roller, and a sharp utility knife made all the difference in my work. They allowed me to achieve a professional-level finish and saved me from frustration. Trusting tools proven to handle the job ensures your installation not only looks great but stands the test of time. For more insights on equipment, explore this comprehensive guide.
Personal Flaws That Shape My Approach
My tendency to rush measurements early on cost me dearly—seams not aligning properly, which was painfully obvious at the finish. Now, I double, even triple-check my calculations and leave extra material for adjustments. These small steps boost confidence and ensure a flawless result, whether you’re doing it yourself or hiring professionals.
Going Beyond the Basic: The Hidden Factors
One often overlooked aspect is subfloor condition—moisture levels, bumps, and cracks directly impact the lifespan of your flooring. I avoid shortcuts by assessing these factors meticulously, preventing future issues like warping or mold. Learning to identify these problems has empowered me to protect my home’s investments effectively.
Resources that Elevate Your Craft
- Expert Flooring Tips: The main guide offers step-by-step strategies that transformed my understanding of installation.
- Quality Tools: I personally rely on a digital moisture meter and a seam roller to ensure durability and seamless seams.
- Design Trends: Updates on baseboard styles keep my interior modern and cohesive.
- Professional Consultation: When in doubt, reaching out to experts through contact pages gives peace of mind and personalized advice.
Take the Next Step with Confidence
No matter your experience level, mastering these nuances can elevate your home’s look and longevity. With careful preparation, the right tools, and ongoing learning, you’ll be well on your way to achieving a flawless finish that lasts for years to come. Remember, each project is an opportunity to refine your skills and create spaces you’re proud of. Don’t hesitate to start—your perfect carpet or flooring installation is closer than you think.
Have you ever encountered a mistake during your installation process? Share your stories or questions below—I’m here to help you succeed!

One thought on “Carpet Installation Guide: Perfecting Your Home Flooring in 07:22”
Lauren Mitchell
February 17, 2026 at 1:12 amReading this post really resonated with me because I once rushed through the surface prep stage of my DIY carpet project and ended up with several wrinkles that needed redoing. Since then, I’ve realized that patience during initial measurements and thorough surface checks are crucial for a clean, professional result. It’s fascinating how even small things like moisture testing or extra measurement margins can make a huge difference in the final outcome.
I’m curious—has anyone found specific tools or techniques that help streamline these meticulous steps without adding too much time to the project? For example, I’ve heard a lot about digital moisture meters being quite effective, but I’d love to hear about other practical tips that can help DIYers stay patient and precise, especially in larger rooms. Would love to hear your experiences or any suggestions to make the process smoother while still maintaining quality.