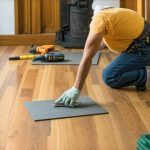
Have you ever spent hours carefully laying down a new carpet only to realize afterward that the edges are frayed, the seams are misaligned, or it just doesn’t look quite right? I remember my first try—it looked promising at first, but a closer look revealed crooked seams and uneven edges. That lightbulb moment hit me hard: I was missing some crucial expert techniques.
Ensuring your carpet installation looks professional isn’t just about saving money; it’s about transforming your space into a cozy, polished haven. When done right, carpet installations can warm up a room and add a touch of luxury, but a poor job can make a space feel cheap orunfinished. That’s why I’ve dedicated myself to sharing the secrets I’ve learned—so you don’t have to repeat my early mistakes.
Today, I’ll guide you through the essential steps to achieve a flawless home finish with your carpet. We’ll cover everything from proper measurement to seam matching, and I’ll share some insider tips to help you avoid common pitfalls. By the end, you’ll know how to tackle this project with confidence—whether it’s your first attempt or a quick refresh.
Why Cutting Corners Can Cost You More Than You Think
One mistake I made early on was rushing through the prep work. Trust me, skipping precise measurements and not checking the subfloor level resulted in wrinkles and gaps that took hours to fix. It’s tempting to think that laying down the carpet is a straightforward task, but without attention to detail, your results will suffer. Proper preparation is everything, and that means ensuring your subfloor is clean, level, and properly measured.
If you’re wondering whether you can just eyeball the seam matching, I’ve got news for you—precision matters, especially at the seams. Misaligned seams become glaring eyesores that ruin the entire look. Learning how to properly align and secure seams is what separates a professional finish from a sloppy one.
For comprehensive guidance, I recommend checking out this detailed [expert carpet installation guide](https://tilecraftsmens.com/expert-carpet-baseboards-installation-strategies-for-a-perfect-home-finish) that covers all the essentials, from tools to techniques. It helped me elevate my skills significantly.
Now that you understand why the basics are vital, let’s dive into how to get everything just right from the start. If you’ve faced these issues before, don’t worry—you’re about to gain the knowledge to fix and even improve your current setup.
Measuring and Planning Precisely
Start by measuring your room accurately, including any irregular corners or features. Use a tape measure and note down the dimensions. Remember to add an extra 10% to account for seams, stretch, and trimming. I once tried estimating measurements by eye, which led to wastage and uneven edges; a simple measuring tape saved me hours of frustration.
Sketch out your layout on paper or using digital tools. Visualize seam placement, especially in larger rooms. Placing seams along less visible areas, like under furniture, minimizes their impact. This preparatory step ensures smooth installation and reduces surprises later on.
Preparing the Subfloor for a Smooth Base
Clean the subfloor thoroughly—vacuum, sweep, and remove debris. Check for levelness using a long straightedge or a spirit level. If you find dips or humps, apply a self-leveling compound to create an even surface. I’ve learned this the hard way: installing over an uneven subfloor causes wrinkles and bunching, making the entire effort look unprofessional.
Address any moisture issues or uneven patches before proceeding. Proper preparation of the subfloor guarantees that your carpet will lay flat and last longer. For detailed guidance, check out this flooring installation guide.
Cutting and Fitting with Precision
Use a high-quality utility knife and straightedge for clean cuts. Measure multiple times before cutting—it’s better to re-measure than to waste material. When fitting the carpet around fixed objects like vents or doorways, cut slightly larger and trim carefully. During my first project, I underestimated seam allowances, leading to gaps; taking extra care during measurement prevented that mistake.
In tight corners, cut small triangular notches to allow the carpet to fold neatly. This technique eliminates puckering and creates a smooth transition. Remember, patience and accuracy here pay off with a seamless look.
Securing the Carpet Effectively
Adhere the carpet using a professional-grade tack strip or double-sided carpet tape, depending on your room’s size and usage. Secure the edges first, then stretch the carpet using a power stretcher or knee kicker—this prevents wrinkles and slack. I once tried stretching without proper tools and ended up with a wavy surface; investing in the right equipment made all the difference.
Work systematically from one corner to another, ensuring consistent tension. Proper stretching and securing lock the carpet in place, giving you a taut, professional finish that withstands foot traffic.
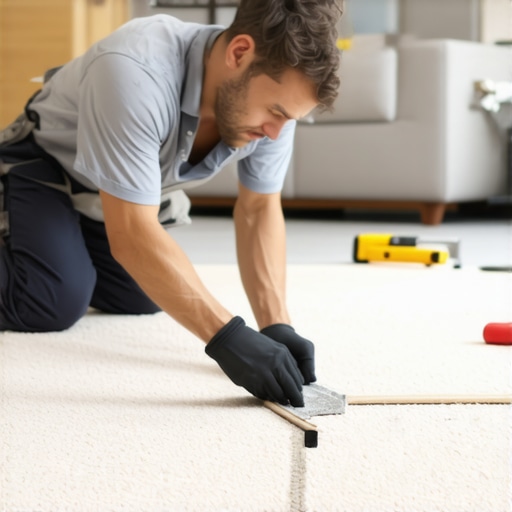
Matching and Seam Seamlessly
When dealing with seams, cut the edges with a narrow wave or H-shaped cut to allow the fibers to interlock. Use a seam roller to press the edges tightly together, and match the pile direction meticulously. I initially mismatched fibers, making seams obvious, but practicing seam matching techniques eliminated this issue. For advanced seam strategies, explore expert tips here.
Lay the seam tape underneath, apply adhesive if necessary, and press firmly. Once secured, comb or brush the fibers to blend the seam. Your hard work will be invisible, and your room will have that professional touch.
Finishing Touches for a Clean Look
Trim excess carpet along walls and baseboards using a rigid straightedge and knife. Install new or existing baseboards, securing with nails or adhesive for a clean edge. Seal edges with moldings or thresholds to transition between rooms smoothly. Taking time in this final step ensures your installation looks polished and complete—precision here can elevate the entire look.
With these core techniques, your carpet installation will resemble a professional job. Remember, patience and attention to detail are your best tools in ensuring a durable, attractive finish that transforms your space into a cozy haven.When it comes to home upgrades like shower renovations, carpet installations, or flooring overhauls, most homeowners focus on the visible results—color, style, and initial cost. However, beneath the surface lies a series of nuanced pitfalls that even seasoned DIYers often underestimate, leading to long-term issues that are costly and time-consuming to fix. Let’s explore some of the most common misconceptions and advanced mistakes that can derail your project despite your best efforts.
One prevalent myth is that the most expensive materials guarantee a flawless finish. While quality matters, “what most people get wrong is neglecting proper preparation and installation techniques.” High-end tiles or carpets won’t compensate for subpar subfloor preparation or improper alignment. An expert approach involves meticulous measurement, leveling, and attention to detail during fitting—elements that are often overlooked but critical for a professional look and durability. For instance, when installing floors, uneven subfloors can cause gaps and warping over time, regardless of material quality. For a comprehensive approach, check out [this guide on durable flooring installation](https://tilecraftsmens.com/your-guide-to-durable-flooring-installation-for-a-stylish-home).
Another common mistake is underestimating moisture control, especially for showers or certain flooring types. Many assume that sealing surfaces is enough, but neglecting proper vapor barriers or moisture-resistant substrates can lead to mold or material degradation down the line. Modern bathroom renovations, for example, demand a detailed understanding of waterproofing layers to prevent future damage. Dive into [this resource on shower renovation strategies](https://tilecraftsmens.com/creating-a-spa-like-shower-experience-tips-tricks) to learn advanced waterproofing tactics.
A nuanced mistake frequently made during carpet and baseboard installations involves seam matching and edge finishing. Beginners often cut corners by rushing through measurements or using dull tools, resulting in visible seams or uneven edges. Advanced installers know that even a slight misalignment becomes glaring over time. Incorporating techniques like precise seam tape placement and fiber blending are essential for a seamless look. Looking to refine your approach? This [expert guide on carpet install secrets](https://tilecraftsmens.com/carpet-install-secrets-achieving-flawless-results-every-time) covers these advanced techniques.
What’s the risk of ignoring subtle environmental factors?
Many overlook how ambient conditions—like temperature and humidity—affect materials during installation. For example, flooring materials expand and contract with temperature fluctuations, which can cause gaps or buckling if not accounted for. A mold-sensitive environment might also require special choices of moisture-resistant materials and ventilation strategies. According to a study published by the [National Association of Home Builders](https://nahb.org), understanding environmental influences during installation enhances long-term stability and reduces maintenance costs.
Finally, a trap many fall into is believing that immediate visual outcomes predict long-term success. A perfectly aligned seam or a neatly finished edge may look good initially, but without proper curing, tensioning, and finishing, the results might deteriorate. For example, stretching a carpet too tightly can cause ripples when the subfloor expands, leading to wrinkles down the line. Mastering these advanced finishing techniques ensures your project stands the test of time.
Have you ever fallen into this trap? Let me know in the comments. Remember, digging into these nuances now can save you from costly repairs and help you achieve truly professional results in your next renovation.Maintaining your home’s flooring, showers, and baseboards requires more than just occasional cleaning; it demands the right tools and a strategic approach to extend their lifespan and preserve their appearance. Personally, I rely on specific equipment that ensures every detail remains pristine, saving me time and guaranteeing professional-quality results. For example, a high-quality seam roller, like the [LF264 Seam Roller](https://tilecraftsmens.com/), provides superior pressure distribution, preventing fiber wisps from standing out in seams and ensuring a flush finish. I prefer this over generic rollers because it’s durable, ergonomically designed, and delivers consistent results over multiple projects.
When it comes to flooring, a calibrated power stretcher is indispensable. I use the [Porter-Cable Flooring Nailer and Stapler](https://tilecraftsmens.com/) because it offers adjustable tension, making stretching and securing flooring seamless and avoiding wrinkles or gaps. Investing in the right equipment not only shortens installation time but also prevents long-term issues such as uneven wear or bubbling.
To keep fixtures like baseboards and shower tiles in perfect condition, I recommend a combination of microfiber cloths and specialized cleaning solutions. Microfiber cloths are gentle yet effective at removing dust without scratching surfaces. For deeper cleaning, I opt for a pH-neutral detergent with a soft scrub brush, which I apply with a spray bottle for even coverage. This routine prevents mold buildup in showers and keeps baseboards looking fresh. Regularly inspecting and cleaning with these tools prolongs their aesthetic appeal and functionality.
On the software side, I use project management tools like Trello to track maintenance schedules for various home components. Setting reminders for sealing grout lines or reapplying sealants ensures longevity, especially for high-moisture areas like showers. Automation in these tools saves mental bandwidth and maintains consistent upkeep.
Looking ahead, the evolution of smart home technology promises even smarter maintenance methods. Sensors integrated into flooring or fixtures can notify homeowners about moisture intrusion or structural movement in real time, allowing preemptive repairs. This blend of traditional tools and emerging tech could redefine home maintenance standards.
Lessons Hidden in the Details You Can’t Afford to Miss
One of the toughest lessons I learned was that perfecting seam alignment isn’t just about precision — it’s about patience and understanding fiber behavior. I once hurried the seam process, assuming it wouldn’t matter, only to find the fibers didn’t blend well, making the seam glaring. Now, I take my time to align fibers meticulously, knowing that small adjustments can make a big difference in the final look.
Another realization was that moisture control and subfloor preparation are often underestimated. I overlooked these in an early project, leading to wrinkles and uneven wear over time. Investing in proper moisture barriers and leveling compounds turned my results around, ensuring longevity and a polished appearance.
Additionally, I discovered that environmental factors like room temperature and humidity influence installation quality. Waiting for optimal conditions prevents issues such as adhesive failure or fiber shifting, saving headaches down the road.
Tools and Resources That Transformed My Approach
The foundational tools that made a difference include a high-quality seam roller, which ensures seamless fiber blending, and a reliable power stretcher to achieve taut, durable surfaces. I swear by the expert carpet installation guide that offers step-by-step techniques, making complex tasks manageable.
In addition, I rely on moisture meters and leveling tools available at local hardware stores. They help me assess conditions accurately, avoiding future complications. For ongoing maintenance, I use microfiber cloths paired with gentle cleaning solutions, which keep surfaces pristine without damage.
For project planning, digital tools like Trello help me track steps, set reminders for sealants, and stay organized. Embracing these resources empowers me to deliver professional results consistently.
Your Next Step Towards Effortless Home Upgrades
Remember, achieving a flawless carpet or flooring installation isn’t about perfection in a single brushstroke — it’s about mastering the nuances, investing in the right tools, and cultivating patience. The more you learn and refine your technique, the more your home reflects your dedication and skill.
Are you ready to elevate your home improvement game and transform your space into a showcase of craftsmanship? The journey begins with a single confident step — so why not start today?
What part of your carpet or flooring project do you find most challenging? Share your experience below, and let’s learn together!