One weekend, I decided to finally tackle installing new hardwood floors in my living room. I was confident—until I saw the uneven gaps, stubborn bubbles, and a finish that looked more DIY than professional. It was a lightbulb moment for me: even small mistakes in flooring installation can turn an otherwise beautiful upgrade into a constant source of frustration. If you’ve ever felt that sinking feeling of a project gone awry, you’re not alone. But here’s the good news—there’s a way to get it right the first time, and it starts with understanding some expert tips that truly make a difference.
Why Precision Matters in Flooring Installation
Getting your floors to look flawless isn’t just about choosing the right material; it’s about meticulous technique. When I first learned this, I realized that rushing through preparation or skipping crucial steps can sabotage your entire project. For example, improper subfloor prep can lead to squeaks and uneven surfaces, which no amount of high-quality flooring can fix. According to industry experts, a well-installed floor can last decades and significantly boost your home’s value. That’s why mastering a few key installation secrets is worth every minute of effort. Today, I’ll share these insider tips to help you avoid common pitfalls and achieve a professional finish.
Is Skipping the Details Really That Risky?
Absolutely. Early on, I made the mistake of ignoring the importance of acclimating my flooring to the room’s humidity. I thought I could just lay the planks straight out of the box. Big mistake. The planks warped within a few months because I failed to give them time to adjust. This taught me that details matter—like ensuring proper expansion gaps and using the right adhesive or nails. For even more detailed guidance, check out my post on expert flooring tips for lasting results. Trust me, these small steps make a huge difference in the final look and durability of your floors.
Are you facing a similar challenge or feeling overwhelmed by all the advice out there? Don’t worry—by following a proven process, you can avoid costly mistakes and achieve a stunning, long-lasting finish. Let’s dive into the specific strategies that will elevate your flooring game, starting with proper surface preparation and layout planning. Ready to transform your space? Keep reading, because your perfect floor is closer than you think.
Prepare Your Surface Like a Pro
Start by clearing the area and removing all furniture. Sweep and vacuum thoroughly to eliminate dust and debris that could interfere with adhesion or cause uneven surfaces. Check the subfloor for levelness using a long level; if you notice dips or high spots, sand or fill them accordingly. Think of this step as laying a foundation—without a flat, clean surface, the entire project risks failure. I once skipped this step and ended up with squeaky, uneven floors that took twice as long to fix.
Plan Your Layout Before Cutting
Measure your room carefully and decide on an optimal layout. Use chalk lines to mark the center of the room and plan your starting point. Imagine it like a road trip—knowing your route prevents wrong turns. I once started laying planks from a corner without planning, which resulted in awkward cuts and visible seams. Taking the time to map out your pattern ensures a professional-looking finish and minimizes waste. For detailed layout tips, check out my flooring planning guide.
Master the Expansion Gaps
Leave a gap of at least 1/4 inch around the perimeter to allow for expansion. Use spacers to maintain consistent gaps and prevent the flooring from buckling as it expands or contracts with humidity changes. I once neglected this and noticed my floor buckling after a humid summer—an easy mistake to make but costly to fix. Think of this gap as the breathing room your floor needs, like giving a plant space to grow. Remember, this small detail saves you headaches later.
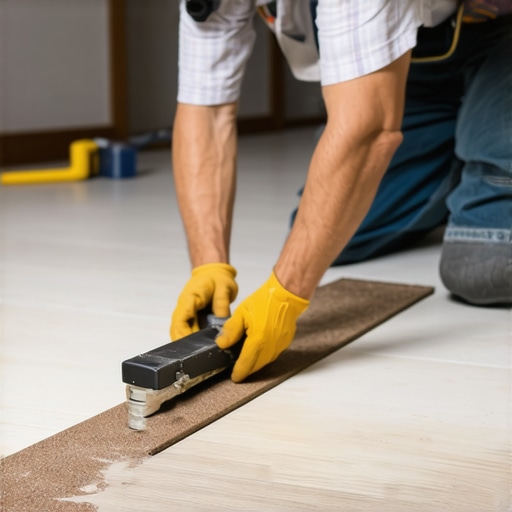
Use Proper Adhesives and Fasteners
Choose the right adhesive or nails for your flooring type. For engineered hardwood, a high-quality adhesive ensures stability; for solid wood, nails or staples are preferred. Apply adhesives evenly with a notched trowel, avoiding puddles that can cause uneven settling. I once used an incorrect adhesive and faced a slippery mess that delayed my project by days. Always double-check manufacturer recommendations and do a test patch if uncertain. For expert advice, see my guide to durable flooring.
Lay the Planks Carefully
Start from your designated starting point, aligning each plank tightly with the previous one. Use a tapping block and mallet to snug joints without damaging the wood. For long, straight runs, consider using a flooring nailer for consistency. I once tried to lay planks by hand, which resulted in gaps and misalignments that were obvious after finishing. Take your time to check each row’s alignment periodically, and don’t rush. Precision here makes all the difference in the final look.
Finish with Proper Trimming and Sealing
Once the flooring is down, install baseboards or moldings to hide expansion gaps. Use a level to ensure trim is straight, and nail it securely into wall studs, not drywall. Seal the gaps with caulk for a seamless look. I learned this lesson the hard way—leaving gaps exposed looked unprofessional and allowed dirt to collect. For a sleek upgrade, explore my tips on baseboard updates. Proper finishing touches elevate your entire project and protect your investment.
Many homeowners fall into pitfalls when tackling flooring, carpet installation, shower renovations, or baseboard updates, often due to misconceptions or overlooked nuances. Let’s dig deeper into what most people get wrong and how to avoid these costly mistakes. Contrary to popular belief, the biggest errors are not always about choosing the right materials but about mastering the details that ensure a flawless finish.
Why Expertise in Details Outshines Basic Knowledge
It’s a common myth that simply laying down flooring or installing a shower is straightforward. The truth is, small nuances — like proper substrate preparation or correct sealing techniques — can make or break your project. For example, many think that laying a shower pan without considering waterproofing can lead to leaks and mold issues down the line, which is why consulting expert guides such as this detailed shower guide is so crucial. Skipping these steps is a trap many fall into, resulting in expensive repairs or premature failure.
Are You Overlooking the Role of Humidity in Installation?
One of the most underestimated factors is humidity. Many think that once the material is installed, it’s done. However, materials like hardwood and certain carpets are highly sensitive to moisture changes, which can cause warping, buckling, or gaps over time. Professional installers always recommend acclimating materials for at least 48-72 hours before installation, a step often dismissed by DIYers. This oversight can lead to costly adjustments and an uneven finish. For advanced tips on this topic, check out my comprehensive flooring guide.
Have you ever fallen into this trap? Let me know in the comments.
Mastering the Art of Seamless Transitions and Finishes
Another common mistake is poor finishing—especially with baseboards and shower trims. Many underestimate the importance of precise cuts, consistent gaps, and proper sealing. For instance, neglecting to caulk around the baseboards or shower edges can allow water or dirt infiltration, degrading the material faster. Using the right tools and techniques, such as a fine-tooth saw for cuts and high-quality caulk, ensures a professional look that lasts. For detailed styling and finishing tips, visit this guide on baseboard upgrades.
In shower renovations, paying attention to tile layout and waterproofing layers is essential. A common misconception is that applying a waterproof membrane is optional, but experts confirm that neglecting this step can result in leaks and mold growth. Check out modern shower ideas for inspiration on proper waterproofing techniques.
How to Avoid the Hidden Traps
One sneaky mistake is rushing through preparation or measurement. Precise measurements and careful planning save time and money. For example, uneven subfloors or misaligned baseboards are often the result of a lack of proper planning. Using tools like laser levels or chalk lines can dramatically improve accuracy. Remember, a little extra time spent on planning and prep pays off with a flawless finish. For more advanced strategies, see my expert flooring tips.
In summary, the real secret to successful home upgrades lies in understanding and executing the little details. By challenging common myths and paying attention to nuances like humidity, finishing techniques, and thorough planning, you can avoid costly mistakes and achieve professional results. Have you ever encountered unexpected issues because of overlooked details? Share your experience below, and let’s learn together!
Maintaining your newly installed flooring, showers, and baseboards is key to ensuring their long-lasting beauty and functionality. The right tools and routine care can make all the difference in avoiding costly repairs and keeping your home looking pristine for years to come. In this post, I’ll share the specific equipment and methods I personally rely on, along with a glimpse into future trends in maintenance that can help you stay ahead.
How do I maintain my flooring and showers over time?
Consistency is crucial. I always recommend using a high-quality microfiber mop for hardwood and laminate floors. These mops trap dust and debris effectively without scratching surfaces. For deep cleaning, a damp microfiber cloth combined with a gentle cleaner designed for your specific flooring material works wonders. Regularly inspecting grout lines and shower seals is essential; I use a silicone sealant remover and reapply fresh sealant with a professional-grade caulk gun to prevent water infiltration.
When it comes to showers, I personally use a grout haze remover to keep tiles looking fresh and a grout brush with stiff bristles for stubborn grime. For baseboards, a soft brush or vacuum extension helps remove dust from intricate profiles, while a damp cloth with a mild cleaner keeps them spotless. Investing in these tools has saved me from frequent repainting or replacements. Additionally, I utilize a laser level to check for any shifts or unevenness that might need addressing early, saving time and money in the long run.
Tools I recommend for long-term maintenance
One of my favorite tools is the Cordless Detail Brush. It’s perfect for cleaning tight corners and grout lines without damaging delicate surfaces. I also swear by a professional-grade caulk gun for resealing showers and baseboards; it provides control and precision, ensuring a perfect finish every time. For floors, a steam mop can be a game-changer, especially for tile and sealed hardwood, as it sanitizes without the use of harsh chemicals.
Looking ahead, I believe that smart moisture sensors and IoT-enabled cleaning devices will become standard in maintenance routines. These innovations will alert homeowners to humidity spikes or leaks before they cause damage, enabling proactive care rather than reactive repairs.
Why embracing these tools and strategies matters
By integrating these specific tools into your regular maintenance schedule, you’ll extend the life of your flooring, showers, and baseboards. In addition, staying vigilant with routine inspections and cleanings prevents minor issues from escalating. For example, I regularly check my grout lines with a moisture meter to ensure no hidden water is seeping behind tiles, which can lead to mold growth.
Don’t forget: a little investment in quality tools now can save you a lot of money and frustration later. Try adopting a monthly maintenance routine that includes these tools, and you’ll notice your home staying in top shape with minimal effort. For more advanced tips, consider reading my guide on durable flooring maintenance.
Start today by selecting one of the recommended tools, such as a microfiber mop or a professional caulk gun, and make maintenance a regular part of your home care. Your future self will thank you for it!
The Hardest Lesson I Learned About Flooring and Showers
One of my biggest surprises was realizing that even the smallest oversight, like neglecting humidity acclimation, can ruin a carefully planned renovation. I once installed new hardwood without giving the planks time to adjust to my home’s humidity, leading to warping within months. That taught me the importance of patience and detailed prep, which are often overlooked but critical for success.
Uncovering My Biggest Myths About Home Renovation
I used to believe that a quick DIY fix could replace professional expertise. But I learned the hard way that shortcuts in sealing, measuring, or finishing can cause long-term problems like leaks or uneven surfaces. Now, I know that investing in quality tools and taking extra time with finishing touches saves me money and stress down the line.
Why Paying Attention to Details Transformed My Results
From correctly setting expansion gaps to perfecting caulking around showers, I discovered that true craftsmanship lies in the details. Small actions—like using spacers or a laser level—made my projects look professionally done, increasing their durability and aesthetic appeal. It’s these nuances that separate a good job from a great one.
My Go-To Resources That Keep Me on Track
I trust this guide on creating spa-like showers for waterproofing techniques, and this resource on baseboard upgrades for finishing touches. They’re my go-to because they combine expert advice with practical tips that I can apply immediately.
Embrace the Challenge and Make It Your Own
The journey of home renovation is filled with lessons, surprises, and opportunities to learn. Don’t be discouraged by setbacks; view them as stepping stones toward mastery. Your perfect flooring, shower, or baseboard update is within reach if you stay patient, detail-oriented, and eager to learn. Ready to turn your home into a masterpiece? Your next project awaits!
What’s the biggest home upgrade challenge you’ve faced? Share your story below, and let’s support each other in creating beautiful, lasting spaces.
One thought on “Expert Flooring Installation Tips for a Flawless Finish”
Samantha Lee
February 9, 2026 at 2:10 amWow, reading this post really resonated with me. When I first attempted a DIY hardwood floor installation, I underestimated how critical proper subfloor prep and humidity acclimation are, and I faced similar issues with gaps and buckling. It’s incredible how these small details can make such a huge difference in the overall look and longevity of the floor. I especially appreciated the emphasis on using spacers for expansion gaps—something I learned the hard way after encountering long-term problems. I’ve found that following expert guidance on layout and proper sealing not only saves time but also prevents costly mistakes later. For anyone about to start a flooring project, do you have tips on how to efficiently measure and plan your layout? I’d love to hear how others tackle this crucial step to ensure a seamless finish.