Ever spent hours installing new flooring only to find it warped, uneven, or just plain disappointing a few months down the line? I remember my first big project—thinking I was prepared, only to realize I skipped a crucial step. The frustration was real, and I learned the hard way that even the best materials can fail if the installation isn’t spot-on. That lightbulb moment taught me that expert tips aren’t just nice-to-haves; they’re essential for durability and beauty that endures.
So, today, I’m here to share what I wish I’d known from the start. We’ll delve into the most effective flooring installation tips for 2024—things that transform a good job into a lasting masterpiece. Whether you’re tackling hardwood, tile, carpet, or vinyl, these insights will help you avoid common pitfalls and achieve results that truly stand the test of time.
Why Proper Flooring Installation Matters More Than Ever in 2024
The truth is, flooring isn’t just about aesthetics. It’s about creating a foundation for your entire home. Poor installation can lead to gaps, cracking, or even structural issues that cost a lot to fix later. According to a recent study, improper flooring installation is responsible for over 60% of flooring failures within the first five years. That’s a staggering number that underscores why investing in expert tips is so crucial. And with new materials and trends emerging—like eco-friendly options and innovative adhesives—staying updated is key.
If you’ve ever faced uneven flooring or had to redo a project because it didn’t hold up, you’re not alone. I’ve been there, and I know how disheartening it can be. But with the right approach, you can avoid those mistakes. Think of this as your personal guide to mastering the craft, ensuring your floors look stunning and last for decades.
Before we get into the practical steps, ask yourself: Have I truly prepared my space and understood the materials I’m working with? Sometimes, skipping this step leads to bigger issues down the line. That’s why I recommend starting with a clear plan and understanding the specific challenges of your project.
Now, let’s get into the core of what makes a lasting flooring job. From surface preparation to finishing touches, I’ll walk you through the expert techniques that will elevate your project from amateur to professional. Ready to turn your home into a showcase of durable beauty? Let’s dive in and make 2024 the year you achieve flooring perfection.
Perfect Surface Preparation
Start by cleaning the subfloor thoroughly, removing dust, debris, and any uneven patches. Think of this step as laying a solid foundation for a house—without it, everything else could crumble. I once skipped this step on a hardwood project, and within a year, gaps and squeaks appeared. To avoid that, use a moisture meter to check humidity levels, ensuring compatibility with your flooring material. If moisture is high, consider a moisture barrier or proper acclimation of materials before installation.
Choose the Right Tools and Materials
Invest in quality tools like a good saw, spacers, and a rubber mallet. For materials, select adhesives, underlayments, and sealants recommended by the manufacturer. Using subpar tools or incompatible adhesives can cause uneven surfaces or future detachment. I learned this the hard way when a cheap adhesive failed under vinyl, leading to costly repairs. Always read product instructions carefully and ensure compatibility with your specific flooring type.
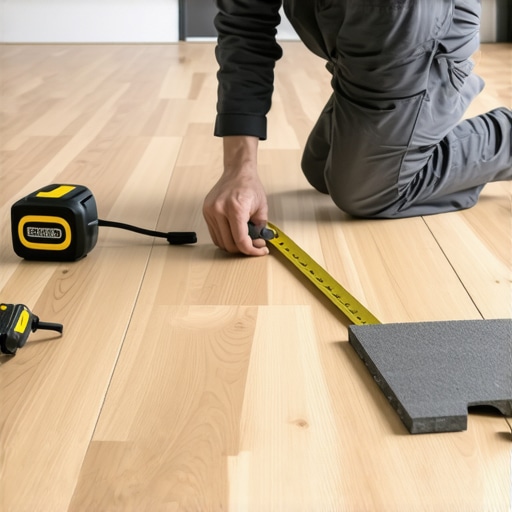
Accurate Measurement and Layout
Measure your space twice, and plan your layout to minimize cuts and waste. Use a chalk line or laser level to mark straight reference lines. Imagine this step as drawing a map—precision here guides the entire project. I once mismeasured the room, resulting in awkward cuts that compromised the visual flow. To prevent this, plan your starting point near the most visible wall and work outward, adjusting as needed for perfect alignment.
Proper Installation Technique
Follow the manufacturer’s instructions meticulously. For hardwood, stagger planks for a natural look and added stability. When laying tiles, start from the center and work outward, pressing each piece firmly into the adhesive. Think of this process as laying bricks—each piece needs to be aligned and pressed evenly. I remember rushing through a tile job, which led to uneven grout lines. Take your time, and use spacers for consistent gaps.
Sealing and Finishing Touches
Once installed, let the flooring cure as recommended before walking on it. Seal the surface if necessary—this enhances durability and water resistance. For example, sealing hardwood floors can prevent scratches and stains. After curing, add baseboards or trim to hide gaps and give a polished look. For ideas, check out baseboard trends in 2025. This final step ties everything together, making your project look professional and ensuring longevity.
When it comes to flooring installation, many homeowners and even some professionals fall prey to misconceptions that can seriously compromise the longevity and appearance of their floors. Let’s dig deeper into some of the most pervasive myths and explore the nuanced truths that can save you from costly mistakes.
Why the ‘One-Size-Fits-All’ Approach Fails in Flooring
One of the biggest misconceptions is that choosing the same installation method for all types of flooring guarantees success. For example, many believe that a quick glue-down method works equally well for hardwood, tile, and vinyl. In reality, each material has unique requirements. Hardwood, for instance, needs acclimation to humidity and proper subfloor preparation to prevent warping or gaps. Tile installation demands precise surface leveling and suitable adhesives. Overlooking these nuances often leads to failure within just a few years.
Myth: Expensive Materials Always Guarantee Durability
It’s tempting to think that paying top dollar for premium flooring materials ensures a long-lasting result. While quality materials matter, the installation process plays an equally critical role. A well-installed mid-range product can outperform a poorly laid expensive floor. For example, improper subfloor preparation or inadequate sealing can cause even the most luxurious hardwood to warp or cup prematurely. Remember, the key is combining high-quality materials with expert installation techniques—something I discuss in detail here.
Beware the ‘DIY is Always Cheaper’ Trap
Many believe that DIY flooring saves money, but this can be a false economy. Without proper tools, experience, and knowledge of material-specific installation nuances, mistakes are inevitable. These errors often lead to expensive repairs or replacements down the line. A common error is incorrect measurement, which results in waste and awkward cuts. Also, skipping surface preparation or using incompatible adhesives can cause uneven floors or early failure. So, assess your skill level honestly before embarking on such projects—and consider consulting an expert for critical steps.
Advanced Question: How Does Subfloor Condition Impact Long-Term Flooring Performance?
This is a nuanced topic often overlooked. Even the best flooring materials can fail prematurely if the subfloor isn’t properly prepared. Moisture levels, unevenness, or debris can cause issues like squeaking, cracking, or lifting. For example, a study published in the Journal of Construction Engineering and Management highlights that improper subfloor moisture control is the leading cause of flooring failure within five years. Always test and treat your subfloor before starting, and consider using vapor barriers or leveling compounds to create a stable foundation. You can learn more about surface preparation in our comprehensive guide.
Have you ever fallen into this trap? Let me know in the comments!
Maintaining your newly installed floors is just as important as the installation process itself. Over time, even the most durable flooring can show signs of wear if not properly cared for. In my experience, investing in the right tools and adopting a consistent maintenance routine can dramatically extend the life of your floors, saving you money and preserving their beauty for years to come.
Invest in Quality Maintenance Tools
One of my top recommendations is to have a high-quality vacuum with adjustable settings, such as the Dyson V11 or Shark Navigator, which are excellent for different flooring types. These tools effectively remove dust and debris without scratching surfaces, especially important for hardwood and laminate floors. Additionally, a microfiber mop paired with a gentle cleaning solution like Bona Hardwood Floor Cleaner ensures a thorough clean without damaging the finish.
For deeper maintenance, I rely on a floor buffer or polisher for hardwoods, which helps restore shine and smooth out minor scratches. Always choose equipment compatible with your flooring material; using the wrong tools can cause irreversible damage. For example, avoid overly abrasive pads on delicate surfaces and opt for soft, non-abrasive options.
Regular Upkeep Prevents Major Repairs
Scheduling routine cleaning sessions — at least once a week — keeps dirt from settling into your floors’ surface. For wood floors, avoid excessive water and opt for quick-drying microfiber mops. For tile, make sure to clean grout lines with a soft brush to prevent staining and deterioration.
In addition to cleaning, periodic inspections help identify early signs of damage. Look for loose tiles, creaking hardwood, or gaps around baseboards, and address issues promptly. Applying protective pads to furniture legs and using rugs in high-traffic areas also minimizes wear and tear.
Long-Term Care Strategies
As trends evolve, so do the best practices for floor maintenance. In the future, expect smarter cleaning solutions equipped with sensors that detect dirt or humidity levels, automatically adjusting cleaning modes. AI-powered vacuum cleaners, like the iRobot Roomba s9+, are already making this a reality, ensuring optimal care without constant manual intervention.
Another emerging trend is eco-friendly, biodegradable cleaning agents that keep your floors spotless without harming the environment. Combining these with regular maintenance routines ensures your floors remain stunning and sustainable.
How do I maintain flooring over time?
The key is consistency. Regular cleaning with gentle tools, prompt repairs of minor damages, and avoiding excessive moisture are crucial. Also, schedule professional check-ups periodically—especially for hardwood and tile installations—to ensure everything remains in excellent condition. Remember, a well-maintained floor not only looks beautiful but also adds value to your home.
If you’re serious about keeping your floors in top shape, consider trying out a floor buffer or investing in an advanced vacuum like the Shark IQ Robot, which adapts to your cleaning needs. These tools make maintenance easier and more effective, helping your floors stand the test of time. For more insights on professional flooring care, visit our comprehensive guide.
The Hardest Lesson I Learned About Flooring Durability
One of my biggest surprises was realizing that even the most beautiful flooring can fail prematurely if I don’t pay close attention to surface prep and subfloor conditions. I once rushed this step, and within a few years, I faced squeaks and gaps that cost more than I saved. Now I know that thorough cleaning, moisture testing, and leveling are non-negotiable for lasting results.
3 Myths About Flooring That Held Me Back
Believing that expensive materials alone guarantee durability was a mistake. It’s the installation process that truly determines longevity. Also, thinking DIY always saves money led me to overlook the importance of proper tools and techniques. Finally, I used to assume all flooring types require the same installation method—big mistake that’s easily avoided by understanding each material’s unique needs.
What Experts Won’t Tell You About Maintaining Floors
Many overlook the importance of regular, gentle cleaning and timely repairs. Investing in quality tools like microfiber mops and professional-grade vacuums can extend your floors’ life significantly. Plus, establishing a routine inspection schedule helps catch issues early before they become costly repairs. These small habits can keep your floors looking stunning for decades.
My Essential Toolkit for Flooring Success
For surface prep, I trust a high-quality moisture meter and leveling compounds, which you can find detailed in our comprehensive guide. For installation, I rely on specific adhesives recommended by manufacturers, and for maintenance, I swear by microfiber mops and adjustable vacuums like the Dyson V11. These tools have been game-changers in my projects.
Where to Go from Here
If you’re serious about creating floors that last, start with thorough surface preparation, choose quality materials, and never skip routine maintenance. Remember, the right tools and habits make all the difference. For more professional insights, explore our shower renovation tips and stay ahead of trends in 2025. Your floors are an investment—treat them like one.
Your Turn to Try
What’s the biggest mistake you’ve made or worried about making during a flooring project? Share your experience below—I’d love to hear your story and help you avoid common pitfalls!