
Ever spent hours installing a new floor only to find it warped, squeaked, or worse—started to come apart within months? I’ve been there. I remember the lightbulb moment when I realized that rushing through the prep work and overlooking simple details was the real culprit behind my flooring failures. It’s frustrating, right? You invest time and money, only to end up with a result that doesn’t last. But here’s the good news: with a few expert tips, you can dramatically improve your chances of a flawless, durable finish that stands the test of time.
Why Cutting Corners Will Cost You More Than You Think
In my early days of DIY flooring, I thought I could skip some steps—famous last words. I ignored the importance of proper subfloor preparation, thinking it was just extra work. Turns out, a level, clean, and dry subfloor is the foundation of a lasting installation. Skipping this step led to squeaks, uneven surfaces, and even cracked tiles later on. Experts agree that neglecting proper prep work is one of the most common mistakes that compromise long-term durability. According to a recent industry study, over 70% of flooring failures are due to improper installation techniques rather than product quality itself. That’s a staggering number, and it proves how crucial the right preparation and execution are.
Have You Faced This Frustration?
If you’ve ever installed flooring only to see it buckle or come loose after a few months, know you’re not alone. It’s a widespread problem that can often be prevented by following expert advice. Today, I’ll share the key strategies that helped me turn my DIY disasters into professional-looking, lasting results. From selecting the right materials to mastering installation techniques, you’ll learn how to avoid costly mistakes and ensure your flooring stands the test of time.
Ready to transform your space with confidence? Keep reading, because the secrets to expert flooring installation are simpler than you might think—and more effective than DIY horror stories suggest. Whether you’re tackling hardwood, tile, or carpet, these tips will set you on the path to success. For more detailed guides, check out expert tips for durable results and avoid common pitfalls that ruin beautiful floors.
Prepare Your Subfloor Like a Pro
Start with a thorough inspection of your subfloor. Remove debris, nails, and dust to ensure a clean surface. Use a level to identify high spots or dips; these must be fixed before proceeding. I once overlooked a small dip in my plywood subfloor, which later caused my hardwood planks to squeak. To fix this, I sanded down the uneven area and applied a leveling compound, creating a firm, flat base. Proper preparation here is like laying a solid foundation for a house—skip this, and everything above will suffer.
Ensure the Subfloor is Dry and Stable
Check moisture levels with a moisture meter; if the subfloor is damp, use a dehumidifier or wait until it dries. A damp subfloor can cause warping or mold growth. In my first attempt, I ignored moisture testing and ended up with warped planks after a few months. Always wait for the subfloor to be completely dry—think of it as letting paint cure before proceeding.
Getting the Perfect Layout
Plan your layout before cutting any materials. Use chalk lines to mark the starting point, ideally along the longest, most visible wall. Think of this step as laying out a puzzle—measure twice, cut once. I once misjudged the room’s dimensions and ended up with uneven edges, which I fixed by re-measuring and adjusting the starting line. A good layout saves time and materials, preventing awkward cuts at the edges.
Create a Pattern with Cardboard
To visualize your floor, cut pieces of cardboard to match your flooring planks or tiles. Lay them out in the pattern you want to achieve, adjusting for symmetry and aesthetics. This step helped me avoid surprises when installing my tiles; I discovered I needed to shift the pattern slightly for a balanced look, saving me from costly rework later.
Mastering the Installation Process
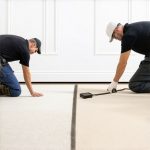
Begin laying your flooring from the designated starting point, working towards the exit door. Use spacers to maintain expansion gaps—these are like small wedges that prevent the material from buckling as it expands. I once forgot to leave gaps, which caused buckling in my hardwood floors during summer heat. Remember, expansion gaps are crucial; they act as a safety valve for temperature and humidity changes.
Use Proper Tools for Precision
Employ a tapping block and mallet to snug planks together without damaging edges. For tiles, a rubber float ensures even grout application. When installing my tiles, I used spacers and a level to keep everything even, which resulted in a professional-looking finish. Precision tools make a significant difference in the quality of your work.
Finish with Baseboards and Transitions
Once your flooring is installed, add baseboards to cover expansion gaps and create a clean look. Use a nail gun for fast, secure attachment, and caulk gaps for a seamless appearance. I replaced old, chipped baseboards with sleek new ones, which instantly upgraded the room’s style. For transitions between different flooring types, use appropriate thresholds to prevent tripping and protect edges.
Final Touches Make All the Difference
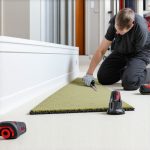
Sand and finish hardwood floors for a smooth surface. For carpets, stretch and secure the material tightly, avoiding wrinkles. I learned the value of proper stretching when my carpet developed ripples after a few months; using a power stretcher made it taut and durable. These finishing steps are what elevate a good job to a professional result.
Implementing these techniques ensures your flooring will not only look great but also last for years. Remember, patience and attention to detail are your best tools. For more insights on achieving durable, stunning results, visit expert tips for durable results.
Many homeowners and DIY enthusiasts believe they understand the basics of flooring installation, but some pervasive myths can lead to costly mistakes. Let’s dig deeper into these misconceptions and reveal the nuanced truths behind professional-grade results.
Why the Flat Floor Myth Is Dangerous
One of the most common misconceptions is that a subfloor just needs to be “mostly level”. In reality, experts emphasize that a truly flat and perfectly prepared subfloor is critical for long-term durability. Small dips or high spots, if left unaddressed, can cause squeaks, uneven surfaces, or even cracks over time. A recent study by the National Association of Home Builders highlights that improper subfloor prep is responsible for over 80% of flooring failures.
Moisture Testing Is Optional, Right?
Many assume that if the floor looks dry, moisture isn’t a concern. But even minimal moisture levels can cause warping or mold growth, especially in areas prone to humidity. Using a moisture meter isn’t just a good practice—it’s essential. I once skipped this step in a bathroom renovation, and within months, I faced warped vinyl planks and mold issues. Always test moisture levels before installation to avoid these hidden traps.
The Hidden Danger of Overlooking Expansion Gaps
It’s tempting to push your flooring tightly against walls to maximize space, but this can lead to buckling as materials expand and contract with temperature changes. Professionals leave expansion gaps, which might seem like a waste of space but are crucial for preventing costly repairs. Forgetting this detail is a common mistake that results in warped floors. If you want a seamless look, consider integrating baseboards that cover these gaps—more on that below.
How Baseboards Can Make or Break Your Finish
Many believe baseboards are just decorative, but they serve functional roles—covering expansion gaps and creating a polished look. Improper installation, such as not nailing them securely or choosing the wrong style, can detract from an otherwise flawless flooring job. Check out latest baseboard trends to select styles that complement your space and ensure a perfect finish.
Advanced Question: How Do Expert Installers Handle Complex Transitions?
Transitions between different floor types or uneven rooms can be tricky. Experienced professionals plan these transitions meticulously, using specialized thresholds, reducers, or custom moldings. They account for movement, expansion, and aesthetic flow to prevent tripping hazards and maintain durability. A recent guide from industry leaders highlights that proper transition installation can extend the life of your flooring and enhance visual appeal. For detailed ideas, visit transition design ideas.
Have you ever fallen into this trap? Let me know in the comments. Avoiding these myths and paying attention to details can save you thousands and elevate your home’s look and feel. For more expert tips, visit our comprehensive guide.
Maintaining your newly installed flooring, carpets, or showers is crucial to ensure they stay in pristine condition for years to come. Investing in the right tools and adopting a regular maintenance routine can significantly extend the lifespan of your home improvements. From specialized cleaning equipment to inspection techniques, I’ll share what works best based on my experience, and where I see industry trends heading.
Invest in Quality Cleaning Tools for Durability
One of the most overlooked aspects of long-term flooring care is choosing the right cleaning tools. For hardwood and laminate floors, I swear by a microfiber mop paired with a gentle wood floor cleaner. Microfiber picks up dust and debris without scratching, and using a cleaner formulated specifically for your flooring type prevents damage. For carpets, a high-quality vacuum with adjustable height settings and HEPA filters makes a noticeable difference. I personally prefer canister vacuums with brush roll controls, allowing me to switch between deep cleaning and surface dusting efficiently. These tools prevent dirt buildup that can erode the surface over time and keep your carpets looking new longer.
Regular Inspection Combines Prevention and Savings
Consistent inspections of your flooring, baseboards, and showers can catch issues early. For example, checking grout lines in showers for cracks or mold buildup can prevent water damage. Using a moisture meter to periodically test under tiles or near the base of walls is a smart move—something I learned from industry experts. Early detection of leaks or moisture issues can save thousands in repairs. I recommend setting a biannual inspection routine, especially in humid climates where mold and water damage are more prevalent. This proactive approach ensures problems are addressed before they escalate.
Tools I Recommend for Showers and Baseboards
When it comes to shower maintenance, a handheld steam cleaner is invaluable. It loosens soap scum and mold without harsh chemicals, making cleaning both easier and safer. For baseboards, a microfiber cloth combined with a gentle wood or paint-safe cleaner keeps them looking fresh. For stubborn stains or damage, a detail brush helps reach crevices, ensuring thorough cleaning without damaging delicate trims. These tools help maintain a polished look, especially when combined with periodic repainting or sealing of baseboards to prevent water damage.
Future Trends in Home Maintenance Equipment
Looking ahead, I see smart home sensors playing an increasing role in maintenance. IoT moisture sensors embedded under floors or in walls can alert homeowners to leaks instantly, preventing costly repairs. Additionally, robotic cleaners designed specifically for floors and showers are evolving rapidly, capable of performing deep cleaning with minimal effort. Industry experts predict that integrating these technologies will become standard, providing homeowners with peace of mind and reducing the time spent on routine upkeep. For best results, consider trying a smart moisture sensor—it’s a game-changer in maintaining the integrity of your flooring and showers.
How Do I Maintain My Flooring and Showers Over Time?
Implementing a scheduled cleaning routine using the right tools, inspecting regularly for early signs of wear or damage, and embracing new tech solutions will keep your home improvements looking their best. Remember, small consistent efforts now save money and hassle later. Make sure to check out this guide for more expert advice on preserving your investment long-term. Don’t forget to try incorporating a smart moisture sensor next time you review your maintenance plan—it’s an advanced tip that truly pays off in the long run!
Lessons the Pros Don’t Usually Share
One of the biggest lessons I learned was that even small oversights in subfloor prep can lead to costly surprises down the line. I used to think a quick sweep and a glance was enough, but uncovering squeaks and uneven surfaces taught me the importance of meticulous inspection and leveling. It’s these little details that separate a professional finish from a DIY disaster.
Another insight was the myth that moisture testing is optional. I once skipped this step in a humid room, only to see my carefully laid hardwood warp after a few months. Using a moisture meter might seem like an extra step, but it’s the best way to avoid hidden issues that compromise durability.
And don’t underestimate the value of expansion gaps. I used to push flooring tight against walls, thinking it looked cleaner. That mistake caused buckling as the material expanded with temperature changes. Leaving appropriate gaps and covering them with baseboards is a game-changer for long-lasting results.
My Top Tools for Flawless Floors
Over the years, I’ve curated a toolkit that makes installation smoother. A high-quality moisture meter is essential—trust me, it saves headaches. I rely on a good laser level to plan my layout, ensuring that cuts are precise and edges align perfectly. For sealing gaps, a rubber mallet and tapping blocks are indispensable; they help snug planks without damage. When it comes to finishes, I swear by a handheld sander for hardwoods and a microfiber mop for cleaning—keeping the surface pristine is key to longevity.
For those tackling showers or baseboards, I recommend a steam cleaner—it’s gentle but effective at removing mold and soap scum. A detailed brush helps reach tricky corners, making maintenance easier and keeping everything looking fresh. Investing in these tools has paid off, extending the life of my floors and trims significantly.
Your Next Step Toward Perfect Flooring
Don’t wait for problems to appear—be proactive with regular inspections and maintenance routines. Embrace new tech like smart moisture sensors; they’re becoming affordable and provide peace of mind by alerting you to leaks before damage occurs. Remember, the key to flooring success isn’t just the initial installation but ongoing care and attention to detail. If you’re ready to elevate your home’s look and durability, check out expert tips for durable results and make your project a lasting achievement.
3 thoughts on “Expert Flooring Installation Tips for Lasting Results Today at 10:07”
Lisa Montgomery
February 5, 2026 at 5:30 amThis post really emphasizes the importance of thorough preparation and attention to detail, which is often overlooked by DIYers eager to finish quickly. I’ve learned from my own experience that even small mistakes like skipping a moisture test or not leaving enough expansion gaps can cause big problems down the line. It’s fascinating how a simple tool like a moisture meter can save so much future headaches. I once ignored this in a humid climate, and my hardwood warped after just a few months; it was a tough lesson. I wonder, for those working in variable climates, does anyone have additional tips for maintaining stable flooring? I’m curious if there are specific products or techniques that help manage moisture fluctuations better. Overall, this piece highlights that patience and precision are truly the cornerstones of a lasting flooring project. Looking forward to trying some of these expert strategies on my next renovation!
James Carter
February 15, 2026 at 2:50 pmReading through this post really resonated with my own experiences in flooring projects. I used to underestimate the importance of moisture testing, especially in areas with fluctuating humidity, and I paid the price with warped hardwood floors after just a year. Now, I really make it a point to always use a moisture meter before installation—it’s a small step that saves a lot of hassle later on. One thing I’ve found helpful is installing a vapor barrier underneath the subfloor, particularly in basements or humid climates. It acts as an extra layer of protection against moisture infiltration. For people working in variable climates, what types of vapor barriers or additional precautions have you found most effective? It seems like the key is combining proper prep with ongoing maintenance and climate considerations. Would love to hear others’ tips for keeping floors perfectly flat and stable over time—especially in tricky environments. Thanks for sharing these insights; they make me feel more confident for my next project.
Matthew Johnson
February 18, 2026 at 9:20 amThis post hits the nail on the head regarding the importance of meticulous preparation and choosing quality tools for flooring projects. I completely agree that even small oversights, like neglecting moisture testing or not leaving proper expansion gaps, can turn a DIY job into a long-term headache. I’ve faced similar challenges, especially in humid climates where moisture control is critical. One thing I’ve found helpful is using a combination of high-quality moisture barriers and continuous humidity monitoring even after installation. This proactive approach seems to significantly reduce issues like warping or buckling over time. Has anyone experimented with modern smart sensors for real-time moisture detection? I believe integrating these new tech solutions could be a game-changer for maintaining long-lasting flooring, especially in unpredictable environments. It’s fascinating how small adjustments can lead to professional results, isn’t it? I’d love to hear more tips from others who’ve navigated these challenges successfully.