I’ll never forget the first time I tried installing a hardwood floor alone. I was excited, confident even, until I stepped back to admire my work and noticed a small gap along the edge that I couldn’t ignore. That tiny mistake led to warping and unevenness down the line. It was a real lightbulb moment for me—solid installations require more than just nailing boards down; they demand a keen eye for detail and proper technique. Over the years, I’ve learned that achieving long-lasting results isn’t about shortcuts or guesswork; it’s about following proven tips and avoiding common pitfalls.
Why Proper Flooring Installation Changes Everything
Honestly, the quality of your installation determines whether your beautiful new floors will stand the test of time or become a source of frustration. A flawless job can transform your entire home into a sleek, inviting space, but even minor slip-ups can lead to problems like creaking, shifting, or worse—early wear. Experts agree that good installation practices extend the lifespan of your floors and prevent costly repairs later on. Did you know that improper installation accounts for nearly 70% of flooring failures? That’s a startling statistic from industry research, emphasizing how crucial it is to get it right from the start.
If you’re tackling a flooring project, you might wonder whether hiring a professional is really worth it. Trust me, I’ve been there. That initial fear of spending more money can be tempting, but the long-term savings and peace of mind are worth every penny. Not to mention, professional installers often bring valuable tips to ensure each plank or tile is perfectly placed. I recall a time I skimped on prep work, thinking it wouldn’t matter much—big mistake! That early oversight made my entire project harder and less durable in the long run. To avoid repeating my mistakes, I’ll share specific strategies that will help ensure your flooring lasts and looks stunning for years to come.
Is the Promise of Perfect Flooring Installation Too Good to Be True?
Like many DIY enthusiasts, I used to believe that following basic instructions was enough. But experience taught me differently. The truth is, a flawless finish comes down to attention to detail, proper tools, and understanding the nuances of each flooring type. Without these, even the most meticulous DIYer can encounter issues. To give you a real shot at success, I recommend checking out trusted advice on techniques and common pitfalls—such as the ones I fell for early on. Want to learn how to avoid the biggest mistakes and ensure your flooring stands the test of time? Read on, because the next steps will guide you through expert tips that have saved my projects, and countless others, from failure.
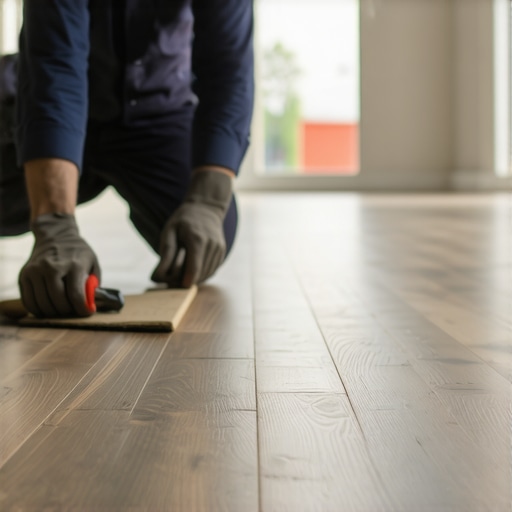
Prepare Your Space and Gather Essential Tools
Start by clearing the room completely, removing existing flooring and furniture. Ensure the subfloor is clean, dry, and level; this foundation is critical for a durable installation. Gather tools like a chalk line, tape measure, carpenter’s square, underlayment, utility knife, pry bar, and a rubber mallet. Having everything within reach prevents delays and mistakes—think of it as setting the stage before a performance.
Accurately Measure and Plan Your Layout
Measure the room’s length and width to calculate the total area, adding a 10% margin for waste. Use a chalk line to mark the starting point—typically the longest wall—ensuring your rows are straight and square. I once skipped detailed measurements, leading to uneven edges; double-checking saved me from costly corrections later. Planning your layout meticulously ensures a balanced look and minimizes material waste.
Lay the Subfloor or Underlayment
If necessary, install a moisture barrier or underlayment suited to your flooring type. For hardwood and laminate, this step prevents future warping; for tiles, a proper membrane ensures waterproofing. When I installed laminate flooring, I rolled out and snapped the underlayment into place, smoothing out bubbles. Proper underlayment acts like a cushion, absorbing minor imperfections and providing stability.
Install the Main Flooring Material
Hardwood and Laminate
Start laying planks from your designated starting line, clicking or nailing each row carefully. Use spacers to maintain expansion gaps along walls—these are vital for accommodating temperature changes. Remember, snapping a chalk line as a guide kept my rows perfectly straight, preventing a ripple effect across the floor.
Tile Flooring
Mix thinset mortar according to manufacturer instructions, then spread it with a notched trowel, creating ridges for even adhesion. Press tiles firmly, using spacers for grout lines. Regularly check alignment with a level; I once rushed this step, causing uneven grout lines that I had to re-do. Precision here ensures a flat and uniform surface.
Carpet Installation
Measure and cut the carpet, leaving extra for seaming and stretch. Use a knee kicker to stretch the carpet tightly over the tack strips, avoiding wrinkles. Securing edges with tack strips or adhesives completes the job. I once skipped proper stretching, resulting in a saggy appearance—stretching the carpet as I worked made a noticeable difference.
Finish with Baseboards and Transitions
Attach baseboards using nails or adhesive, covering expansion gaps and giving your room a polished look. https://tilecraftsmens.com/baseboard-trends-in-2025-fresh-styles-for-every-room offers the latest trends to elevate your interior. For transitions between different flooring types, use appropriate thresholds or transition strips to ensure smooth, safe transitions. Once, I replaced old baseboards with modern styles, instantly updating the room’s vibe and concealing minor imperfections along the edges.
Final Checks and Cleanup
Inspect the entire installation, checking for loose tiles, gaps, or uneven areas. Remove spacers, clean excess adhesive, and allow materials to settle as per manufacturer instructions. Proper finishing guarantees your flooring stays pristine and functional for years. I learned that patience during this step prevents costly repairs down the line, especially when dealing with expansive materials like hardwood that need room to breathe.
Even seasoned DIY enthusiasts often believe that following basic instructions guarantees a flawless finish. However, the real nuance lies in understanding the subtle details that can make or break your project. One common misconception is that zero gaps and perfect alignments are simply achieved through visual inspection and patience. In reality, advanced techniques—like precise acclimatization of materials and controlling environmental conditions—are critical for longevity and aesthetic appeal. For instance, many overlook the importance of acclimating hardwood or laminate flooring to the room’s humidity for at least 48 hours prior to installation, a step that experts advocate to prevent warping and gaps over time. According to a study by the National Wood Flooring Association, improper acclimation can lead to up to 30% of flooring failures within the first year, highlighting its significance.
Is Surface Level Enough, or Do I Need a Perfect Subfloor?
Another nuance is the assumption that a subfloor’s flatness isn’t crucial, especially when installing tiles or carpets. Yet, uneven subfloors can cause grout cracking, ridges, and unsightly bumps that are visible and uncomfortable underfoot. Advanced installers use a laser level or a long straight edge, not just handheld tools, to detect and correct these imperfections. Skipping this step might seem minor initially, but the long-term repercussions include uneven wear and compromised joint integrity. For a sophisticated approach, consider detailed subfloor assessment protocols described in expert guides, which emphasize that even minor deviations exceeding 3/16 inch can result in significant issues.
Additionally, many underestimate the complexities involved in fitting baseboards and transitions seamlessly. It’s not enough to just nail them into place; precise measurement of room dimensions, accounting for wall irregularities, and selecting the right transition strips are crucial. Modern trends lean towards larger, statement baseboards, but without proper planning, these can accentuate uneven walls or floor imperfections. External experts suggest using flexible caulks and adjustable transition strips to accommodate expansion and contraction, preventing gaps or buckling. This level of attention to detail is often overlooked by DIYers eager to finish quickly but can dramatically improve the final look and durability. Want to master these advanced techniques? Check my comprehensive guide on achieving professional results with baseboards and transitions.
Lastly, many assume that carpet installation ends with stretching and trimming. Yet, sophisticated installers focus on the padding’s quality and density, which influences comfort and lifespan. In high-traffic areas, upgraded padding with rebound foam or rubber layers can reduce wear and improve soundproofing. Moreover, professional stretchers with power tools ensure a tight, wrinkle-free surface—something manual tools often fail to deliver consistently. According to the Carpet Institute, improper stretching can lead to wrinkles and bubbling within as little as six months, emphasizing its importance. Don’t underestimate the power of precise equipment and high-quality padding; they make all the difference in achieving that plush, flawless look that endures. For more in-depth tips on perfecting carpet installations, explore this guide for lasting elegance and durability.
Maintaining your flooring, baseboards, showers, and carpets over time requires more than just occasional cleaning. Investing in the right tools ensures your installations stay pristine and durable for years to come. One crucial tool I personally swear by is a moisture meter, which helps monitor humidity levels in the space. This device prevents wood and laminate floors from warping due to excess moisture—something I learned the hard way early in my DIY journey. When I purchased my first moisture meter, I noticed subtle fluctuations in humidity that tipped me off to ventilation issues, allowing me to address them before damage occurred. For reliable and accurate readings, I recommend models like the Wagner Meters Orion 940, which offers non-destructive testing and precise data, ensuring your subfloor and flooring conditions are always optimal.
How do I maintain flooring and finishes over time?
Consistent cleaning with high-quality, pH-balanced products prolongs the lifespan of your surfaces. I avoid harsh chemicals that can degrade sealants or finishes—preferring gentle cleaning solutions like a mix of water and mild detergent. For carpets, periodic deep cleaning with a professional-grade steam cleaner helps remove embedded dirt and allergens, keeping your space healthier. When it comes to showers, regular inspection and cleaning of grout lines with a ceramic tile cleaner prevent staining and microbial growth. To make this process even more efficient, I use a grout brush with stiff bristles—another essential tool in my maintenance kit because it reaches into crevices that a regular sponge can’t. As for baseboards, a soft microfiber cloth combined with a good quality furniture polish keeps themlooking fresh and prevents dust buildup. Modern trends like larger baseboards are visually striking, but they demand regular dusting and surface conditioning to maintain their elegance, especially in high-traffic areas.
Future trends in maintenance and tools
The future of home maintenance points toward smart monitoring devices integrated with home automation systems, allowing you to track humidity, temperature, and even surface wear remotely. Advanced sensors could alert you to issues before they become costly repairs, making upkeep more proactive and less reactive. For example, integrating a system like the Fibaro Flood Sensor can notify you immediately if moisture levels rise unexpectedly—critical for preventing long-term damage in environments with hardwood or laminate floors. As technology continues to evolve, adopting these tools now can save time and money down the road. To kick-start your journey into smarter maintenance, try implementing a moisture monitoring system in your next update. You’ll be surprised how much peace of mind this small investment can provide. Want more guidance? Visit [this detailed guide](https://tilecraftsmens.com/your-guide-to-durable-flooring-installation-for-a-stylish-home) for expert tips on maintaining your flooring and finishes efficiently and effectively.
Lessons That Would Have Saved Me Thousands
- Never underestimate the power of meticulous subfloor prep; I once skipped leveling and paid dearly for it later, learning that patience here is more cost-effective than rushed fixes.
- Understanding environmental factors, like humidity and temperature, is crucial; I used to ignore acclimatization, but now I know that proper adjustment can prevent warping and gaps down the line.
- Detail-oriented measurements matter—those extra minutes measuring multiple times saved me from material wastage and uneven finishes, highlighting that precision pays off.
- Choosing quality tools and materials isn’t optional; I underestimated this initially, but investing in the right essentials has dramatically improved my results and confidence.
Tools and Reads That Raised My Standards
- For flawless flooring, I highly recommend the detailed guides at expert installation tips. They transformed my approach to surface preparation and layout planning.
- The Wagner Orion 940 moisture meter became my best friend, helping me monitor humidity levels and avoid future problems—a small device with a big impact.
- Latest baseboard trends expanded my décor options and taught me how finishing touches make all the difference in visual harmony.
- Reading the home styling guides equipped me to blend durability with design, ensuring my flooring isn’t just functional but also stunning.
Your Next Step Could Transform Your Space
Embarking on a flooring revival might seem daunting, but with the right knowledge and tools, you can create a space that’s both beautiful and enduring. Remember, the real magic lies in paying attention to the details that often go unnoticed—adjusting for humidity, ensuring level surfaces, selecting quality materials, and finishing with care. Your home’s character deeply depends on these choices, and every step you take is an investment in long-term happiness. Don’t let fear or doubt hold you back—start small, learn as you go, and celebrate each milestone. Ready to make your dream floors a reality? Share your project plans or setbacks below—I’d love to hear what you’re working on or help troubleshoot any challenges you face.

One thought on “Expert Flooring Installation Tips for Long-Lasting Results Today”
Benjamin Carter
February 15, 2026 at 10:40 amReading through your detailed account of flooring installation, I can definitely relate to the importance of meticulous preparation and following expert tips. When I did my first hardwood project, I overlooked acclimating my hardwood planks to the room’s humidity, which led to gaps after a few months. That experience taught me how crucial environmental factors are, just as you’ve pointed out. I’ve also found that investing in quality tools, like a laser level and proper spacers, makes a huge difference—preventing uneven lines and ensuring precision. My biggest challenge now is maintaining consistent pressure when fitting tiles, especially on larger surfaces. Have others here faced similar issues and found effective methods to apply uniform pressure to prevent lippage? Overall, I agree that paying attention to small details, like subfloor flatness and transition strips, greatly extends the lifespan of the flooring. Would love to hear tips from fellow DIYers on smoothing out those tricky transition areas with uneven walls.