Have you ever stared at your newly installed floor, only to realize it’s not quite as flawless as you imagined? I’ve been there. I once rushed through a flooring project, thinking I could save time, only to end up with uneven seams and a finish that looked more DIY than professional. That lightbulb moment taught me a crucial lesson: the secret to stunning results isn’t just in the materials you choose, but in expert tips that ensure precision and durability every single time.
Why Proper Flooring Installation Can Make or Break Your Home’s Look
When I first started tackling flooring projects, I underestimated how much the little details mattered. It’s tempting to think that laying down tiles, hardwood, or carpet is straightforward. But the truth is, even small mistakes can turn a sleek design into a visual nightmare. Proper installation isn’t just about aesthetics; it’s about longevity and safety too. A poorly installed floor can lead to squeaks, gaps, or even structural issues over time. That’s why investing in expert tips is worth it—because your home deserves nothing less than perfection.
Is It Really Worth the Extra Effort to Follow Expert Tips?
Absolutely. I remember early on, making the mistake of skipping proper surface prep, which caused my tiles to crack months later. It’s these mistakes that cost time and money in the long run. According to flooring specialists, the majority of flooring problems arise from inadequate preparation or rushing the process. By following proven strategies—like correct leveling, proper adhesive application, and precise cutting—you can avoid these pitfalls and achieve a finish that looks professional and lasts for years. Want to learn how to sidestep common errors and get flawless results? Keep reading, because I’ve gathered some expert advice that will change the way you approach your next project.
Ready to transform your space with confidence? Let’s dive into the essential tips that will help you master the art of flooring installation and leave your home looking stunning. And if you’ve ever faced setbacks or doubts, I’ll share how to navigate those challenges too.
Prepare Your Surface Like a Pro
Before laying down any flooring, ensure the subfloor is perfectly level and clean. I once skipped this step, rushing to install hardwood, only to find it squeaking and developing gaps after a few months. To avoid this, use a leveling compound and a straightedge to check for uneven spots. Clean debris thoroughly with a vacuum or broom. Think of this step as laying a solid foundation for a house; without it, everything else may crumble.
Check for Levelness and Cleanliness
Use a long straightedge or a laser level to identify high and low spots. Fill gaps with a self-leveling compound and sand smooth. Remove dust and debris with a damp cloth or vacuum. This prep work ensures your flooring adheres properly and stays flat over time.
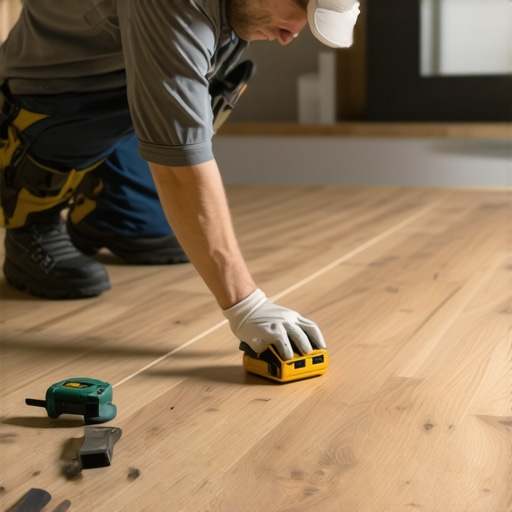
Accurate Measurement and Cutting
Measure your space meticulously. When I installed tiles in my bathroom, I marked tile cuts with a pencil, then double-checked measurements before cutting. This prevents waste and ensures a perfect fit. Always measure multiple times before cutting once, and use a high-quality saw or tile cutter for precision.
Use the Right Tools and Techniques
For hardwood, a power saw with a fine blade makes clean cuts. For tiles, a wet saw or angle grinder with a diamond blade works best. Take your time, and make slow, steady cuts—quick cuts often result in chips or inaccuracies. Remember, precision here saves you time and frustration later.
Proper Adhesive Application
Applying the right amount of adhesive is crucial. I learned this the hard way when I over-applied glue on my laminate flooring, causing uneven surfaces. Follow manufacturer instructions closely. Use a notched trowel to spread the adhesive evenly across the subfloor. For large areas, work in sections to prevent the adhesive from drying out before you lay the flooring.
Work in Sections and Maintain Consistency
Divide your space into manageable sections. This prevents adhesive from drying prematurely, which can cause tiles or planks to shift or lift. Keep a consistent trowel notch size to ensure even coverage. This step is key to prevent future buckling or gaps.
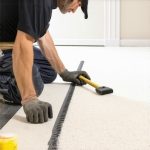
Precise Fitting and Placement
Lay your flooring pieces carefully, staggering seams for strength and visual appeal. When I installed a hardwood floor, I used spacers to maintain expansion gaps around the perimeter. These gaps allow for natural expansion and contraction with temperature changes. Use a tapping block and a mallet to snug each piece into place without damaging the material.
Maintain Consistent Gaps and Alignment
Check alignment frequently with a level or straightedge. Use spacers to keep uniform gaps for baseboards and expansion joints. Cutting the last row or piece often requires careful measurement and a fine saw. Patience here ensures a professional-looking finish.
Seamless Finishing Touches
Once your main installation is complete, install baseboards or trims to cover expansion gaps. I recommend using a nail gun for clean, quick attachment. For a polished look, caulk the gaps between the flooring and baseboards. Visit this guide for more baseboard tips.
Remember, taking your time during each phase yields results that look professional and last longer. Follow these expert steps, and your flooring will be a source of pride for years to come.
Many homeowners believe that flooring installation is straightforward and that following basic instructions guarantees professional results. However, this oversimplification often leads to costly mistakes and subpar finishes. Let’s explore some of the nuanced truths that seasoned professionals know but are frequently overlooked by DIY enthusiasts.
Why Skipping Surface Preparation Can Sabotage Your Floor
One widespread myth is that surface prep is optional or can be rushed. In reality, even a slight unevenness or debris on the subfloor can cause major issues like squeaking, buckling, or gaps over time. Experts emphasize meticulous surface leveling and cleaning as foundational steps—neglecting them is the fastest way to compromise durability. For advanced tips on surface prep, check out this comprehensive guide.
Cutting Corners on Adhesive Application
Many assume that using less adhesive or rushing the application process won’t affect long-term performance. In fact, uneven or insufficient adhesive coverage is a common pitfall that causes tiles or planks to lift or crack prematurely. Proper adhesive application involves not only the right amount but also consistent spreading with the correct trowel notch. Remember, quality results depend on precision here. For expert adhesive tips, visit this resource.
Why Seams Matter More Than You Think
Many think that hiding seams or placing them randomly won’t affect the overall look. But advanced professionals understand that seam placement, staggering, and alignment are critical for both aesthetics and strength. Improper seam management can lead to uneven wear and visual chaos. Use spacers and measure meticulously to ensure seamless continuity. Want more on finishing techniques? See this article.
What Most Overlook About Expansion Gaps
A common mistake is to ignore or underestimate the importance of expansion gaps. Without proper gaps, floors can buckle or warp due to temperature and humidity changes. Many DIYers either seal gaps completely or leave no room for movement, which damages the flooring over time. Advanced installers leave strategic gaps and finish with trim or baseboards to conceal them elegantly. For trendy finishing ideas, visit this page.
Understanding these nuances and avoiding common traps can elevate your flooring project from amateur to professional level. Have you ever fallen into this trap? Let me know in the comments.
Keeping your flooring in top shape over the years requires more than just careful installation; it demands the right tools and a consistent maintenance routine. Personally, I rely on a handful of specialized equipment and methods that have proven invaluable in ensuring my floors remain pristine and durable. In this article, I’ll share exactly what tools I recommend for ongoing upkeep and how to use them effectively to extend your flooring’s lifespan.
Invest in the Right Cleaning Equipment
My go-to tool for routine cleaning is a high-quality microfiber mop paired with a vacuum cleaner that has a hardwood or tile setting. The microfiber mop gently lifts dust and dirt without scratching surfaces, which is crucial for maintaining the finish. I prefer vacuums with HEPA filters and adjustable brush settings—these prevent debris from scratching delicate finishes and ensure thorough cleaning without damage. Regular sweeping and vacuuming prevent grit from settling into seams or grout, which can cause wear over time.
Why I Swear By a Steam Cleaner for Deep Cleaning
For periodic deep cleaning, I use a steam cleaner designed for hard floors. It’s chemical-free, environmentally friendly, and effective at removing stubborn grime. I particularly like models with adjustable steam levels and wide cleaning heads, which make the process quick and efficient. This tool helps preserve the finish and prevents the buildup of residues that can dull your floors’ appearance. For tips on maintaining your floors between deep cleans, visit this guide.
Tools for Spot Repairs and Touch-Ups
Over time, minor scratches or scuffs may appear. I keep a small kit with touch-up pens matching my flooring color, a putty knife, and a microfiber cloth. Applying touch-up pens to scratches immediately prevents them from worsening and keeps your floors looking new. For larger repairs, a laminate or hardwood patch kit, along with a precision saw and sandpaper, helps restore damaged sections seamlessly. Having these tools handy means you can address issues promptly, saving you from costly replacements later.
How do I maintain my floors over time?
Consistency is key. Regular sweeping, gentle cleaning, and immediate attention to scratches or stains extend your floors’ beauty and functionality. Additionally, periodically applying a protective finish or sealant—especially for hardwood—can bolster resistance against wear and moisture. For detailed maintenance routines, I recommend checking this expert guide.
Future Trends in Flooring Maintenance
Looking ahead, I predict the integration of smart sensors that monitor humidity, temperature, and even wear levels will become standard in high-end flooring systems. These devices will notify homeowners when maintenance is needed, allowing for proactive care. As technology advances, investing in intelligent maintenance tools now can save significant time and money in the long run.
Ready to take your flooring’s longevity seriously? Start by incorporating a quality microfiber mop and a steam cleaner into your routine today. These tools will help you maintain a pristine, durable surface that stands the test of time.
Lessons the Pros Won’t Tell You About Flooring Success
- One of the hardest lessons I learned was that surface prep is everything. Skipping this step felt like saving time, but it led to squeaks and cracks down the line. Now I always double-check for levelness and cleanliness before starting.
- Another insight is that adhesive application is an art. Using the right amount and spreading it evenly with a notched trowel prevents future lifting or gaps. Patience here saves headaches later.
- Seam placement and staggering are more critical than I initially thought. Properly aligned seams not only look better but also distribute wear evenly, extending your floor’s lifespan.
- Ignoring expansion gaps can be disastrous. Giving your floor room to breathe prevents buckling and warping, especially with humidity changes.
- Finally, I discovered that small tools like touch-up pens and a microfiber cloth are invaluable for maintaining a pristine look over time. Quick repairs keep your floor looking fresh for years.
My Go-To Gear for Flooring TLC
- Microfiber Mops and HEPA Vacuums: Gentle cleaning tools that protect your finish and keep dust at bay.
- Steam Cleaners: Eco-friendly deep cleaning for stubborn grime, extending your floor’s shine.
- Touch-Up Kits and Small Patches: For quick fixes that prevent small scratches from becoming big eyesores.
- Quality Measuring and Cutting Tools: Essential for precision, saving time and reducing waste.
Ignite Your Flooring Journey Today
Taking the time to learn these insider tips and assembling a reliable toolkit transforms your DIY project from a gamble into a guaranteed success. Your home deserves a floor that not only looks stunning but also lasts decades. So, why wait? Dive in with confidence, and let your craftsmanship shine. Remember, every perfect finish starts with a single careful step. Ready to elevate your space with expert flooring installation? Share your biggest challenge below and let’s solve it together! Contact us for professional support or advice.