Ever been midway through a flooring project, only to notice unsightly peaks and gaps ruining your once-perfect finish? I remember the sinking feeling when I first encountered those stubborn carpet peaks after installing a new living room floor. No matter how carefully I measured or stretched, the seams still looked uneven and unprofessional. It was frustrating—like all my hard work was being undone by tiny, invisible flaws that caught the eye every time I walked into the room. That experience was a lightbulb moment for me, leading me to discover a game-changing technique that transformed my approach to carpet seams.
Why Mastering Seam Finishing is the Real Key to Flawless Results
Carpet installation might seem straightforward, but the little details—like seams—really make or break the overall look. Seam peaks and gaps not only ruin the aesthetic but can also compromise the durability of your flooring over time. A well-executed seam creates a seamless, professional appearance that lasts for years. According to industry experts, hidden and tight seams are essential for achieving a clean and durable finish, especially with high-quality materials that demand precision. But here’s the thing: most DIYers and even some pros overlook the importance of a specific, little-known trick that ensures your seams stay flawless—enter the 2026 Seam Iron Trick.
If you’ve faced the frustration of uneven seams or shifting edges, you’re not alone. Early in my career, I made the mistake of relying solely on stretch and adhesive, neglecting the importance of proper seam finishing. That oversight often resulted in peaks, gaps, or even homeowner complaints. Once I embraced the right techniques—particularly the innovative use of the seam iron during installation—the quality and appearance of my work improved dramatically. Want to learn how this simple yet effective hack can save your project from costly rework? Keep reading, and I’ll walk you through the step-by-step process to perfect every seam.
Is the 2026 Seam Iron Technique Actually Worth the Hype?
I’ve seen many skeptics doubt whether a tool or a small trick could truly make a significant difference. Trust me, I was one of them until I experienced the transformation firsthand. Early attempts with the seam iron often ended in disappointment because I didn’t understand the proper technique or timing. The key mistake I made early on was rushing the process and not thoroughly preparing the seam area, which led to uneven heating and poor adhesion. Now, with the right approach—using the seam iron methodically and at the correct temperature—I consistently achieve seamless, flat joints.
Curious to see how this trick can elevate your installation game? I’ll be sharing the exact steps and tips to master the seam iron trick, ensuring your finished floors look as professional as those in high-end showrooms. Ready to leave behind lumpy seams and gaps? Let’s dive into the practical part of the trick that has changed the way I install carpet forever.
,
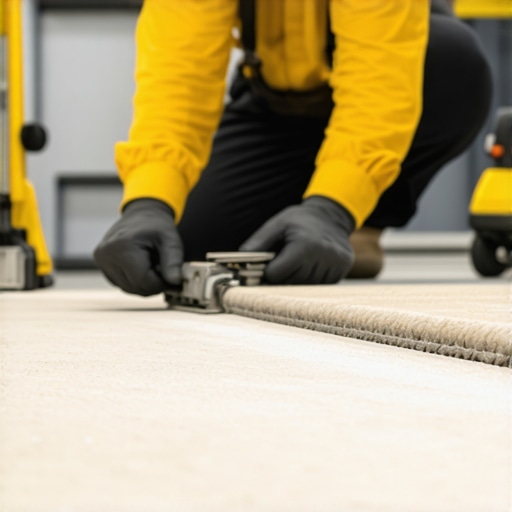
Prepare the Seam Area Thoroughly
Start by laying your carpet pieces close to their final positions. Use a utility knife to trim any uneven edges that might interfere with alignment. Vacuum the seam area to remove dust and debris, which can prevent proper adhesive bonding and heating. I once neglected this step, and the seam started to bubble within a week—learning this the hard way emphasized its importance.
Align and Tape the Carpets
Position the seams carefully, ensuring the pile runs in the same direction for a seamless look. Temporarily secure the edges with carpet tape to prevent shifting during pressing. Using double-sided tape along the seam line has saved me from accidental misalignments, especially on larger rooms where gravity tends to pull the carpet apart.
Heat and Press with the Seam Iron
Set your seam iron to the appropriate temperature—usually medium heat—by testing on a scrap piece or inconspicuous area first. Glide the iron along the seam line, applying firm pressure to activate the adhesive beneath. Think of this step like ironing clothes: even heat and consistent pressure smooth out wrinkles, or in this case, peaks and gaps. I once rushed this process, resulting in uneven seams that I had to rework, so patience is key.
Smart Techniques for a Better Finish
Maintain the seam iron moving steadily, avoiding prolonged contact in one spot, which can burn the carpet. Use a pressing cloth if needed to prevent scorching. Applying a second pass with the iron can help if the seam isn’t fully melded, but don’t overdo it to prevent damage. This method ensures the adhesive melts uniformly, creating a flat, invisible seam, quite like a professional job. For further insights, check out carpet installation secrets.
Let the Seam Cool and Set
Allow the seam to cool down completely before walking on it. This solidifies the bond and prevents shifting. I remember warming the seam and immediately stepping on it—resulting in a stubborn peak that I had to sand down later. Patience during this cooling phase ensures a flawless, durable finish that lasts for years.
Finish with Appropriate Trimming and Securing
Trim any excess carpet fibers carefully, then secure the edges with tack strips or transition bars, especially at doorways. This final step locks everything in place, preventing future gaps. Proper finishing can turn a good installation into a professional-looking masterpiece, comparable to showroom quality. For more tips on finishing touches, explore baseboard and finishing techniques.
While many believe that precision in measuring and cutting is enough for a flawless floor, the truth is that most professionals and DIY enthusiasts overlook subtle yet critical nuances that determine long-term success. One common myth is that sealing seams with caulk or undersized trims can mask imperfections, but this often leads to future gaps and uneven surfaces. Instead, understanding the importance of accurate scribing and joint fitting can significantly enhance durability and aesthetics. An advanced mistake I often see is rushing through moisture testing or failing to acclimate materials properly, which can cause warping or gaps over time—something experts like those at the [ultimate flooring guide](https://tilecraftsmens.com/your-guide-to-durable-flooring-installation-for-a-stylish-home) emphasize. For instance, improper acclimation might seem trivial but can lead to expansion issues, especially in fluctuating climates.
Have you ever fallen into this trap? Let me know in the comments.
One nuanced aspect that trips up both amateurs and seasoned installers is the precise alignment of baseboards with flooring especially around irregular or angled walls. Many skip the scribing process, assuming miter cuts will suffice, but this often results in gaps or uneven joints that compromise the visual flow. The secret lies in meticulously marking the wall’s contour and using a coping saw for tight fitting—an advanced technique recommended by industry veterans. Furthermore, selecting the right adhesive and understanding substrate behavior is vital. Bear in mind that over-application of glue or using incompatible products can lead to bubbling or separation. An often underestimated detail is ensuring proper expansion gaps along walls and around fixtures, which accommodates material shifts and prevents buckling.
Looking to elevate your skills? Check out our expert tips on creating seamless transitions and flawless finishes, which reveal how to master these nuances effectively. The goal is to avoid common pitfalls that undermine longevity and appearance. Remember, a small step like precise scribing can save you hours of rework and ensure your renovation stands the test of time.
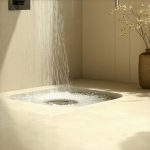
Keeping Your Flooring and Showers in Top Shape
Investing in quality tools and adopting a consistent maintenance routine are crucial for ensuring the longevity of your flooring, baseboards, and shower installations. Personally, I rely on specialized equipment that allows me to perform precise repairs and ongoing upkeep, saving time and preventing costly rework down the line.
What Tools Actually Make a Difference Over Time?
One tool I can’t live without is a high-precision seam anemometer. This device helps me monitor and adjust humidity levels in the room, which is especially important for flooring materials like hardwood and vinyl that expand or contract with moisture fluctuations. Maintaining optimal humidity prevents gaps, buckling, and other issues—the kind of problems that can linger if overlooked.
For shower maintenance, I recommend a professional-grade silicone removal tool. Over time, silicone seals degrade or develop mold. Using a dedicated tool ensures clean removal without damaging adjacent materials, which is vital before resealing or applying new waterproofing layers. Combining this with a quality silicone sealant designed specifically for wet environments ensures your shower remains leak-free for years to come.
Smart Maintenance Methods for Durability
Routine inspections are your best defense. I schedule quarterly checkups of baseboards, especially at joints and corners—areas prone to gaps caused by shifting or settling. Regularly cleaning grout lines and applying protective sealants on showers prevents moisture infiltration, which is key to avoiding leaks or tile damage. For a comprehensive approach, [consult our guide](https://tilecraftsmens.com/your-guide-to-durable-flooring-installation-for-a-stylish-home) for expert tips on long-term maintenance.
Predictions for the Future of Flooring and Shower Care
Advancements in smart home technology, such as moisture sensors integrated with leak detection systems, are poised to become standard. These systems can alert homeowners instantly about potential issues, allowing for prompt action. Additionally, innovative materials like self-healing grout and nanocoatings on surfaces are on the rise, promising reduced maintenance and extended lifespan. Staying ahead means investing in these emerging technologies and tools now, so your installations remain flawless for decades.
How Do I Maintain My Floor and Shower Over Time?
The key is consistency and using the right products. Regular cleaning with pH-neutral cleaners preserves the integrity of sealants and finishes. Scheduling professional inspections every year can catch minor issues before they escalate. Conversely, neglecting maintenance can lead to moisture damage, warping, or mold growth—problems that are costly and disruptive to repair. Make sure to keep tools like a moisture meter and high-quality sealants within arm’s reach for quick fixes when necessary.
If you’re ready to elevate your maintenance routine, try out precision tools like the moisture meter and use them regularly to monitor environmental conditions. Incorporate seasonal checks to catch early signs of wear or damage, especially around water-prone areas. Keeping your floors and showers in pristine condition not only enhances beauty but also protects your investment for the future. For additional tips, don’t hesitate to explore our comprehensive [installation and maintenance resources](https://tilecraftsmens.com/experts-tips-for-lasting-results) and stay ahead of emerging trends in home improvement.

Through my journey of flooring and installation, I realized that many of the most impactful lessons are learned in the quiet moments — when no one is watching. One of the hardest lessons I encountered was understanding that flawless results come from attention to the small, often overlooked details. Whether it was perfect seam ironing or precise scribing around irregular walls, these nuances made the difference between a good finish and a professional-grade outcome. Embracing this mindset transformed my approach and helped me produce results that not only lasted but also wowed clients and homeowners alike.
The Surprising Lessons That Sharpened My Skills
- Stop rushing the seam finishing process. Patience and proper technique with the seam iron can turn a plain seam into a virtually invisible join. I used to think speed was essential, but I learned that rushing compromises the finish, leading to peaks and gaps.
- Master the art of scribing walls and irregular surfaces. A simple, well-measured scribe ensures a seamless look that hides even the bumpiest walls or floors. This deepens my respect for craftsmanship and elevates the final appearance.
- Don’t underestimate the power of preparation. Vacuuming the seam area, adjusting the room’s humidity, and choosing the right adhesive all contribute to longevity and beauty. These small steps, often dismissed, are truly game-changers.
- Invest in quality tools and stay updated on the latest techniques. From a high-precision seam iron to advanced scribing tools, the right equipment accelerates learning and improves results over time. Continuous education through expert guides keeps me ahead of trends and avoids costly mistakes.
- Understand moisture’s impact on flooring materials. Using humidity monitors and proper acclimation prevents warping and gaps, saving time and money in the long run. This insight helped me troubleshoot issues before they became serious problems.
Tools and Resources That Keep Me at the Top
- Seam Iron with Adjustable Temperature: Critical for melting adhesives evenly and creating flat seams. I trust models that have precise temperature controls, like the one recommended in our carpet installation secrets.
- High-Quality Scribing Tools: These enable me to match wall contours accurately. The right scribing tool reduces gaps and ensures a professional fit.
- Moisture Meter: Maintaining optimal humidity is crucial. I use a reliable moisture meter to prevent expansion issues, especially in fluctuating climates.
- Expert Guides and Tutorials: Resources like this comprehensive flooring guide constantly update my techniques and keep me sharp.
- Consultation with Industry Veterans: Engaging with seasoned professionals through forums or workshops offers insights that no book or tool can match. Learning from their experiences is invaluable.
Seize the Moment: Elevate Your Craft Now
Remember, the difference between a standard installation and a stunning, durable finish lies in the care you invest in the details. Embracing these lessons and leveraging the right tools can dramatically boost your confidence and results. Don’t wait for perfection to find you—take action today and transform your approach to flooring, baseboards, and shower finishes. Your future self will thank you for the effort and passion you put into mastering the craft.
What aspect of carpet or flooring installation do you find most challenging? Share your experiences below, and let’s learn together!