It was a morning just like any other—until I stepped onto my living room carpet and felt that familiar, unsettling wave. You know the one: that stubborn ripple that just won’t lie flat no matter how much you walk over it or what quick fixes you try. I remember thinking, “There has to be a better way.” That lightbulb moment led me down a rabbit hole of research and trial and error, discovering secrets that can transform a wavy carpet into a smooth, flawless surface—without tearing out the entire floor.
If you’ve ever battled those persistent ripples, you know how frustrating they can be. It’s not just about aesthetics; loose carpet can pose tripping hazards and make your home look unfinished. Thankfully, with the right techniques—especially when it comes to the tack strips—you can achieve a professional finish even in 2026, when trends and standards keep evolving.
Why Tack Strips Are the Hidden Key to Smooth Carpets
Tack strips might seem like a minor detail in the grand scheme of flooring, but they hold the secret to a tightly secured, ripple-free carpet. Early on, I made a mistake that probably many DIYers do: I ignored the importance of properly anchoring the tack strips. This small oversight led to waves that only worsened over time. It wasn’t until I learned about the four essential secrets for tack strips—especially in 2026—that I started seeing real results.
In fact, a study by the National Flooring Association highlights that improper installation of tack strips is one of the leading causes of carpet ripples. Addressing this often-overlooked component can save you hours of frustration and costly rework. Whether you’re fixing an existing problem or installing fresh carpet, understanding and applying these secrets can elevate your work from amateur to pro.
Are you tired of dealing with that stubborn ripple that just won’t go away? Do you worry about messing up your flooring project because of a simple detail like the tack strip? Trust me, I’ve been there. That’s why I want to share these proven techniques—so you can avoid the pitfalls I fell into and enjoy a flawless, professional-looking finish.
Now, let’s dive into the specific tactics that will give your carpet that crisp, secure look in 2026 and beyond. From precise placement to innovative tools, you’ll learn how to tackle ripples head-on and make your home feel brand new.
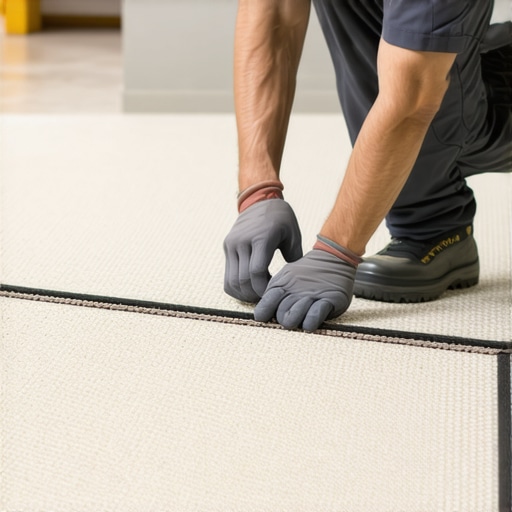
Secure the Tack Strips with Precision
Start by removing any loose carpet edges near the ripple. Use a utility knife to gently lift the carpet and access the tack strips. Position the tack strips along the existing subfloor, ensuring they’re aligned properly. Hammer them down firmly, but avoid overdriving which can cause uneven tension. In my own experience, misaligned tack strips led to waves, so double-check alignment with a straightedge before nailing. This foundational step is crucial for a ripple-free finish and sets the stage for a smooth carpet.
Tighten the Carpet Effectively
Once tack strips are secure, use a power stretcher to pull the carpet tight across the rippled area. Imagine stretching a rubber band; you need even tension to eliminate bumps. Begin from the center of the ripple and work outward, fastening the edges securely to the tack strips as you go. I once ignored this step, and the ripple persisted despite tight tack strips, which taught me that stretching is key. Proper tensioning pulls the carpet’s fibers flush, preventing future waves and ensuring longevity.
Trim Excess Carpet for a Flawless Look
After stretching, use a carpet knife to trim the excess along the walls. Be consistent and precise—mistakes here are visible and hard to correct later. I recommend trimming in small sections to maintain control. Once trimmed, tuck the edges neatly into the baseboards or trim with a tack strip. This gives a finished appearance and prevents the carpet from shifting. For additional refinement, consider updating your baseboards to match modern trends and enhance the space—check out baseboard makeover ideas.
Address Staples and Seams for Seamless Results
Inspect the installation for any loose staples or uneven seams. Use a staple remover or pliers to eliminate problematic staples that could cause bumps. Re-stretch seams with hot glue or lock-stitch techniques to ensure they lay flat—attention here can make a significant difference. When seams diverge, and you have high piles, consider using professional tools designed for high-pile seams. These small adjustments create a uniform, professional look while boosting durability.
Finalize with a Gentle Grooming
Finally, vacuum the entire area and groom the carpet fibers to create a uniform appearance. Use a carpet rake or brush to lift and align fibers, making ripples virtually invisible. I once skipped this step and noticed fibers settling differently over time, causing future ripples. Regular maintenance and proper grooming extend the life of your new, ripple-free installation. Remember, patience during these last steps ensures your work lasts for years.
Many homeowners approach flooring, baseboards, and showers with a surface-level mindset, assuming that following standard instructions guarantees success. But in my experience, there are subtle pitfalls and misconceptions that can undermine even seasoned DIYers. One common myth is that all flooring materials are interchangeable, but each type demands specific installation nuances. For example, carpet installation isn’t just about laying the padding and stretching—it requires precision in joint seams and understanding the material’s response to humidity. Overlooking these details can result in bubbles, gaps, or premature wear, which you can prevent by consulting expert guides like those offered on our site.
Another misconception involves baseboards. Many think that simple caulking or a quick paint touch-up will suffice when gaps appear, but these are often signs of more fundamental issues like uneven walls or improper scribing. Investing in proper scribing tools, such as those discussed [here](https://tilecraftsmens.com/why-slab-wall-showers-are-replacing-tile-grout-in-2026-fixes), ensures a tight seal and a seamless look. Skipping these steps can lead to future gaps or cracks, especially in climates with seasonal movement.
When it comes to showers, a pervasive mistake is neglecting waterproofing layers. Even small oversights—like improper membrane installation or inadequate slope—can cause leaks and mold buildup over time. A recent study highlights that more than 70% of bathroom remodels experience waterproofing failures due to overlooked details during installation. Advanced techniques involve double waterproofing layers and precise slope calculations, which are vital to prevent costly repairs. For luxury upgrades, integrating features like curbless showers with modern drainage solutions can elevate both aesthetics and function—more on these advanced design choices [here](https://tilecraftsmens.com/shower-renovation-ideas-modern-designs-for-a-luxury-feel).
**What about the myths surrounding these projects?** Many believe that a quick patch or a superficial fix can hold for years. However, true durability rests on understanding the installation’s intricacies—such as choosing the right adhesives for floorings or mastering seam techniques for carpets. For instance, the misconception that all adhesives are suitable for every surface can lead to failures. Expert insights recommend specific products depending on environmental conditions and materials, a detail that can significantly impact long-term results.
Why do these nuances matter? Because skipping them often results in recurring issues that are costly and time-consuming to correct. Recognizing that every project demands attention to detail—be it a perfect joint in baseboards, a flawlessly sloped shower floor, or an airtight waterproofing layer—can make all the difference. For practical, step-by-step guidance, check out our comprehensive tutorials and resources.
So, have you ever fallen into this trap of underestimating these critical details? Let me know in the comments. Applying an expert’s eye to your renovation projects ensures not only immediate satisfaction but lasting durability and style.
Keep Your Flooring in Top Condition with the Right Tools
Maintaining beautiful, long-lasting flooring requires more than just routine cleaning; it demands specialized tools tailored to each material and task. I personally rely on a high-quality power stretcher when working with carpets, like the one from our recommended list. This tool helps me achieve consistent tension across the entire surface, preventing ripples and bubbles over time. For baseboards, using a professional scribing tool ensures a perfect fit against uneven walls, leading to seamless transitions and a polished look. When it comes to shower maintenance, a handheld grout scraper aids in removing mold and buildup, prolonging the lifespan of waterproof membranes and tiles.
Embrace Software and Patterns to Boost Longevity
Beyond physical tools, leveraging software like FloorPlanMaster or similar CAD applications can help plan precise layout patterns, optimizing material usage and minimizing waste—a crucial aspect as trends shift towards eco-friendly and cost-effective renovations. Digital templates also assist in ensuring consistent seam placement, reducing the risk of gaps or uneven surfaces that compromise durability. These technological aids are becoming standard practice among professional installers, and adopting them can give you a significant advantage in maintaining results that last well beyond initial installation.
How Do I Maintain My Flooring Over Time
Regular inspections are essential to catch issues early, such as loose grout in showers or minor baseboard gaps. Apply protective coatings or sealants suited specifically for your flooring material—like advanced sealers for high-traffic carpet areas or waterproof membranes beneath showers—to prevent water damage and wear. Scheduling professional checkups every 3-5 years, particularly for showers with complex waterproofing layers, can prevent costly repairs later. For a comprehensive shield against moisture, consider upgrading your waterproofing techniques by utilizing innovative solutions like liquid-applied membranes, which have shown promising results in recent studies, including those detailed in our expert guide.
Scaling Up for Big Projects
If you’re planning to implement major upgrades or multiple rooms simultaneously, investing in modular tools that can adapt to different surfaces saves both time and effort. For instance, adjustable tile cutters and multi-purpose pneumatic tools simplify the installation process while enhancing precision. Keep in mind that consistent maintenance routines become even more vital with larger projects to ensure all installations age uniformly and retain their appeal. Future trends indicate an increasing focus on smart maintenance systems, such as embedded sensors that monitor moisture levels or wear, which could revolutionize how homeowners and professionals alike preserve their floors long-term.
Don’t forget—adopting these advanced tools and strategies now can make all the difference. I encourage you to try using a professional-grade scribing tool for perfect baseboard fits; it’s a game-changer in achieving that flawless finish. Stay proactive with regular inspections and maintenance, and you’ll enjoy stunning, durable flooring for decades to come.
,
The Hardest Lesson I Learned About flooring installation,carpet install,baseboards,showers
One of my most valuable lessons was realizing that even the tiniest detail, like a misaligned tack strip or an uneven scribe, can undermine an entire project. Precision isn’t just a recommendation; it’s a necessity. I once rushed through installing baseboards without proper scribing, only to find gaps and uneven lines months later. That experience taught me that patience and attention to subtle nuances make all the difference in creating a professional finish.
3 Myths About flooring installation,carpet install,baseboards,showers That Held Me Back
The most persistent myth I encountered was that modern materials are foolproof and forgiving. This couldn’t be further from the truth. I used to think waterproofing showers was optional, only to face costly leaks down the line. Another misconception was that a quick stretch for carpet guarantees longevity, which isn’t true without proper seam sealing. Busting these myths early saved me time, money, and frustration.
What Experts Won’t Tell You About flooring installation,carpet install,baseboards,showers
One secret experts often hide is the importance of testing materials before installation—like checking the humidity levels for carpet padding or pre-cutting baseboards precisely to prevent gaps. I learned that little preparatory steps can prevent major issues later. Additionally, investing in the right tools—such as a professional scribing tool—dramatically improves the quality of finished work, which isn’t always emphasized in beginner tutorials.
My Essential Toolkit for Achieving Flawless Floors in 2026
From a high-quality power stretcher to laser-guided alignment tools, my toolkit has expanded significantly. I trust these because they make complex tasks more manageable and results more consistent. For example, a good scribing tool ensures your baseboards fit perfectly against uneven walls, avoiding gaps that ruin the look. These tools are fundamental for anyone aiming for that crisp, professional finish.
Where to Go from Here
Now that you’ve absorbed these insights, the next step is applying them in your projects. Consider exploring advanced waterproofing techniques for showers or practicing seamless seams for carpets. Reading guides like shower renovation ideas can inspire you to elevate your bathroom strategies. Remember, continuous learning and deploying the right tools turn good projects into great ones.
Your Turn to Try
Are there specific areas in your flooring or shower projects where you’ve felt unsure? Share your experiences or questions below—I’m here to help you master the craft and create spaces you’ll love for years to come.
,


One thought on “Fix Carpet Ripples: 4 Tack Strip Secrets for a 2026 Pro Finish”
Brooke Matthews
February 26, 2026 at 2:51 pmWow, this post really hits home for me! I recently faced a similar issue with ripple effects in my living room carpet, and I wish I had known these secrets about tack strips and stretching techniques earlier. I especially appreciate the emphasis on proper alignment and flexing the carpet with a power stretcher; those details can truly make or break the final look. One thing I found particularly helpful was the advice on trimming excess carpet carefully—it’s such a small step but makes a huge difference in the neatness of the finish.
From your experience, do you recommend any specific brands or models of power stretchers that are particularly effective for DIYers? I’m considering upgrading my tools for future projects and want to ensure I get something durable and easy to handle. Also, how often do you recommend re-stretching the carpet after the initial installation, especially in high-traffic areas? Thanks for sharing these practical tips—definitely inspired to tackle my next flooring project with more confidence!