I vividly remember the moment I realized my first hardwood flooring project was heading south—the uneven seams, the stubborn gaps, and that sinking feeling of disappointment. It was late at night, and I was staring at a floor that was supposed to look flawless, but instead looked like it had been through a rough storm. That lightbulb moment taught me that even small mistakes can turn a beautiful space into a visual headache. Over time, I discovered that the secret isn’t magic, but practical tips and patience,
especially when working with hardwood and vinyl floors. If you’ve ever faced uneven surfaces or worry about your flooring lasting years without issues, you’re not alone. Lucky for you, today I’m sharing proven strategies to help you avoid those costly mistakes, ensuring your floors are smooth, durable, and stunning.
Why Smooth, Flawless Floors Matter More Than You Think
The truth is, a well-installed floor can transform an entire room. But more than aesthetics, proper installation extends the life of your flooring—preventing gaps, buckling, and early wear. As a seasoned enthusiast, I can tell you that rushing or cutting corners often leads to uneven seams or damage that’s hidden until months later. Trust me, I’ve learned this the hard way—early on, I overlooked the importance of properly acclimating materials, which caused warping down the line. That mistake cost me time, money, and a lot of frustration.
To truly master the art of flawless flooring, understanding common pitfalls is half the battle. In the next sections, we’ll dive into practical tips that I’ve refined through years of experience, ensuring your project stays on track and reaches that beautiful, professional finish you desire.
If you’ve ever wondered whether you’re doing it right—or just want to avoid the pitfalls that trip up many DIYers—you’re in good company. Keep reading, and you’ll find all the guidance you need to transform your space with confidence.
Ready to get started? Let’s explore the most crucial steps for superb flooring results.
Is It Really Worth It to Overthink Every Detail?
When I first started, I thought a quick, rushed job wouldn’t matter. But I learned that neglecting small details like subfloor preparation and proper spacing can lead to significant issues—issues that are expensive and time-consuming to fix later. A study from the National Association of Home Builders confirms that poor installation accounts for nearly 80% of flooring failures. That’s a staggering statistic, and it underscores how attention to detail is essential.
Have you ever skipped a step because it seemed minor? Trust me, I’ve been there. But taking the time upfront can save you countless headaches down the line. Stay with me, and I’ll show you exactly what I did wrong early on—and how you can avoid those mistakes—so your flooring project will be nothing short of a success.
Prepare Your Subfloor for Success
Start by removing existing flooring carefully, then sweep or vacuum thoroughly to eliminate debris, dust, and loose particles. Use a moisture meter to check for excess humidity, especially in basement areas—excess moisture can lead to warping and buckling. If moisture levels are high, apply a suitable moisture barrier. Think of this step like laying a solid foundation for a house; without it, everything else can shift or crack over time. I once skipped this prep, and within months, my vinyl floors warped; don’t make that mistake.
Acclimate Your Materials
Allow your flooring materials to sit in the room where they’ll be installed for at least 48 hours. This helps them adjust to the room’s humidity and temperature, preventing future expansion or contraction issues. For example, I once brought in hardwood from a climate-controlled warehouse straight onto a cold, dry site—within a week, the boards cupped and separated. Proper acclimation is like letting wines breathe—necessary for a perfect finish.
Plan Layout and Cut Precisely
Measure the room meticulously, accounting for expansion gaps—typically 1/4 inch around the perimeter. Use chalk lines to guide your flooring layout, ensuring that planks run parallel to the longest wall, which often gives a room a more spacious feel. When cutting, use a sharp blade or saw, and always measure twice before cutting once. This precision prevents awkward seams and unnecessary waste—saving time and money. I once mismeasured a doorway cut, forcing me to scrap an entire row; double-checking measurements would have avoided that problem.
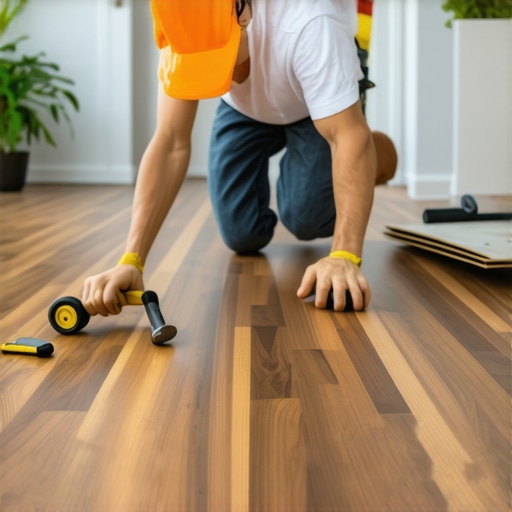
Install with Confidence
Apply adhesive if necessary, or lock planks together using the manufacturer’s recommended method. For floated floors, click-lock systems simplify the process—just angle and click. For glue-down floors, spread adhesive evenly using a notched trowel, then press down firmly. When I installed my first vinyl plank, I used a tapping block and a mallet to ensure tight seams—this made a noticeable difference in the look and durability. Think of it like building with Lego blocks—tight connections make for a stable, seamless surface.
Pay Close Attention to Edges and Corners
Use spacers to maintain the expansion gap and cut precisely at the edges to fit around walls and doorways. For doorways, cut planks to fit tightly, then use a jamb saw to ensure a clean, flush appearance. When fitting around irregular shapes or pipes, make relief cuts or use a jigsaw for accuracy. Do not rush through corners; proper fit ensures a professional look and prevents future issues like squeaking. I once forced a piece into a tight corner, which led to gaps and unevenness—patience here pays off.
Lay Baseboards and Transitions
After flooring is installed, remove spacers and install baseboards to cover expansion gaps—use nails or adhesive as appropriate. For a seamless flow between rooms, use transition strips—like T-molding or threshold strips—to connect different flooring types. This final touch elevates the overall look, creating a polished finish. For example, upgrading my baseboards with a simple paint job drastically improved the room’s appearance—simple updates can make a huge difference.Learn more about baseboard makeover tricks.
Many homeowners and even some DIY enthusiasts operate under misconceptions about flooring, carpet, baseboards, and showers that can jeopardize long-term durability and aesthetic appeal. One prevalent myth is that choosing cheaper materials inherently leads to savings, but in reality, low-quality products often require replacement or repairs sooner, increasing costs in the end. Skilled installers know that proper subfloor preparation, moisture management, and accurate measurements are non-negotiable steps often overlooked by novices. Contrary to popular belief, installing baseboards isn’t simply about attaching trim; it involves precise cuts, choosing the right nails or adhesive, and understanding how wall movement affects stability. When it comes to showers, many assume waterproofing is optional or can be rushed—this is a costly mistake. Expert shower installations involve meticulous sealing, proper slope, and—importantly—using high-quality waterproof membranes that prevent leaks and mold growth.
What advanced techniques can prevent common installation pitfalls in high-moisture areas?
Advanced professionals focus on vapor barriers, proper curing times, and moisture testing throughout the process. For instance, an industry study from the National Association of Home Builders emphasizes that attention to vapor management and climate control during installation reduces failure rates significantly, especially in bathrooms and basements.
Another oops many make is ignoring the impact of thermal expansion and contraction. For flooring and baseboards, this means leaving adequate gaps at edges and around obstacles to allow natural movement. Failing to do so can cause buckling, cracking, or gaps over time. It’s a subtle nuance that makes a stark difference in longevity. Learning about these details can help you avoid costly repairs or aesthetic compromises later.
Have you ever fallen into this trap? Let me know in the comments. To elevate your project, check out some expert tips on [transforming your home with professional flooring installation](https://tilecraftsmens.com/transform-your-home-expert-flooring-installation-tips-for-2025) and ensure every detail is considered for lasting beauty.Ensuring your flooring, baseboards, and showers remain pristine over time requires more than just proper initial installation; it demands the right tools and regular maintenance. Personally, I swear by a high-quality oscillating multi-tool for meticulous trim work—it allows precision when trimming baseboards or adjusting for perfect fit around irregularities. For cleaning, I recommend a microfiber mop combined with pH-neutral floor cleaners to prevent deterioration of sealants and finishes. These tools are essential for preserving the integrity and appearance of materials like hardwood and tile over years of use.
In addition, maintaining a consistent schedule of inspections can catch minor issues before they escalate. For example, checking grout lines in showers for cracks and resealing every couple of years prevents costly water damage. When working with showers, I invest in a digital moisture meter to monitor humidity levels, as excess moisture leads to mold and structural warping. Incorporating these tools into your routine not only prolongs the aesthetic appeal but also significantly reduces long-term repair costs.
Predicting future trends, I believe smart monitoring devices integrated with home automation will become standard—allowing homeowners to track moisture and humidity remotely, alerting them to potential problems early. This proactive approach is transforming maintenance from reactive to preventive, especially in moisture-prone areas.
How do I maintain my flooring and fixtures over time?
Using the right set of tools is just the beginning. Consistent cleaning with appropriate products, routine inspections, and timely repairs are key. For example, sealing grout in showers annually with a professional-grade silicone sealant protects against leaks and prolongs the lifespan of the tile.
To further enhance durability, consider applying protective coatings to hardwood floors every few years. A reputable finish not only revitalizes appearance but also adds a layer of defense against scratches and moisture. For instance, high-quality polyurethane finishes can extend the life of your hardwood, maintaining its original luster.
Remember, adopting advanced maintenance methods can save you thousands in repairs and replacements down the line. For more expert insights on extending the longevity of your installations, check out our comprehensive guide on [long-lasting flooring installation](https://tilecraftsmens.com/expert-flooring-installation-tips-for-lasting-home-results). Implementing these proactive techniques now will ensure your home continues to impress for years to come.
Why Cutting Corners Always Catch Up
Early on, I believed rushing through certain steps wouldn’t affect the final look. But I soon learned that neglecting meticulous preparation, like proper subfloor leveling or moisture testing, can cause issues months later, such as buckling or mold. It’s a reminder that patience and attention to detail aren’t just virtues—they’re necessities for lasting results.
My View on Tools and Tricks That Truly Make a Difference
Over the years, I’ve discovered that investing in quality tools like a reliable moisture meter or a sharp jigsaw transforms the installation process. These aren’t just gadgets—they’re your allies in ensuring precision and reducing stress. Trust me, the difference between a good and a great finish often boils down to having the right tools at your side.
When a Small Mistake Turns Big
One of my biggest lightbulb moments was realizing that tiny miscalculations, like mismeasured cuts or overlooked expansion gaps, can ripple into significant flaws. That’s why I always double-check measurements and leave room for natural movement—because a little extra effort upfront saves you from painful fixes later.
Seeking Perfection Beyond the Surface
I’ve found that the real art lies in finishing touches—like precise baseboard cuts or seamless transitions between flooring types. These details elevate a job from good to exceptional and reflect your commitment to quality. Don’t underestimate the power of small details; they pay off in long-term durability and visual appeal.
Resources That Keep My Skills Sharp
For those eager to enhance their craft, I recommend investing in industry-standard guides such as expert tips for flooring installation which offer insights from seasoned professionals. Additionally, quality tools like moisture meters (trusted brands I personally use) help prevent common issues. Lastly, staying updated with blogs and forums dedicated to home improvement can provide fresh ideas and solutions that keep your projects on the cutting edge.
Step Up and Make It Happen
Embarking on your flooring or shower remodel may seem daunting, but remember—every expert started as a beginner. Your attention to detail and willingness to learn will set your project apart. Dive in with confidence, knowing that each step taken is a step toward a stunning, durable finish that you’ll enjoy for years.
Have you ever caught a mistake early and saved your project? Share your stories below—I’d love to hear how you turned a potential setback into a success!


One thought on “Flooring Installation Tips: Achieve Flawless Hardwood & Vinyl Results”
Emily Carter
February 15, 2026 at 10:20 amReading this post really resonated with me because I learned the hard way how overlooked details can lead to long-term issues. My first hardwood installation was rushed, and within a few months, I noticed gaps and minor warping. Since then, I’ve understood the importance of proper acclimation and precise measurements. What struck me was the mention of moisture testing—something I didn’t prioritize initially but now consider crucial, especially in our humid climate. I’ve started using a moisture meter and see a big difference in avoiding problems like buckling. In your experience, what’s the most overlooked step by DIYers that leads to the biggest headaches later on? I’d love to hear more about how others tackle these common pitfalls to ensure a perfect finish every time.