
Ever spent hours installing carpet only to realize the edges are frayed, seams are visible, or the baseboards look uneven? I remember my first attempt—thinking I could wing it like a pro. Spoiler alert: I was wrong. That lightbulb moment hit hard when a customer pointed out the rough edges and crooked trim. Since then, I’ve learned that a little know-how and proper strategy can turn a shaky start into flawless results.
Why Your First Carpet and Baseboard Project Matters More Than You Think
Getting these details right isn’t just about aesthetics; it’s about durability, safety, and your reputation. A sloppy job can lead to peeling carpet, damaged walls, or costly rework. But if you follow proven techniques, your work can last for years, impress clients, and boost your confidence. Today, I’ll share the secrets I wish I knew from the beginning—tips that turn a basic installation into a showcase of craftsmanship.
Have You Faced This Common Problem
If you’ve ever struggled with uneven seams, visible staples, or baseboards that don’t sit flush, you’re not alone. These issues often stem from overlooked details or shortcuts. And trust me, those shortcuts always catch up with you in the end. But don’t worry—I’ve found that with a few tweaks, you can avoid these pitfalls and achieve professional-looking results with ease.
Is Flawless Installation Really Achievable
Absolutely, but only if you understand the importance of preparation, precision, and patience. Early on, I made the mistake of rushing through the measuring process, which led to gaps and uneven edges. It’s a classic mistake that many beginners make. Learning to take accurate measurements and plan your cuts carefully is a game-changer. Want to dive deeper into these strategies? Check out top secrets for flawless installation.
By the end of this post, you’ll have a clear roadmap for creating a seamless, durable, and visually stunning carpet and baseboard setup. Ready to transform your next project? Let’s get started!
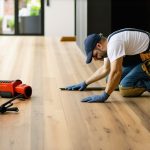
Measure with Precision to Avoid Gaps
During my first project, I rushed the measuring process and ended up with a carpet that was either too short or too long, causing unsightly seams. Always double-check your measurements with a tape measure, and add a few extra inches for safety. Think of it like sewing: better to have a little extra than to be caught short. Use a chalk line to mark your cuts clearly and avoid mistakes.
Cut Carefully and Use the Right Tools
When I cut the carpet, I made the mistake of rushing through it with dull scissors, which led to uneven edges. Invest in a sharp utility knife and a straightedge for cleaner, more accurate cuts. For baseboards, a miter saw is your best friend—set the angle precisely and make smooth cuts. Remember, clean cuts mean a better fit and a more professional appearance.
Lay the Carpet Smoothly and Securely
In my early days, I would just roll out the carpet and tack it down without smoothing out wrinkles. This resulted in bumps and creases. Use a knee kicker or a carpet stretcher to pull the carpet tight and eliminate wrinkles. Secure the edges with quality staples or tack strips, making sure they’re flush with the floor. Imagine stretching a canvas tight over a frame — tension is key for a flawless finish.
Hide Seams for a Seamless Look
Seams are the most visible flaw if not handled properly. I learned to align the seams carefully, overlapping the edges slightly. Use a carpet seaming tape and a hot iron to fuse the edges. For extra durability, reinforce the seams with seam adhesive. The goal is to make the transition invisible; think of it like sewing two pieces of fabric seamlessly.
Install Baseboards for a Clean Finish
When installing baseboards, I used to just nail them up without measuring. Big mistake. Measure the length needed for each wall, cut the baseboards at the correct angles, and use a level to ensure they sit straight. Attach them securely to the wall, filling gaps with caulk for a polished look. For a modern upgrade, check out baseboards makeover ideas.
Adjust for Uneven Walls
Walls aren’t always perfectly straight. Use shims or filler strips behind the baseboard to ensure a flush fit. This small step prevents gaps and wobbly installations. It’s like adjusting a picture frame—small tweaks make a big difference.
Finish with Attention to Detail
Finally, inspect your work. Use a flashlight to catch shadows or bumps, and make small adjustments as needed. Fill nail holes with wood filler, sand smooth, and paint or stain for a professional look. Remember, patience and precision are your best tools for a flawless finish.
For more tips on achieving durable and stylish flooring, visit your guide to durable flooring.
Many homeowners and even some professionals believe that flooring and baseboard installation are straightforward tasks that can be rushed or simplified. However, this mindset often leads to costly mistakes and subpar results. Let’s dig deeper into the nuances that many overlook, and challenge some popular myths that might be holding you back from achieving a truly professional finish.
Myth: All flooring materials and installation methods are equally forgiving
Contrary to popular belief, different flooring types demand distinct techniques and attention to detail. For example, laminate and vinyl planks require precise underlayment and expansion gaps to prevent warping, while hardwood needs acclimation and careful sanding. Overlooking these specifics can cause issues like buckling or gaps over time. It’s worth noting that expert installation strategies, such as those discussed in expert flooring tips, can make all the difference in durability and appearance.
Trap to Avoid: Underestimating the importance of surface preparation
One of the biggest pitfalls in installation projects is neglecting the surface beneath the flooring or baseboards. Even minor imperfections, like uneven subflooring or residual adhesive, can cause visible bumps, creases, or gaps. For instance, in shower renovations, failing to properly level the shower pan can lead to leaks and mold issues down the line. Proper preparation, including leveling, cleaning, and moisture testing, is essential — a principle often underestimated by DIYers. For advanced tips, check out durable flooring strategies.
What advanced installers do differently
Expert installers pay close attention to detail—measuring multiple times, checking for wall and floor irregularities, and adjusting their approach accordingly. For example, when installing baseboards, professionals often use shims to compensate for uneven walls, ensuring a flush fit that looks seamless. They also prioritize finishing techniques, like filling nail holes with wood filler and sanding for a smooth surface. This is especially crucial in high-visibility areas such as living rooms or bathrooms, where imperfections catch the eye. For a full makeover, explore baseboard upgrade ideas.
Have you ever fallen into this trap? Let me know in the comments. Remember, understanding the hidden nuances and avoiding common myths can elevate your installation skills from amateur to professional. Don’t rush the process; meticulous preparation and attention to detail ensure lasting, beautiful results that stand the test of time.
Keeping your flooring, carpets, showers, and baseboards in top shape requires more than just proper installation; it’s about the right tools and ongoing maintenance that ensure longevity and beauty. I’ve learned through years of hands-on experience that investing in quality tools and adopting effective routines can save you time, money, and frustration down the line.
Why Quality Tools Make All the Difference
When I first started, I underestimated the importance of specialized tools. For example, using a high-quality, sharp utility knife isn’t just about making clean cuts—it significantly reduces the risk of uneven edges that can cause gaps or frayed carpet. I personally prefer a **Stanley Utility Knife with a retractable blade** because of its durability and ease of blade replacement. For precise miter cuts on baseboards, a **decent miter saw with positive stops** ensures perfect angles every time, which is crucial for a professional look. Investing in these tools initially pays off by producing cleaner, more durable results that last for years.
How Do I Maintain Flooring and Showers Over Time?
Maintenance begins with understanding the specific needs of each material. For carpets, regular vacuuming with a good HEPA filter vacuum, like the **Dyson Ball Multi Floor**, can extend the life of the fibers and prevent dirt from settling into the backing. For hardwood or laminate floors, I recommend a **microfiber mop and pH-neutral cleaner** to avoid damaging the finish. Showers and bathroom tiles demand periodic sealing—using a **high-quality silicone sealant** and inspecting for cracks or mold helps prevent leaks and water damage. For a comprehensive guide on long-term care, visit your guide to durable flooring.
What Tools Will Help You Scale Your Projects
If you’re looking to expand your home improvement skills, consider tools like a **digital laser measure** for quick, accurate measurements across large spaces. I personally use the **Bosch GLM 50 C** because it provides precise readings and Bluetooth connectivity to save measurements directly to my phone. For sealing showers, a **caulking gun with adjustable pressure** ensures smooth, consistent bead application. These tools streamline the process and reduce errors, making your projects more efficient and professional-looking.
Future Trends in Maintenance and Tools
Looking ahead, I believe smart tools and automation will play a bigger role. Devices like **smart moisture meters** can detect hidden water issues behind walls or under floors before they become costly repairs. Additionally, AI-driven maintenance schedules and app-based tutorials will empower DIYers and professionals alike to keep their installations in pristine condition without guesswork. Embracing these advancements now will prepare you for a future where efficiency and precision are standard.
Start by trying out a **laser measure** for your next project—its accuracy will surprise you and set a new standard for your work. Proper tools paired with consistent maintenance routines will ensure your flooring, showers, and baseboards stay stunning and functional for years. If you’re interested in learning more about maintaining your installations, don’t hesitate to explore tips for shower maintenance or reach out through contact us.
The Hardest Lesson I Learned About flooring installation,carpet install,showers,baseboards
One of my biggest realizations was that rushing through measurements often leads to gaps and uneven edges. Precision in every step isn’t just a tip; it’s the foundation of a flawless finish. I also discovered that neglecting surface prep, like leveling the subfloor or cleaning thoroughly, can sabotage even the best techniques. These oversights cost me time and money, but now I know that patience and attention to detail are priceless in this craft.
3 Myths About flooring installation,carpet install,showers,baseboards That Held Me Back
I used to believe that all flooring materials are forgiving if you’re in a hurry, but each type demands its own approach. For example, laminate needs proper expansion gaps, or it will buckle over time. Also, I thought that installing baseboards was just about nailing them in—until I realized that measuring wall irregularities and using shims creates a seamless look that lasts. Debunking these myths transformed my work from amateur to professional quality.
What Experts Won’t Tell You About flooring installation,carpet install,showers,baseboards
Experienced installers pay close attention to hidden details—like checking for moisture issues before laying down flooring or ensuring seams are perfectly aligned with seaming tape and heat bonding. They also understand that quality tools, like sharp utility knives and precision miter saws, are investments that save time and improve results. Learning these insider secrets made my projects more durable and visually stunning, proving that mastery is about the fine points others overlook.
Where to Go from Here
If you’re serious about elevating your flooring, carpet, shower, or baseboard projects, start by equipping yourself with essential tools such as a digital laser measure and a high-quality caulking gun. Read guides like how to choose the right carpet and your guide to durable flooring for comprehensive insights. Remember, every detail you learn and implement today builds the foundation for flawless results tomorrow.
Don’t Hesitate—Take Action Now
Your next flooring or baseboard project can be your best one yet. Embrace the lessons learned, invest in quality tools, and approach each step with patience. Confidence in your skills grows with every careful measurement and clean cut. The future of your home improvement journey depends on the effort you put in today—so get started and transform your space into something you’ll love for years to come.
What’s been your biggest challenge in flooring or baseboard installation? Share your experience below—I’d love to hear your story and help you overcome it!

One thought on “Guide to Flawless Carpet & Baseboards Installation Strategies”
Charles Hamilton
January 1, 2026 at 6:30 pmI completely relate to the importance of measuring twice and cutting once—it’s surprising how much a small misstep in the initial stages can ripple into big issues later. Over the years, I’ve found that investing in good quality tools, like a sharp utility knife and a precision miter saw, really does make a difference in the final look of baseboards and flooring. One tip I learned is to use a laser measure for larger rooms; it saves so much time and increases accuracy. Also, when it comes to sealing seams or gaps, I prefer silicone sealant over adhesive; it tends to be more forgiving and easier to work with.
From your experience, what are some common mistakes DIYers make when sorting out wall irregularities or uneven floors before installation? I think that surface prep often gets overlooked but can be the key to a perfect finish. Would love to hear more about tackling those tricky spots!