If you’ve ever stood back during a home renovation and felt that nagging disappointment—walls uneven, corners misaligned, or gaps that seem impossible to hide—you know exactly what I mean. I vividly remember my first attempt at installing baseboards and carpet, only to realize I’d overlooked crucial details. The frustration was real. But that moment sparked a lightbulb in my head: these little finishing touches are the secret to transforming a good room into a stunning space.
The Real Reason Why Perfecting Baseboards and Carpet Matters
Let me be honest: no matter how beautiful your paint or furniture is, bad baseboard and carpet installation can sabotage your entire look. It’s those fine details that give a room character and polish. Poorly installed baseboards or uneven carpet edges shout, ‘I didn’t finish this right,’ even if nobody quite notices at first glance. When done properly, these elements elevate your home’s style and create a seamless transition between surfaces, making everything feel sophisticated and well-thought-out.
Trust me, I’ve learned this the hard way. Early on, I made the mistake of rushing through the trim corners, assuming it was a minor detail. Turns out, these small missteps are what often ruin the overall aesthetic. A curved or uneven edge can make a room look amateurish—something you definitely want to avoid. For more tips on transforming your interiors with simple upgrades, check out our article on baseboard trends in 2025.
Is Beautiful Home Finishing Really Worth the Extra Effort?
I used to wonder if investing extra time in perfecting baseboards and carpets was really necessary, especially when I was itching to finish the project and move on. But I learned something important: the difference between a rushed job and a professional-looking finish is about 15 minutes of careful preparation and patience. According to a study by the National Association of Home Builders, meticulous detail work significantly increases home value and aesthetic appeal. So yes, your effort truly pays off—both in looks and in the long run.
If you’ve ever felt overwhelmed or thought, “This is too complicated,” you’re not alone. I’ve been there. But in the next sections, I’ll walk you through the step-by-step process I’ve perfected over years, ensuring your floors look flawless and your corners are sharp. Ready to take the guesswork out of your project? Let’s dive into how to install baseboards and carpet like a pro—without the stress and with results that will truly wow your friends and family.
Preparing Your Space for Baseboard and Carpet Installation
Before you start measuring or cutting, clear the area completely—furniture, debris, and loose items—to ensure safety and accuracy. Check the walls and floors for levelness using a spirit level; uneven surfaces can cause gaps or crooked lines. I once skipped this step and ended up with wavy baseboards, which took extra sanding and reinstallation to fix. Proper preparation saves time and results in a cleaner finish.
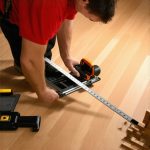
Measuring and Cutting Carefully
Accurate measurements are the foundation of a professional look. Use a tape measure and mark your cuts precisely, adding a little extra for margins when needed. When I installed baseboards in my living room, I measured twice for each wall—once at each corner—to account for slight wall deviations. Cut your materials using a miter saw set at 45° for corners; this ensures tight, seamless joints, like puzzle pieces fitting perfectly. Remember, a clean cut is easier to assemble and looks sharper.
Installing Baseboards with Precision
Start from one corner and work your way around, securing the baseboard with finishing nails or a nail gun. Use a level to confirm it stays straight as you go. For uneven walls, shim behind the baseboard at low spots to maintain a uniform height; this prevents sagging or dips. When nailing into drywall, set nails slightly below the surface and fill indentations with wood filler for a flawless appearance. I found that pre-drilling holes for tricky corners prevents splitting and makes adjustments simpler.
Sealing and Finishing Touches
Once all baseboards are installed, fill nail holes with a quality wood filler and sand smooth after drying. Then, caulk along the top edge to bridge gaps between the baseboard and wall, creating a seamless look—this step is crucial for avoiding dust and dirt accumulation. Paint or stain the baseboards after sealing to achieve your desired finish. I once painted over unfilled gaps; the uneven edges disrupted the aesthetic, so patience at this stage pays dividends.
Carpet Installation Made Easy
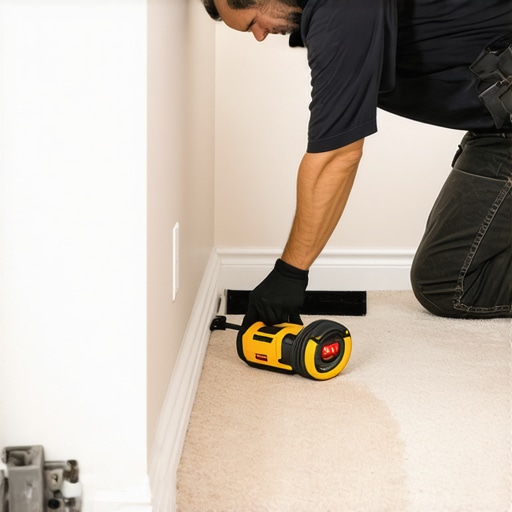
After flooring prep, roll out your carpet and measure slightly beyond the room’s dimensions, accounting for stretch and seams. Use a chalk line to mark your cutting point—think of it as drawing a dinner plate-sized template that guides your cut. When I installed carpet in my den, I cut the excess to allow for a tight fit, ensuring no loose edges. Use a power stretcher to pull the carpet tight, especially at the edges. This tool is like a giant hairdryer but for carpet, ensuring wrinkles and loose fibers are eliminated for a smooth, professional finish.
Seaming and Securing the Carpet
For large rooms, seam two pieces with a seam roller and adhesive recommended by the manufacturer—visualize Kevin from ‘The Office’ laying down carpet like a pro, but remember to keep seam edges aligned perfectly. Secure the edges with tack strips nailed into the subfloor; this anchors the carpet firmly and prevents movement over time. When I did this in my home, I made sure to press the carpet into the tack strips slowly, avoiding stretching or wrinkling. Sticky-back carpet tape can work for small areas or when seaming, but for durability, adhesives and tack strips are preferred.
Final Adjustments and Quality Checks
Walk across your installed carpet and inspect for wrinkles, seams, or loose spots. Use a knee kicker to re-stretch areas if necessary. For baseboards, double-check that all nails are countersunk and filled, then touch up paint or stain where needed. Small details like these transform a good installation into a professional look. I learned that taking time to smooth out every bump or gap makes the entire project look intentional and refined.
For a comprehensive look at sealing and finishing showers, check out this guide. Remember, patience and attention to detail at each step are what turn DIY projects into stunning home upgrades. Keep practicing, and your spaces will reflect your craftsmanship and style.
While most DIY enthusiasts and even professionals focus on the visible aspects like paint colors or tile choices, many overlook the nuanced details that truly determine the quality and longevity of their renovations. One prevalent myth is that a perfect finish only depends on initial measurement and cutting. In reality, subtle errors during installation—such as inconsistent nailing or inadequate sealing—can cause long-term issues like gaps, warping, or mold growth. These small mistakes often manifest months after project completion, emphasizing the importance of mastering the finer points beyond the basic techniques.
For instance, many assume that using cheap adhesives or skipping caulking saves time and money. However, this common shortcut can lead to premature wear and tear, especially in humid environments like bathrooms or kitchens. Proper sealing not only enhances aesthetic appeal but also adds a crucial barrier against moisture damage. Experts recommend using high-quality, water-resistant sealants and paying close attention to the edges and seams—an investment that pays dividends in durability.
Another misconception is that uniform, rigid flooring is always best. While a flat surface is essential, overcorrecting with aggressive leveling compounds can create a stiff substrate that causes cracks or squeaks over time. Instead, understanding the subtle difference between leveling and stabilizing your subfloor is critical. A study by the National Institute of Building Sciences highlights that a balanced approach to subfloor prep significantly reduces future repair costs, especially with materials like hardwood or laminate flooring.
What advanced tricks do pros use to prevent long-term issues with baseboards and flooring?
One sophisticated technique involves allowing expansion gaps around the perimeter of flooring and baseboards, accounting for temperature and humidity fluctuations. Many novices neglect this step, resulting in buckling or warping. Additionally, employing staples or nails at strategic angles rather than straight-in can provide more secure fastening, reducing movement over time. For a comprehensive guide on elevating your finishing techniques, be sure to explore latest baseboard trends in 2025.
When it comes to showers and wet areas, many believe that installing the tiles and sealing are the only critical steps. However, experts emphasize the importance of proper substrate preparation—using waterproof membranes and ensuring proper slope for drainage. Skipping this can cause water intrusion and mold within walls, leading to costly repairs. A well-executed shower renovation, guided by the principles shared in modern shower design tips, guarantees long-lasting beauty and function.
Finally, the secret to truly professional results lies in patience and attention to detail—something that often distinguishes amateur craftsmanship from expert-level finishing. Whether it’s filling every nail hole before sealing or testing moisture levels before sealing grout, these small, deliberate steps make all the difference. Have you ever fallen into this trap? Let me know in the comments, and remember: mastering the subtle nuances can elevate your home renovation from average to exceptional.
Keep Your Installations in Top Shape
Once your baseboards, flooring, carpets, or showers are installed flawlessly, the journey isn’t over. To ensure these elements stay beautiful and functional over years, regular maintenance combined with the right tools is essential. I personally recommend investing in a high-quality vacuum with adjustable settings for carpets and a microfiber mop for hardwood or tile flooring. These tools help remove dust and debris without damaging delicate surfaces, maintaining their appearance and integrity.
For instance, using a vacuum equipped with a beater bar or brush roll on carpets can dislodge dirt trapped deep in fibers, preventing premature wear. Similarly, a soft-bristle broom is perfect for gently sweeping baseboards, avoiding scratches or paint damage. When it comes to showers, applying a daily spray of a pH-balanced cleaner like vinegar diluted with water can prevent soap scum and mineral buildup, reducing long-term staining and mold growth.
How do I maintain my flooring and finishes over time?
Long-term results depend heavily on consistent upkeep and using the appropriate tools. For floors, I love a steam mop with adjustable settings—it’s effective at cleaning without harsh chemicals, especially on sealed surfaces. For carpets, consider hiring a professional deep-cleaning service once a year, which removes embedded dirt and extends the lifespan of your investment. Regular inspections are also vital; for example, checking the caulk seals around showers periodically helps catch potential leaks early, preventing water damage and mold issues.
Following manufacturer guidelines for cleaning and maintenance is crucial. Many flooring and shower products now come with detailed instructions; adhering to these can avoid voiding warranties and ensure longevity. As an example, the expert advice on shower maintenance underscores the importance of not using abrasive scrubbers that can erode sealants over time.
Tools and Techniques for Lasting Impact
Investing in quality tools makes a surprising difference. For example, I recommend a cordless oscillating tool for detailed work like caulking gaps or trimming excess grout—it provides precision and ease that manual tools can’t match. Additionally, a handheld steamer can be invaluable for refreshing carpets and tiles, loosening dirt without harsh scrubbing. These tools not only save time but also minimize the risk of damaging your carefully installed surfaces.
Looking ahead, I believe the trend toward smart maintenance is poised to grow. Automated cleaning devices, moisture sensors, and app-controlled inspection tools could become standard in home care routines, making long-term upkeep simpler and more effective. Embracing advanced technology early can keep your finishes looking pristine without constant manual effort.
Don’t wait for problems to arise—try incorporating a monthly deep-cleaning routine with your favorite tools. For example, schedule a professional carpet cleaning or a shower sealing inspection, and you’ll preserve your home’s beauty for years to come. Remember, consistent care today leads to stunning results tomorrow, ensuring your investment continues to impress and perform. If you’re interested in elevating your maintenance game, explore the comprehensive guide on durable flooring upkeep.
The Hardest Lesson I Learned About Finishing Touches
One of my biggest realizations came when I neglected to double-check the alignment of my baseboards in a rush to finish. That small oversight resulted in an uneven look that was painfully obvious once the walls were painted. It taught me that patience at this stage is what separates a professional finish from an amateur job.
Tools That Changed My Approach to Home Detailing
Investing in a quality miter saw and a reliable nail gun transformed my projects. These tools made precise cuts and rapid installation feasible, saving me time and reducing errors. I trusted them because they consistently delivered clean, tight joints, boosting my confidence and results.
Don’t Let Mistakes Hold You Back
Early on, I believed shortcuts like skipping sealing or rushing measurements were minor. But these small decisions led to long-term problems like gaps and uneven surfaces, which are costly to fix later. Learning to prioritize detail work early on was a game-changer in achieving a polished look.
The Unexpected Benefit of Proper Sealing
Sealing gaps with high-quality caulk may seem tedious, but it actually protects your home from moisture damage and keeps dust out. Giving this step the respect it deserves preserves the beauty and longevity of your installation, making it well worth the extra effort.
Why Every Detail Counts in Home Renovations
From my experience, paying attention to small elements like nail hole filling, sanding, and precise cuts results in a cohesive space that feels deliberate and refined. These nuances elevate your project from a DIY attempt to a showcase of craftsmanship, inspiring pride and admiration from visitors.
Curated Resources That Elevate Your Skills
For those serious about mastering home finishing, I recommend exploring the latest baseboard trends in 2025—it offers fresh ideas and techniques. The flooring installation tips for 2025 also provide innovative strategies to ensure durability and style. Additionally, manuals like expert shower renovation guides can inspire your bathroom upgrades. These resources come from trusted professionals who prioritize quality and longevity in every detail.
Your Move Toward Home Excellence Starts Now
Remember, every upgrade you make with care and attention to detail adds lasting value and beauty to your home. Embrace patience, invest in quality tools, and never underestimate the power of precision. Your dedication today will reward you with spaces that feel thoughtfully curated and beautifully finished for years to come.
What’s the one finishing step you often rush through? Share your experiences below—let’s learn from each other’s journeys to home perfection!
,