I’ll never forget the moment I looked at a freshly installed stone wall, only to realize my pristine baseboards didn’t quite meet the uneven surface perfectly. That sinking feeling when you realize your beautiful trim won’t sit flush without some serious finesse—that’s when I knew I had to crack the code on scribing baseboards to stone walls. It wasn’t just about aesthetics; it was about achieving a flawless finish that lasts. If you’ve ever faced the frustration of gaps, uneven cuts, or crooked baseboards hugging rugged stone, you’re not alone. I’ve been there, and I can tell you—there’s a way to make it look professionally done, even if you’re a DIYer like me.
Why Getting Baseboards to Sit Perfectly on Stone Walls Matters More Than You Think
When it comes to interior finishing, baseboards often become the unsung heroes. They frame a room, hide imperfections, and add that polished touch that transforms a space. But stone walls—especially those with character or age—bring a unique challenge. They are uneven, unpredictable, and stubborn. If you try to install baseboards without proper technique, you’ll end up with visible gaps, crooked lines, and an overall look that feels rushed or sloppy. That’s not just a cosmetic issue; it affects the entire vibe of your room. Believe me, I learned this the hard way early on, making the mistake of relying solely on standard miter cuts without considering the surface irregularities.
However, with the right hacks, you can turn this challenge into an opportunity for craftsmanship. Today, I’ll share three pro secrets that I’ve perfected over numerous projects, which will help you scribe baseboards to any stone surface seamlessly. These tips aren’t just theoretical; they stem from real experiences and tested techniques, and I promise they’ll elevate your installation game to professional levels. If you’re serious about a flawless finish—whether for your living room, bathroom, or accent walls—these tricks are your new best friends.
Is It Really Worth the Extra Effort to Scribe Baseboards on Uneven Walls?
At first glance, you might think it’s too much trouble—just cut the piece and call it a day, right? Well, I almost did that until I realized how much of a difference a perfectly scribed baseboard makes. Plus, a mistake early on can lead to bigger issues down the line, like gaps widening over time or the edge cracking. I personally botched a few runs by rushing through this step and paid the price. The truth is, investing a little extra time now saves you a lot of headaches later. And it’s not as complicated as it sounds, especially once you learn the pro hacks that make scribing straightforward. For more on the importance of precise installation, check out our guide to [baseboards makeover](https://tilecraftsmens.com/baseboards-makeover-elevate-your-interior-with-simple-updates).
So, if you’re tired of trying to hide uneven edges with filler or cover-ups, stick with me. We’ll walk through techniques that will help your baseboards sit flush against any textured wall, adding that perfect finishing touch you’ve been dreaming of. Ready to master the art? Let’s dive into the first hack that will transform your installation process and deliver results that wow.
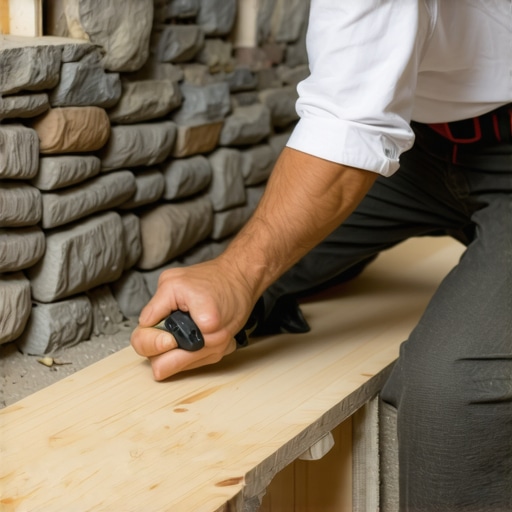
Marking Precise Cut Lines on Wavy Surfaces
Start by placing the baseboard against the wall and use a pencil to trace the curve where it touches unevenly. For a clean line, hold a flexible ruler or a scrap piece of cardboard along the traced path and trace around it. I recall the time I used an old paint stir stick as a makeshift scribing tool, which perfectly followed the wall’s contours. This method creates a custom cutting line, ensuring your baseboard follows the wall’s irregularities closely.
Transferring the Scribe Line to the Mitered End
Once you’ve marked the wall-contact edge, it’s crucial to transfer this profile onto the back of the cut piece. Hold the baseboard in position, ensuring it’s flush with adjoining pieces, and trace the profile onto the face that will be attached to the wall. This step is like customizing a puzzle piece—precision ensures a tight fit. I once neglected this, and the result was a gap that I later filled with filler, but it took extra time to fix. Accurate transfer prevents gaps and results in a seamless look.
Cutting the Baseboard with the Correct Tools
Use a fine-tooth saw or a miter saw set to 45 degrees for a clean cut. For intricate profiles, a jab saw or coping saw may be necessary. When I cut my baseboards, I found a fine-tooth hand saw reduced splintering. Carefully cut along the traced profile, following the line smoothly. Think of it as carving a delicate sculpture—steady hands produce the best result. This method is faster and cleaner than freehand cutting and results in precise edges that require minimal sanding.
Fitting and Adjusting for Flawless Alignment
After cutting, place the piece against the wall to test fit. Minor adjustments can be made with a sanding block or fine rasp. When fitting my own baseboards, I often sanded the edges slightly to refine the profile, especially on stubborn uneven spots. This step ensures the baseboard hugs the wall tightly, eliminating gaps. Don’t be discouraged if it takes a few tries—precision fitting pays off with professional-looking results that elevate your space.
Sealing Gaps for a Seamless Finish
For any small imperfections or gaps, apply a flexible caulk to fill the gaps. Smooth the caulk with a damp finger or caulk finishing tool for a neat appearance. Remember, filler or caulk alone won’t hide large irregularities; the scribing process is the foundation of a clean finish. In my projects, meticulous caulking transformed a rough fit into a virtually invisible joint, giving the illusion of a perfectly custom fit—comparable to high-end craftsmanship. Proper sealing ensures your new baseboards look polished and prevent drafts or pests from sneaking in.
 When it comes to home renovations like shower upgrades, flooring installation, or adding baseboards, many homeowners overlook critical nuances that can make or break the final look. A widespread myth is that the most important factor is choosing high-end materials; in reality, proper installation techniques often determine durability and aesthetics more than the material itself. For instance, many believe that simply applying a sealant will prevent future leaks in showers, but expert contractors emphasize that the underlying waterproofing layer’s quality and installation are far more crucial, as highlighted in studies on moisture management in wet areas.
Why does neglecting proper surface preparation lead to costly mistakes?
Skipping detailed surface prep—such as leveling subfloors before laying flooring or cleaning walls thoroughly before tiling—can lead to uneven surfaces, gaps, or premature failures. This oversight often appears minor but results in issues like squeaky floors, cracked tiles, or mold growth due to trapped moisture. The ‘oops’ factor here is ignoring the foundational step; it might seem tedious but ensures the longevity of your installation. For example, improperly jointed flooring can lead to gaps and buckling over time, which could have been prevented with meticulous prep, according to flooring experts.
Advanced question: How does climate affect moisture-related challenges in renovations?
Climate plays a subtle yet significant role in materials’ performance. Humidity and temperature fluctuations can cause expansion, contraction, or moisture ingress. For example, in humid regions, choosing the wrong type of grout or sealant can lead to peeling or mold. A detailed approach involves selecting materials with appropriate moisture resistance and applying them according to best practices, as outlined in the expert guides on durable flooring installation. Moreover, proper air circulation and ventilation, especially in bathrooms and kitchens, help mitigate these issues, ensuring that the investment stands the test of time. Understanding these nuances allows homeowners and professionals alike to avoid common pitfalls and achieve a truly professional finish. For more insights on creating a water-resistant and stylish shower space, visit our guide to modern shower renovation ideas.
Equip Yourself for Long-Term Success
Investing in the right tools is crucial for maintaining your home projects like flooring, baseboards, or shower renovations. I personally rely on a high-quality oscillating multi-tool, such as the Fein MultiMaster, to make precise trimming and sanding easier, especially in tight corners or irregular surfaces. Its versatility allows me to fix minor imperfections or refresh seals without the need for specialized equipment, saving both time and money. Additionally, a digital moisture meter is indispensable for monitoring humidity levels around bathrooms or basements, helping prevent issues like mold or water damage over time. For large-scale projects, I prefer a cordless drill with variable speed settings, which provides control when drilling or screwing into different materials, from wood to tile backerboards. Testing tools before beginning any maintenance work ensures accuracy and reduces errors, leading to a finish that lasts.
Proper maintenance extends beyond tools. Regular inspections of caulking and grout around showers or flooring joints can prevent leaks and structural issues. For instance, I schedule seasonal checks to replace deteriorated seals, as recommended by experts in waterproofing. An electric grout float or a handheld caulk finishing tool can make resealing jobs more professional-looking and durable—these are small investments that pay off in the long run. Staying proactive with maintenance tools also means you catch potential problems early, avoiding costly repairs down the line.
How do I maintain my home installations over time?
Routine maintenance involves a few key practices: cleaning surfaces to prevent buildup, resealing vulnerable joints periodically, and inspecting for signs of wear or movement. Using a flexible putty knife can help remove old caulk without damaging surrounding materials, making reapplication cleaner and more effective. Regularly checking for loose baseboards or squeaky floors allows me to tighten fasteners before they worsen, often with just a cordless screwdriver or a nail punch. Staying organized by marking your maintenance schedule can make this process habitual, ensuring longevity for your investments. As we look ahead to the future of home maintenance, I anticipate smart monitoring devices becoming more integrated, alerting homeowners to humidity spikes or structural shifts—making upkeep even smarter and more automated.
To ensure your repairs are resilient, consider tools aligned with the latest standards. For example, the latest waterproofing sealant formulations have improved adherence and flexibility, which significantly extends their lifespan in humid environments. Testing these products on a small area before broad application can save you from costly mistakes. I encourage you to try using a moisture meter before resealing your shower or bathroom areas; it offers immediate feedback and helps determine if your efforts are enough or if further waterproofing is necessary. Small steps like these can make all the difference in preserving your home’s integrity for years to come.
The Hidden Lessons in Achieving Perfect Fit
One of the most valuable insights I gained is that patience and meticulous measurement outweigh speed. Rushing through the scribing process often led to gaps and uneven edges, which compromised the aesthetic. Remember, the extra moments spent on precise marking and careful cutting save hours of sanding and filling later. I also learned to trust my own flexibility—sometimes a little sanding or scraping is necessary to refine the profile, especially on stubborn stone surfaces. These small adjustments, made with a keen eye, transform an ordinary installation into a professional finish.
My Craftsman’s Toolbox for Lasting Results
Beyond the basic saw and pencil, I swear by a few key tools that elevate the project: a high-quality coping saw for intricate cuts, a flexible drywall sander for fine-tuning profiles, and a reliable caulk gun for seamless sealing. For tackling uneven surfaces, a contour gauge becomes indispensable—I’ve found it invaluable for transferring complex curves accurately. For those serious about getting it right, investing in a digital angle finder can make a difference, ensuring your cuts match the wall’s irregularities. These tools, combined with patience, have consistently produced results I can proudly showcase, and I recommend them to anyone aiming for a flawless finish.
Embracing the Learning Curve and Growing Your Skills
Perhaps the most profound lesson is that perfection isn’t achieved overnight. Each project teaches something new—whether it’s how to better transfer profiles or how much material to remove for a snug fit. Mistakes are inevitable, but they’re also the best teachers. I’ve found that documenting my steps and noting what worked (and what didn’t) accelerates growth. Eventually, scribing becomes intuitive, and what once seemed daunting becomes a satisfying part of the craft. If you’re eager to refine your skills, I encourage you to practice on scrap pieces first, then apply your knowledge to your project. Progress might be slow at first, but persistence pays off in a room that looks professionally finished and uniquely yours.