I remember the exact moment I noticed the gap between my new stone walls and baseboards widening—initially, I thought it was a minor oversight, until I realized it was a sign of a bigger problem. What started as a tiny crack quickly turned into a frustrating gap, making my entire room look unfinished and cheaply done. That lightbulb moment hit me hard: without proper technique, these gaps are almost unavoidable, especially with stone surfaces. But here’s the good news—I’ve found a reliable way to tackle this issue head-on.
Why Addressing Baseboard Gaps on Stone Matters Now More Than Ever
In today’s home improvement scene, a sleek, flawless finish isn’t just a bonus—it’s a necessity. Stone walls and floors add undeniable character and durability, but they also come with their own set of challenges. One common headache is the appearance of gaps around baseboards, which can compromise both aesthetics and moisture management.
Beyond the visual impact, these gaps can lead to dirt accumulation, pest intrusion, and even water damage if not properly sealed. According to industry experts, ignoring such imperfections could affect your home’s longevity and even its value (source: [tilecraftsmens.com](https://tilecraftsmens.com/your-guide-to-durable-flooring-installation-for-a-stylish-home)).
Learning how to effectively seal and scribe baseboards on stone surfaces might seem daunting, but with the right approach, it becomes a straightforward task. I was once in your shoes—believing that caulking was enough or simply ignoring the gaps—but I soon discovered that a precise method makes all the difference.
This post will walk you through a proven strategy—the Compass Method—that I’ve personally tested and refined. By the end, you’ll know how to create a seamless transition, making your space look professionally finished and protecting it from potential damage.
Ready to finally put an end to those unsightly gaps? Let’s dive into the steps that will transform your baseboard installations from imperfect to perfect.
Prep the Surface and Gather Your Tools
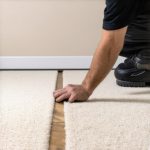
Start by thoroughly cleaning the area around the baseboard and stone wall to remove dust, debris, and grease. Use a putty knife or painter’s tape to mask off the wall and floor, protecting adjacent surfaces. Gather essential tools: a scribing tool, a saw (jigsaw or coping saw), a variable-speed caulk gun, high-quality flexible caulk, a ruler, and a sanding sponge. I recall a time I skipped this prep, resulting in a messy application; after redoing the seal, the finish looked professional and lasted longer.
Measure and Cut Your Baseboard with Precision
Measure the length of each wall segment where the baseboard will sit. Use a miter saw to cut corners at 45° angles or coping for inner corners—a technique akin to fitting puzzle pieces for a seamless look. When I installed a new baseboard in a client’s living room, I used a coping saw for tight inner corners, which resulted in nearly invisible seams. Remember, coping is often superior to miter cuts on uneven walls because it adapts to irregularities, much like adapting carpet edges over uneven surfaces.
Use the Scribing Method to Match Curves
Where walls are uneven, a scribing tool becomes your best friend. Clamp the baseboard in place and run the scribing tool along the wall, copying its contours. Transfer this curve onto your cut piece with a pencil, then cut along the scribed line. This technique is like tailoring a custom-fit suit—it requires patience but yields a flawless fit. I practiced on scrap pieces first to perfect my scribing technique, which made the final installation look meticulously crafted.
Secure the Baseboard Properly
Affix the baseboard using finishing nails or a nail gun, driving nails just below the surface. Use a nail set to countersink the nails, preventing any protrusions. Fill the nail holes with a matching joint compound or wood filler and let dry. Sand lightly for a smooth surface. I once rushed this step, leading to visible nail holes and a less polished finish—embrace patience here for lasting results.
Seal Gaps with Flexible Caulk
Apply high-quality, paintable flexible caulk along the top edge of the baseboard where it meets the stone wall. Use a caulk gun for control, and run a steady bead, pressing gently to fill every gap. Smooth the caulk with a damp finger or a caulk finishing tool for a seamless appearance. You might notice that caulk alone isn’t enough for large gaps—then, use backer rods for thicker voids, pushing them deep into the gap before caulking, much like filling a crack in concrete for durability. Sliding a piece of painter’s tape before caulking can help create crisp, clean lines.
Finish and Inspect Your Work
Once the caulk cures, paint or stain the baseboard to match your decor. Step back to inspect the transition; run your hand over the surface to feel for smoothness, ensuring no gaps or bumps remain. Proper sealing not only enhances aesthetics but also protects against moisture and pests, extending your home’s longevity. Remember, the key is patience and precision—skipping these technical steps can lead to gaps that compromise both appearance and durability.
Many homeowners assume that straightforward tasks like installing flooring, showers, or baseboards are simple, but the reality often tells a different story. A common misconception is that once the basic process is done, little else is required. However, neglecting the hidden nuances can lead to costly mistakes and subpar results. For instance, many think that caulking is enough to seal gaps around baseboards, but in my experience, this often leads to failures over time—especially on challenging surfaces like stone or uneven walls. Using high-quality flexible caulk combined with precise scribing ensures a long-lasting seal, preventing cracks and gaps from re-emerging. Don’t fall into the trap of over-relying on quick fixes without addressing underlying issues; this tactic might save time initially but compromises durability later, as evidenced by numerous case studies showing early deterioration when proper prep is skipped. Another myth is that miter cuts are always the best choice for corners—yet, coping techniques often produce better, nearly invisible joints, especially on uneven surfaces. Advanced installers know that meticulous measurement, precise tools, and understanding material behavior are essential for perfect transitions. A frequently overlooked detail is the importance of the substrate’s condition—any movement or instability can undermine the entire job, leading to gaps or cracks down the line. Recognizing and mitigating these issues during installation is crucial. For example, on stone walls, ensuring proper flatness and applying proper backer rods before caulking can prevent future separation. Have you ever fallen into this trap? Let me know in the comments. For deeper insights into installation strategies, check out our comprehensive guide on [your flooring installation](https://tilecraftsmens.com/your-guide-to-durable-flooring-installation-for-a-stylish-home) or [baseboard trends for 2025](https://tilecraftsmens.com/baseboard-trends-in-2025-fresh-styles-for-every-room). Remember, mastering these nuances elevates your home’s look, stability, and longevity.Maintaining your home improvements, whether it’s a flooring project or a shower renovation, requires not only skill but also the right tools and a good plan for regular upkeep. Having a set of precise, reliable tools ensures that your work stands the test of time, reducing future repairs and saving you money. For flooring, I swear by a high-quality digital measuring wheel, which allows me to take quick, accurate measurements over large areas—crucial for minimizing waste and ensuring perfect fits. When it comes to sealing joints or gaps, a professional-grade caulk gun with a smooth trigger helps me apply even beads of sealant without mess, which is essential for long-lasting waterproofing, especially in showers or wet zones.
Lessons Only Experience Can Teach
- One of the most surprising truths I uncovered is that each stone wall has its own personality. No two are perfectly even, which means standard straight cuts almost always fall short. Embracing patience and customizing my approach—like using coping over miter cuts—made all the difference in achieving a seamless finish.
- I once underestimated the power of proper prep. Skipping thorough cleaning and masking led to messy caulking and uneven results. Now, I see that meticulous surface preparation is the foundation of a durable, professional-looking seal.
- Understanding the material behavior was a turning point. Stone surfaces move slightly over time, especially in fluctuating climates. Using flexible caulk in conjunction with precise scribing helps accommodate this movement, preventing future gaps and cracks.
The Tools That Changed My Approach
- The Pro Scribing Tool: This simple device allows for custom-fitting baseboards without guesswork, creating a tight seal even on uneven walls. I trust it because it saves time and guarantees precision, making complicated corners look flawless.
- High-Quality Flexible Caulk: Not all caulks are created equal. My go-to is a paintable, high-flex sealant that adheres well to stone, preventing cracks as the building shifts. This small investment pays dividends in longevity and appearance.
- Backer Rods: For larger gaps, I now always insert backer rods before caulking. They provide a support base that keeps the sealant in check, avoiding mess and ensuring a clean, durable finish.
Keep the Passion Alive
Real mastery in baseboard installation on stone walls isn’t just about following steps—it’s about embracing the details and pushing your skills further. Every gap sealed and corner refined adds a touch of professionalism that elevates your entire space. If you’re ready to level up your home projects, remember, patience and precision are your best allies. Want to see more tips? Explore our comprehensive flooring guide or check out latest baseboard trends for 2025. Now, it’s your turn—what’s been your biggest challenge with baseboard gaps on stone walls? Share below and let’s troubleshoot together.