I remember the exact moment I realized that my DIY flooring project wasn’t going as smoothly as I hoped. It was late at night, around 8:44 PM—probably too late to be trying to nail down the last baseboard corner, but I was stubborn. As I squished myself into a cramped corner, trying to fit a stubborn piece of carpet, I felt the frustration creeping in. That lightbulb moment hit me hard: I was missing some crucial installation secrets that could make my finishes seamless and professional-looking.
Fast forward a few years, and I’ve gleaned countless tips and techniques that drastically improve the final result. Today, I want to share these with you. Whether you’re tackling carpet installation or giving your baseboards a fresh new look, these clues can turn a messy job into a truly flawless finish. Believe me—I’ve been there. But with a few insider secrets, your project can go from looking clunky to polished, elegant, and lasting.
Why Cutting Corners Can Ruin Your Perfect Floor
Many DIY enthusiasts, myself included early on, tend to overlook key steps, especially around corners and edges. The mistake I made initially was rushing these sections, thinking that if I just pulled the carpet tight enough, it’d all look fine. Turns out, those small shortcuts can lead to uneven surfaces, gaps, or bulges that ruin the entire aesthetic. It’s like trying to hide a bad haircut with a hat—except the hat won’t cover the flaws!
The truth is, detailed attention at the corners and edges isn’t just about aesthetics; it’s about durability too. Loose or poorly installed carpet can lead to fraying, and uneven baseboards can loosen over time. To truly nail that professional look, I recommend following a few proven strategies. Want to dive deeper into how to choose the right carpet to suit your space? Check out this [helpful guide](https://tilecraftsmens.com/how-to-choose-the-right-carpet-for-a-cozy-living-space). That’s step one.
But before we get into the specific steps and tricks, it’s worth addressing one common skepticism:
Is Perfecting Your Carpet and Baseboards Actually Worth the Hassle?
Honestly, I used to think that obsessing over tiny details was overkill. That was until I noticed how much more confident and happy I felt when my home looked impeccably finished. Plus, a well-done installation can significantly boost your home’s comfort and resale value. A study from the National Association of Realtors highlights how upgraded flooring and moldings can boost property value—even just a few percentage points.
My early mistake was glossing over these details because I thought I had better things to focus on. But those ‘little things’ add up to a big difference in the final look and longevity of your project.
Now that I’ve established why these secrets matter—and that you’re probably just as eager to avoid common pitfalls—it’s time to get into the nitty-gritty. Over the next sections, I’ll walk you through-step-by-step—the tools, the techniques, and the insider tips—that will make every corner, every edge, and every seam turn out flawless. Trust me, once you learn these tricks, you’ll never settle for less again.
Preparing Your Workspace and Tools
Start by clearing the room and removing existing baseboards if possible. Have your tools ready: a utility knife, measuring tape, miter saw, level, adhesive, nails, a hammer or nail gun, and a chalk line. For carpets, ensure you have a quality carpet stretcher and padding. Accurate preparations save time and prevent mistakes during installation.
Measuring and Planning Cuts Precisely
Measure the room’s dimensions carefully, accounting for door frames and corners. Always add extra for seam overlaps and cuts. Mark your measurements with a pencil on your materials. Use a chalk line for straight guidelines, especially when cutting carpets or baseboards. A mistake here can cause uneven borders, which are hard to correct later. I once mismeasured a doorway, forcing me to recut sections—the extra effort paid off when the seam was seamless.
Installing the Flooring
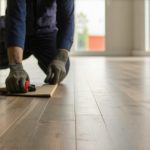
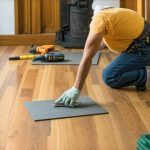
Carpet Installation
Lay the padding first, aligning it with the room’s shape and securing it with staples. Roll out your carpet, stretch it tightly using a power stretcher, and secure it along the edges with tack strips. Focus on stretching it evenly to avoid sagging or wrinkles. When I recently did my bedroom, pulling the carpet tight with a manual tool resulted in a smooth, professional look—much like the results shown in this guide.
Hardwood or Vinyl Flooring
Begin in a corner, leaving expansion gaps against walls. Use spacers to keep these gaps consistent. Lock planks tightly during click-lock installation or glue them down for a more permanent hold. Check with a level regularly; uneven floors show up immediately and are difficult to correct afterward. I once skipped this check, leading to a wobbly floor—removable with some adjustments, but best avoided.
Mastering Corners and Edges
Use a miter saw to cut baseboards at 45 degrees for clean corners. Miter cuts need to be precise; a slight miscalculation causes gaps. When installing, butt the cuts tightly and secure with finishing nails, then fill gaps with caulk or wood filler. For carpet corners, fold the carpet neatly around edges, stapling or tacking it snugly for a seamless finish. I once tried a quick fold without staples—the section came loose after a month, highlighting the importance of secure attachment.
The Finishing Touches
Once the flooring and baseboards are in place, check all seams and edges for gaps or wrinkles. Use a putty knife or caulk to fill small gaps, then paint or stain the baseboards to match your décor. Proper sealing prevents moisture damage and enhances appearance. Remember, patience at this stage yields a polished look—rushing can leave visible flaws that undermine your entire effort. I learned this the hard way after rushing my last project, only to spend extra hours fixing uneven seams.
Attaching and Finishing the Baseboards
Cut your baseboards to fit each wall section precisely, mitering corners for a professional look. Use a nail gun for quick attachment, nailing into wall studs for stability. Caulk the joints and nail holes, then paint or stain to match or accent your décor. For a cleaner look, consider decorative trims, which can elevate your space instantly. Check out this article for creative ideas to upgrade your baseboards easily.
While many believe that following basic measurements and using common tools guarantees professional results, there’s a deeper layer of nuance often overlooked. One prevalent myth is that perfect alignment depends solely on precision cuts; in reality, subtle factors like moisture content, material expansion, and environmental conditions significantly influence the final appearance and longevity of flooring and moldings. For example, neglecting to account for seasonal humidity fluctuations can lead to gaps or buckling over time, a mistake I’ve seen repeatedly in DIY projects. Advanced installation involves understanding how different materials react to moisture; hardwood, vinyl, and even carpets have unique characteristics that demand tailored approaches. Ignoring these nuances can cause costly repairs and frustration. Have you ever fallen into this trap? Let me know in the comments.
An often underestimated aspect is the importance of acclimating materials before installation. Many assume that simply bringing materials into the room a day or two in advance suffices, but industry experts emphasize that acclimation periods should be carefully calculated based on the material’s type and the environment’s humidity levels. This step ensures that materials expand or contract appropriately, preventing future distortions. Additionally, a common mistake is installing baseboards without considering the slight shifting that can occur post-installation; leaving small gaps around the perimeters allows for natural movement without cracking or warping.
Furthermore, the luster often fades when beginners try to save time by skipping detailed preparation, like cleaning subfloors thoroughly or sealing joints properly. This oversight can cause uneven wear and visible seams, diminishing the aesthetic appeal. To avoid this, I recommend consulting industry standards, such as those outlined in expert guides like this comprehensive resource.
In showers and wet areas, layering the installation with advanced waterproofing techniques is crucial. Many installers rely solely on thin membranes without understanding the importance of proper slope, reinforcement, and vapor barriers, risking leaks and mold growth. Expert advice suggests using multiple layers of waterproofing, testing each for integrity—details that can significantly extend your shower’s lifespan. Interested in creating a luxurious shower space? Check out this guide.
In sum, discovering and mastering these nuanced aspects transforms a good DIY project into a long-lasting, high-quality finish. It’s the difference between a quick fix and a home upgrade that stands the test of time. Remember, the devil is in the details—so take the time to learn and apply these advanced tips. How about you? What hidden nuances have you encountered in your projects? Share your experiences, and let’s elevate our craft together.Maintaining your meticulously installed flooring, baseboards, and showers is essential to preserve their beauty and functionality over time. Investing in the right tools and adopting consistent upkeep routines can significantly extend the lifespan of your home improvements. For flooring, a good quality vacuum equipped with adjustable height settings ensures debris doesn’t scratch surfaces. I personally rely on a microfiber broom for daily dusting—it’s gentle yet effective in preventing grit buildup that can wear down finishes. To tackle deeper cleaning, I recommend a steam cleaner designed specifically for your flooring type, which can eliminate stubborn dirt without harsh chemicals, safeguarding your surfaces’ integrity. When dealing with baseboards, a soft cloth combined with a mild cleaning solution preserves the paint and material, especially after any touch-up work. For showers, regular inspection of waterproof membranes and grout lines is crucial; I use a handheld grout brush to diligently clean seams, preventing mold and mildew growth. A quality silicone sealant, applied periodically, seals leaks and maintains water resistance. Monitoring these components with routine checks allows early detection of wear, minimizing costly repairs later. As technology advances, smart home systems may include sensors that alert you about humidity levels or leaks, making maintenance more proactive. Predicting the future, home automation will likely incorporate integrated monitoring tools, simplifying upkeep and enhancing home longevity. How do I maintain my flooring and fixtures over time? I schedule quarterly inspections and clean using industry-recommended methods to keep everything in top shape. For example, I use a trusted microfiber mop for regular dirt removal and only apply cleaning products compatible with my specific flooring material, as outlined in the expert guide on durable flooring installation techniques. This proactive approach saves time and money in the long run. I also suggest trying professional-grade sealants for grout lines in showers once a year—they can prevent water penetration and staining, extending the life of your surfaces. A practical tip is to maintain a small toolkit with essential items like a silicone applicator, grout brush, and specialty cleaner to address issues promptly. This avoids the deterioration caused by neglect and ensures your finished spaces stay stunning. Keep in mind, staying vigilant with simple tools and routine maintenance schedules can make all the difference, allowing you to enjoy your home’s upgrades year after year without worry.
The Hardest Lesson I Learned About Flooring and Finishing Touches
Early in my DIY journey, I discovered that rushing through corner cuts and edge alignments led to uneven surfaces and gaps that mocked my efforts. It taught me patience—taking the time to measure, cut precisely, and secure properly transforms a decent job into a professional-looking finish. The big lightbulb moment was realizing that small details in corners and seams prevent long-term issues and save frustration down the line.
Questions You Should Ask Before Starting Your Project
Do I understand how seasonal humidity affects my materials? Have I acclimated my flooring and baseboards properly? These questions aren’t just checklist items—they’re game changers. Learning about environmental factors and material reactions from trusted guides—like this expert resource—can prevent costly repairs and premature wear, making your efforts last.
Elevate Your Skills and Transform Your Space
Your home deserves finishes that impress and endure. By applying nuanced techniques—meticulous corner cuts, proper material acclimation, and detailed sealing—you craft more than just a beautiful room; you create a lasting haven. Remember, every minor step you master elevates your craft from simple DIY to true artistry. Ready to build confidently? Share your experiences or questions below and let’s learn together!