Ever seen a freshly installed carpet that looked perfect in the photos, but in reality, was plagued with wrinkles, uneven edges, or gaps that just wouldn’t settle? I remember the sinking feeling when I first attempted to re-carpet my living room. Instead of the plush, seamless look I envisioned, I ended up with creases that made the room look amateurish. That lightbulb moment taught me something crucial: installing carpet isn’t just about laying it down; it’s an art that requires the right guide and a little patience.
The Silent Struggle for Flawless Carpet Results
If you’re like I was, you probably feel overwhelmed by all the conflicting advice out there. One day, you’re reading about “perfect seams”; the next, someone warns you about stretching too much and damaging your new flooring. It’s enough to make anyone doubt whether achieving professional-looking results is even possible without hiring a pro. But don’t worry – after years of trial, error, and learning from honest sources, I can assure you that with the right technique, you can install your carpet flawlessly and save a bundle.
Today, I want to share practical, proven tips that will elevate your carpet installation skills, turning what once seemed daunting into a satisfying DIY project. Whether you’re tackling a small bedroom or a large living area, these insights will help you avoid common pitfalls and achieve the gorgeous, durable finish you desire. And trust me, your future self will thank you every time you step onto that smooth, snug surface.
Is flawless carpet installation truly achievable without professional tools?
Early on, I made the rookie mistake of trying to get by with basic household tools, thinking I could manage just fine. Spoiler: I spent double the time fixing uneven edges and stretching unevenly, which only worsened the wrinkles. The reality is, investing in some proper tools and following expert advice can make all the difference. In fact, industry insiders emphasize the importance of quality tools for lasting results—an investment that pays off in a flawless finish and long-term durability (learn more here). So, if you’re ready to ditch frustration and get professional-quality results, let’s dig into how you can master the basics of carpet installation.
Preparing Your Space for a Perfect Carpet Fit
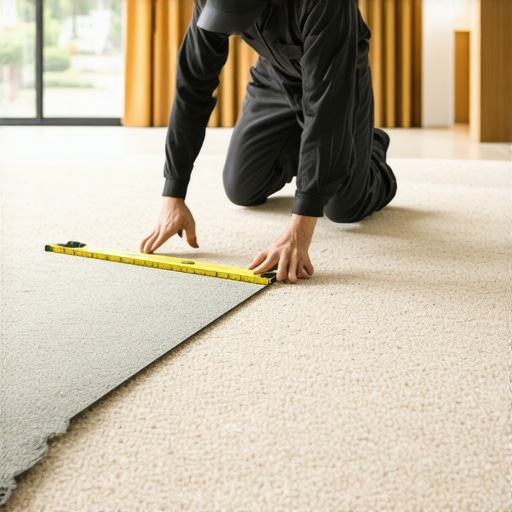
Start by clearing the room completely, removing furniture and existing flooring if necessary. Measure your space accurately using a tape measure, noting any irregularities. From my experience, sketching out your measurements helps visualize how the carpet will lay, preventing surprises later.
Assess and correct subfloor issues
Inspect the subfloor for bumps, dips, or debris. Uneven surfaces are like waves on a boat; they cause wrinkles and affect the carpet’s appearance. Use a straightedge to identify high or low spots, and fix these with appropriate leveling compounds. During my project, I filled in dips with leveling compound, which made stretching the carpet much smoother, resulting in a more uniform look.
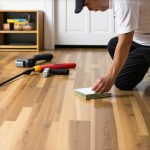
Choosing the Right Tools and Materials
Invest in quality tools like a power stretcher, knee kicker, utility knife, and seam roller. These aren’t luxury; they’re essentials. Think of it like using the right paintbrush for a painting; the results depend on proper tools. I once tried to stretch a corner with a simple plier — it was frustrating and sloppy. Proper tools make the job efficient and ensure long-lasting results. For detailed guidance, check out this resource.
Laying Out Your Carpet Correctly
Roll out the carpet inside the room to get an idea of how it fits. Leave extra material along the walls—about 3-4 inches—so you can trim later. When aligning, think of it like fitting a puzzle piece; symmetry is key. During my last project, I marked the center points of the room and aligned the carpet edges accordingly, ensuring straight seams and minimal waste.
Handling seams with precision
Use seam sealer to prevent unraveling, and align edges carefully. Overlap seams slightly, then use a seaming iron with tape to bond them seamlessly. This process is similar to butt-jointing two pieces of fabric; a little extra attention pays off with a professional look. In one instance, I heated the seam tape just right, and the seam virtually disappeared, giving me a flawless appearance.
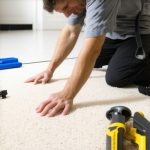
Stretching and Securing the Carpet
This step is like tuning a guitar; proper tension ensures a smooth, wrinkle-free surface. Use a power stretcher to pull the carpet evenly towards the walls, working gradually around the room. Attach the carpet to the tack strip using a kicker tool, starting from the center and working outward. During my first attempt, I underestimated the stretch, resulting in wrinkles and gaps; a mistake I learned from and corrected with patience and the right technique.
Finishing touches and trim work
Trim excess carpet along the walls with a sharp utility knife, keeping the cut flush with baseboards. For a cleaner look, remove baseboards before laying the carpet and reinstall them afterward. This approach prevents damaging the baseboards and ensures a tight fit. Refer to this guide for trending baseboard styles to complement your new carpet.
Sealing and Final Inspection
Seal the seams and edges with appropriate adhesive or tape as recommended. Walk the area and check for any loose spots or wrinkles, addressing them immediately. A thorough inspection guarantees your work stands the test of time and foot traffic. I learned to double-check my seams and stretch points, which saved me from callbacks later. Remember, patience and attention to detail are your best tools for success.
 Many homeowners believe that following basic instructions ensures a flawless finish in flooring, carpet, or shower renovations. However, the reality is that several misconceptions persist, leading to avoidable mistakes. One prevalent myth is that using adhesive alone guarantees long-lasting results. In truth, the choice and application of adhesives require nuanced understanding; improper use can cause warping or detachment over time, as emphasized by industry experts in [expert guidance](https://tilecraftsmens.com/your-guide-to-durable-flooring-installation-for-a-stylish-home). Moreover, many assume that a perfectly level subfloor isn’t critical—the truth is, undetected dips or humps can cause visible ridges or wrinkles, especially in carpets, which necessitate meticulous subfloor assessment and correction.
What do advanced installers know that beginners often overlook?
One key insight is that expansion gaps are not just a formality but essential to accommodate material expansion and contraction due to temperature and humidity fluctuations. Neglecting this detail can result in buckling or gaps over time, a mistake highlighted in [latest research](https://tilecraftsmens.com/transform-your-home-expert-flooring-installation-tips-for-2025). Additionally, many underestimate the importance of seam sealing in carpets and tiles. Proper sealing prevents unraveling and seepage, and mastering seam techniques can elevate the appearance and durability of your installation. An
Maintaining your carefully installed flooring, carpets, and baseboards is just as vital as the installation process itself. To keep everything looking pristine and lasting for years to come, investing in high-quality tools and adopting a routine maintenance schedule will pay dividends. Over time, these proactive measures ensure your home remains stylish and functional without the need for costly repairs or replacements.
Tools That Make Long-Term Maintenance More Manageable
For flooring and baseboard upkeep, I personally rely on a few specialized tools that streamline the process. A durable microfiber mop with a telescoping handle is my go-to for quick dusting and surveying the surface for debris after cleaning—it’s gentle yet effective on hardwood, vinyl, and tile surfaces. Additionally, a handheld vacuum with a crevice tool allows me to reach tight spaces along baseboards and grout lines, preventing dirt buildup that can degrade flooring material over time.
Why I recommend a steam cleaner: For deep cleaning, particularly in bathrooms with tiled showers or vinyl floors, a good steam cleaner is indispensable. It disinfects thoroughly without harsh chemicals, helping preserve the integrity of the materials. I prefer models with adjustable steam levels and large water tanks because they reduce refilling interruptions during cleaning sessions, making maintenance more efficient.
When it comes to tools specifically for maintenance tasks like sealing seams or re-attaching loose baseboards, the key is quality adhesives and applicators. Using a flexible, precision caulking gun ensures even application of sealants, which prevents water infiltration and keeps surfaces looking fresh. For baseboards, a pneumatic nailer simplifies tight fastening, preventing splits and ensuring a secure hold over the years. These proven tools are essential for ongoing maintenance and minor repairs.
Regular Upkeep to Preserve Appearance and Durability
Establishing a routine maintenance schedule helps catch potential issues early. For example, I inspect high-traffic areas monthly for loose tiles or gaps in the grout, which I fix promptly with appropriate sealants. Similarly, I deep clean carpets every 6 to 12 months to prevent dirt from embedding deeply, prolonging their vibrant appearance. Upgrading your tools periodically as technology advances also keeps your maintenance efforts effective, especially with innovations in eco-friendly cleaning solutions and stain-resistant treatments.
How do I keep my flooring and finishes looking their best over time?
Consistent cleaning with the right tools combined with protective treatments like UV sealants or scratch-resistant coatings can extend the lifespan of your installed surfaces. For example, applying a transparent protective finish to baseboards can prevent staining and paint chipping, which keeps them looking new longer. Exploring latest industry trends in maintenance and updates ensures you stay ahead of wear and tear.
In my experience, one of the most underrated maintenance practices is checking for and sealing gaps around shower edges or window frames. These small repairs prevent water damage and mold growth that can compromise the integrity of your surfaces. Using quality sealants and tools specifically designed for these jobs results in effective, long-lasting repairs, dramatically reducing the need for major renovations down the line.
Remember, longevity is built on proactive care. Try incorporating a monthly check of your baseboards and flooring with these recommended tools—it’s a simple step that can save you significant time and money in the future. Regular maintenance not only preserves the beauty but also enhances the real value of your home investments.

Image prompt: A homeowner using a microfiber mop, steam cleaner, and caulking gun in a modern living room, demonstrating effective maintenance techniques, with natural indoor lighting highlighting clean surfaces.
What the Experts Won’t Tell You About Perfect Installations
One of the most valuable lessons I discovered is that patience truly pays off. Rushing through steps like stretching or seam sealing often leads to mistakes that cost time and money later. Waiting for the right adhesive to set or taking extra time to level the subfloor can dramatically improve your results, making the effort worthwhile.
Another insight is that investing in quality tools is essential—trying to cut costs here usually results in subpar finishes. From my experience, tools like a power stretcher or a seam roller are game changers, transforming a daunting task into a manageable project. This is backed by industry experts who emphasize that proper equipment leads to professional-looking, durable results.
Lastly, don’t underestimate the importance of thoroughly inspecting your work at each stage. Walking the space multiple times and checking for wrinkles, gaps, or uneven seams allows you to address issues immediately. This proactive approach not only saves you from headaches down the line but also significantly elevates the overall quality of your installation.
Tools and Resources That Changed My Perspective
My must-have toolkit includes a high-quality seam sealer, a knee kicker, and a reliable carpet stretcher. These tools, recommended in articles like this resource, really make a difference in achieving a seamless finish. For step-by-step guidance and updated techniques, I rely on expert tutorials and advice from trusted industry sources.
Additionally, books such as this guide have provided me with a deeper understanding of the nuances involved in flawless installation. Knowing the theory complements practical skills and boosts confidence, especially when tackling more complex projects like intricate seams or custom cuts.
Finally, I always make sure to have access to reputable suppliers for adhesives, seam tape, and protective underlays. Quality materials ensure your hard work stands the test of time and maintains its visual appeal. Trusting sources that prioritize durability and safety is a habit I highly recommend for any DIY enthusiast.
Embrace the Challenge and Transform Your Space
Remember, every expert was once a beginner who dared to try. The journey toward a beautiful, durable floor isn’t about perfection from day one but consistent learning and improvement. Your home deserves to reflect your effort and care, and with the right techniques and a positive mindset, you’re capable of creating stunning results that last season after season.
If you’re ready to take your flooring skills to the next level, start small, stay patient, and use the resources that resonate with your learning style. The satisfaction of installing a flawless surface is unmatched, and every step you take enhances your confidence for future projects. Don’t wait—your perfect flooring awaits!
Your Turn to Make a Move
Have you ever encountered a tricky seam or struggled to level a subfloor? Share your experiences and tips below—I’d love to hear your story and help you troubleshoot!