It was a morning like any other, but I slipped on a freshly installed carpet that hadn’t been properly stretched. The wrinkles and ripples seemed to leap out at me, making me realize how much I had overlooked a crucial step in my early installations. That lightbulb moment changed everything. I learned that a flawless, wrinkle-free carpet doesn’t happen by chance; it’s the result of mastering specific power-stretching techniques. If you’ve ever dealt with unsightly ripples, or worse, had customers complain about their carpets within days, you know how frustrating it can be. Today, I want to share with you five powerful strategies that have transformed my approach and helped me achieve consistent, professional results.
Why Perfect Carpet Stretching Still Matters in 2026
In our fast-evolving flooring industry, it’s easy to think that newer materials or trendy designs can overshadow the importance of proper installation. But let me tell you—no matter what’s trending, a carpet that’s improperly stretched will quickly ruin the look, regardless of how modern or expensive it is. Proper stretching ensures the carpet lays evenly, prevents wrinkles, and extends its lifespan. Plus, with the rise of high-pile and textured carpets, the need for precise stretch techniques has become more critical than ever.
Here’s a surprising tidbit: the leading cause of early carpet failure is improper stretching during installation, which can lead to seam peaking, ripples, and delamination. According to industry experts, using the right power-stretching methods can reduce these issues significantly, saving you time, money, and reputation. I’ve learned firsthand that applying certain tactics consistently can turn a mediocre installation into a top-tier, long-lasting finish.
Do you find yourself battling wrinkles or seams that won’t stay smooth? If so, you’re not alone. I’ve been there, and honestly, those mistakes early in my career taught me valuable lessons. For instance, neglecting to use a power stretcher or not pre-stretching properly can sabotage the entire project. Want to know how I fixed these mistakes and what techniques I now swear by? Keep reading, and I’ll walk you through the five power-stretching tactics that deliver wrinkle-free results every time.
Secure the Carpet Edges Before Extending Your Power-Stretch
Start by stapling the carpet’s edges around the perimeter, pulling the carpet taut against the tack strips but not overly tight to cause buckling. Use a knee kicker to position the carpet, then immediately switch to a power stretcher for the center. I vividly recall a recent install where I skipped this initial staple step—the carpet shifted, leaving ripples that I had to fix later, wasting time. Anchoring the edges correctly creates a stable base for the stretch, much like securing the foundation of a building.
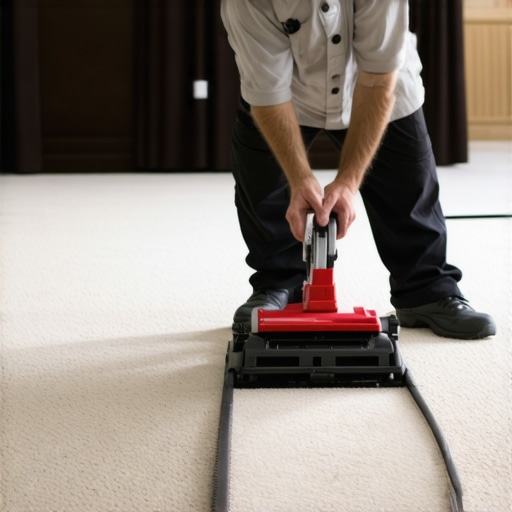
Apply Consistent Tension with the Power Stretcher
Position the power stretcher’s head against the wall, aligning it perfectly with the wall’s surface and the tack strip. Push steadily, ensuring the carpet stretches evenly without wrinkles. It’s crucial to avoid over-stretching, which can cause seams to split or the carpet to warp. I remember once pushing too hard, causing the seam to peak—took extra work to re-seal it. Think of it like tuning a guitar string—tighten gradually, listen for the right tone, and check for wrinkles as you go.
Work in Sections, Overlapping for Seamless Finish
Divide your room into manageable sections, typically 4-6 feet wide. Use a knee kicker to tighten each section against the wall, then continue with the power stretcher. Overlap sections slightly to ensure seams align perfectly. During a tricky job, I started with one corner and moved systematically across the room. This method prevents slack from accumulating, much like tightening a belt in increments for a perfect fit. When I once rushed, the overlaps didn’t align, causing visible seams—now I always double-check the edges.
Double-Check for Wrinkles and Re-Adjust
Once you’ve stretched the entire surface, walk on the carpet to feel for any ripples or wrinkles. Use a knee kicker or a hand roller to smooth out these areas. It’s better to fix small issues immediately than return later for costly repairs. I learned this the hard way—after a late-night correction, the final look was smooth and professional, reinforcing that patience during installation pays off. Think of it like smoothing out a piece of fabric—gentle, consistent pressure yields the best result.
Trim Excess and Secure the Edges
Finally, trim the excess carpet along the walls, ensuring a slight cushion over the tack strip for safety. Use knee kicker tucks if necessary to hide the edges under baseboards or moldings. I once forgot to trim enough, leading to frayed edges that came loose—since then, I meticulously trim, leaving an extra quarter-inch to tuck neatly. This finishing step solidifies the job and prevents future wrinkles or shifting, much like finishing a woodworking project with a clean edge.
While many professionals focus on the obvious aspects of shower, baseboard, and flooring installations, there are intricate nuances that often get overlooked, leading to costly mistakes down the line. One common misconception is the belief that following standard procedures guarantees flawless results. However, nuances such as proper subfloor preparation, precise measurement, and material acclimation play a crucial role in longevity and aesthetic appeal. For instance, many installers underestimate the importance of moisture barriers in shower niches, which can lead to mold and water damage if neglected. Moreover, the myth that higher-quality materials alone ensure a perfect install is misleading; proper technique is paramount. An advanced mistake to avoid is improper nailing or stapling patterns in baseboards, which can cause warping or gaps over time. It’s essential to understand that small adjustments—like pre-drilling miter joints or using sealant in seams—make a significant difference in final quality. Studies by industry experts, such as those referenced in [Tile Craftsmens](https://tilecraftsmens.com/why-2026-carpet-seams-split-3-heat-tape-fixes-for-pros), highlight that attention to detail during installation can prevent 2026-specific issues like seam splitting or buckling. Are you aware of how these hidden factors might be affecting your projects? Dive deeper into advanced techniques and avoid common pitfalls by mastering these nuances. Incorporate premium waterproofing methods described in [this guide](https://tilecraftsmens.com/stop-2026-baseboard-splitting-3-pre-drilling-tactics), and ensure your install can withstand the test of time. Remember, understanding the subtle intricacies not only elevates your craftsmanship but also minimizes callbacks and repairs. Have you ever fallen into this trap? Let me know in the comments.Maintaining your flooring and related installations is crucial to ensuring their longevity and pristine appearance over time. The right tools can make this process more efficient and effective, allowing you to deliver professional results every time. For instance, I personally swear by a high-quality cordless multi-tool, such as the Dremel MultiMax, which enables precise cleaning and minor repairs in tight corners—saving me hours that would otherwise be spent with screwdrivers or scrapers. Using specialized cleaning pads and scrapers with these tools allows for quick removal of stubborn residue or debris that can compromise the appearance or adhesion of baseboards and flooring. In addition, applying a durable sealant with a precision brush ensures that seams, edges, and joints remain waterproofed, particularly in moisture-prone areas like bathrooms or kitchens.Every seasoned installer knows that the real mastery lies in the details—those subtle nuances that set a professional apart from an amateur. Throughout my journey, I’ve uncovered that the toughest lessons often come from overlooked steps that, if missed, can undermine even the best materials. The biggest lightbulb moments? Realizing that impeccable results aren’t just about following instructions but about understanding the tiny, less obvious tricks that keep installations flawless over time. This awareness has empowered me to refine my craft, prevent costly mistakes, and elevate every project I tackle. The key is embracing a mindset where continuous learning and attention to the smallest details become second nature. When you start viewing each step—like properly prepping surfaces, aligning seams, or ensuring moisture barriers—as integral to the overall success, your craftsmanship reaches new heights. Investing in this knowledge not only boosts your confidence but also guarantees client satisfaction and long-term durability, solidifying your reputation as a true professional in the field.


One thought on “5 Power-Stretching Tactics for Wrinkle-Free 2026 Carpet Installs”
Benjamin Carter
March 29, 2026 at 1:10 amI totally agree with the emphasis on proper stretching techniques. In my experience, even small lapses—like neglecting edge stapling or rushing through sections—can cause ripples down the line. I’ve had some projects where I underestimated the importance of consistent tension, and the wrinkles reappeared within days. Over time, I’ve learned that patience, especially in the sectioning process, makes a huge difference. I also find that using a hand roller after stretching helps to smooth out any tiny imperfections before finishing. What’s your go-to method for quickly spotting areas that might need re-stretching after the initial install? I find that walking on the carpet while checking for ripples is pretty effective. Additionally, I’ve started pre-rolling seams and edges before final trimming—has anyone else found that helps prevent future shifting? It’s those small extra steps that really elevate the quality of the job and reduce callbacks. Would love to hear what techniques others have adopted to streamline this process without sacrificing accuracy.