Ever spent hours installing new flooring only to step back and realize it’s lopsided or uneven? I’ve been there. That frustrating moment when your dream home suddenly feels more like a DIY disaster. I used to think that just laying down the planks or tiles was enough—until I learned the hard way that proper technique and some insider tips make all the difference. Now, I want to share what I’ve discovered so you can avoid my mistakes and achieve flawless, durable floors that truly last.
Why Your Flooring Project Needs More Than Just Basic Skills
Let’s be honest. Installing flooring isn’t just about making it look good; it’s about creating a foundation that stands the test of time. One mistake early on can lead to gaps, warping, or worse—costly repairs down the line. When I first started, I ignored the importance of proper subfloor prep and skipped the detailed measurements. The result? A wavy, uneven surface that was a nightmare to fix. According to flooring experts, neglecting these steps can reduce the lifespan of your floors by years. That’s why understanding the right techniques and tips is crucial.
Have You Faced This Common Flooring Fumble?
If you’ve ever wondered why your new floors aren’t as perfect as the showroom or why they develop issues so quickly, you’re not alone. Many DIYers and even pros sometimes overlook key steps, thinking they’re minor details. But those details make all the difference. For example, I once rushed the acclimation process for my hardwood, which caused warping down the line. Learning from that mistake, I now always follow a comprehensive guide, like the one at Your Guide to Durable Flooring Installation.
Today, I’ll walk you through the essential tips that will help you nail your flooring project—whether you’re tackling tiles, carpet, or hardwood—so your results are not only stunning but also long-lasting. Ready to turn your space into a flawless masterpiece? Let’s dive into the first step!
Prepare Your Subfloor Like a Pro
Start by thoroughly inspecting your subfloor for any imperfections, cracks, or moisture issues. Use a level to check for uneven spots and sand down high areas. Think of the subfloor as the foundation of a house—if it’s shaky, everything on top will suffer. I once skipped this step, rushing straight into laying tiles, only to find them cracking and shifting months later. Proper prep here is your best defense against future headaches. For detailed guidance, visit Your Guide to Durable Flooring Installation.

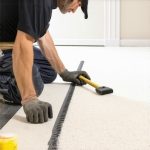
Measure and Acclimate Materials Precisely
Accurate measurement ensures your flooring fits perfectly and reduces waste. Use a tape measure and chalk line to mark your cuts before starting. For hardwood or laminate, acclimate the materials in the room for at least 48 hours. This allows the wood to adjust to room humidity, preventing warping later. I once bought a large batch of hardwood, skipped acclimation, and ended up with twisted planks that I had to replace. Consistency is key—measure twice, cut once. Learn more about this step at Expert Flooring Installation Tips for 2025.
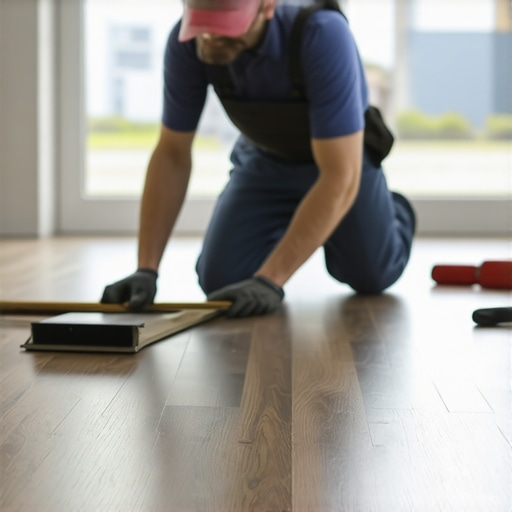
Lay Out Your Pattern First
Before nailing or gluing, lay out the entire flooring in the room to visualize the pattern. This helps you identify the best starting point and avoid awkward cuts at the edges. Use spacers to leave expansion gaps—these are vital to prevent buckling over time. I remember spending extra time planning my tile layout, which saved me from uneven edges and awkward cuts. Think of this step as sketching a map before a journey—clarity now saves chaos later. For more layout strategies, see Top Flooring Installation Tips for 2024.
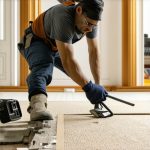
Install with Care and Precision
Begin installation from the center or a straight wall, ensuring your first row is perfectly aligned. Use a chalk line to keep everything straight. When nailing or gluing, work methodically, and avoid rushing. For hardwood, stagger the seams for a natural look and increased strength. I once hurried through the first few rows and ended up with a crooked floor, which I had to fix by removing and redoing the entire section. Patience here guarantees a flawless finish. For detailed techniques, visit Expert Flooring Installation Tips for Lasting Results.
Finish with Expert Trimming and Seals
Once the main installation is complete, add baseboards or moldings to cover expansion gaps and give your floor a polished look. Use a miter saw for perfect corners and secure with nails or adhesive. Seal your flooring with appropriate finishes—varnish, polyurethane, or stain—to protect against wear and moisture. I learned this the hard way after neglecting sealing my hardwood, which led to scratches and water damage. Proper finishing transforms a good job into a professional one. Explore more finishing tips at Baseboards Makeover.
When it comes to flooring, many DIY enthusiasts and even some professionals fall into common traps that can compromise the durability and appearance of the finished project. Let’s dig deeper into some misconceptions that might be costing you time, money, and frustration. Understanding these nuances is vital for achieving a flawless, long-lasting floor.
Myth: More Adhesive Means Better Bonding
Contrary to popular belief, slathering on extra adhesive doesn’t strengthen your flooring. Excess adhesive can lead to uneven surfaces, seepage, and difficulty in future repairs. Experts emphasize using the right amount—just enough to secure the material without excess. This is especially critical with hardwood and laminate flooring, where too much glue can cause warping or uneven expansion. For detailed guidance, visit Your Guide to Durable Flooring Installation.
Don’t Overlook the Subfloor
A common mistake is assuming the subfloor is sufficiently flat or moisture-free. Many get caught off guard when their floors develop squeaks, gaps, or warping within a few years. The reality is, a subfloor needs meticulous inspection and preparation—sanding high spots, fixing cracks, and applying moisture barriers where necessary. Skipping this step is a quick path to unevenness and premature wear. Studies show that proper subfloor prep can extend flooring lifespan by over 30%, making it a step worth investing in.
Advanced Question: How Do I Handle Complex Patterns Without Ruining the Alignment?
For those tackling intricate layouts like herringbone or diagonal patterns, precision and planning are everything. Many believe that laying out the pattern after installing is sufficient, but in reality, pre-planning and dry-laying the pattern reveal alignment issues early. Use spacers and chalk lines to visualize the final look before committing. Misalignment at the start can cascade into crooked seams or uneven edges, which are painfully difficult to fix later. For expert tips on pattern installation, check Expert Flooring Installation Tips for Lasting Results.
Have you ever fallen into this trap? Let me know in the comments. Remember, understanding these hidden nuances can save you countless headaches and help you achieve a professional-grade finish. Proper technique, attention to detail, and a little expert insight are your best tools for flooring success.
Keeping your flooring in top shape requires the right tools and a proactive maintenance routine. Over time, even the most durable floors can show signs of wear, but with the proper approach, you can extend their lifespan significantly. I personally swear by a few specific tools that make maintenance easier and more effective.
Invest in Quality Maintenance Tools
One of my go-to tools is a high-quality microfiber mop. Unlike traditional mops, microfiber picks up dust and dirt more effectively without scratching the surface. I use this regularly to keep hardwood and tile floors looking pristine. For deeper cleaning of tile grout or textured surfaces, a handheld grout brush with firm bristles is invaluable. It helps remove dirt from cracks and prevents discoloration over time.
Another essential is a good vacuum with adjustable settings and soft brushes. I prefer models with HEPA filters to trap allergens and dust, which is especially important if you have pets or allergies. Regular vacuuming prevents dirt from embedding into the flooring, reducing scratches and dullness.
Set a Routine for Routine Maintenance
Consistent cleaning is key. I recommend sweeping or vacuuming at least twice a week, and mopping with a damp microfiber cloth once a week. For hardwood floors, use a cleaner specifically formulated for wood, avoiding excess water that can cause warping. For tiles, a mix of warm water and a gentle pH-neutral cleaner works well.
Don’t forget to protect your floors from furniture scratches. Using felt pads under furniture legs is a simple yet effective step. I’ve learned that replacing pads every few months prevents unsightly marks and keeps floors looking new.
Address Small Issues Before They Grow
Cracks, scratches, or water spots can be tempting to ignore, but addressing them early saves you money and effort. For minor scratches on hardwood, a touch-up pen that matches your floor color can work wonders. For tiles, sealing grout lines annually prevents moisture penetration and staining.
My favorite maintenance tip is to schedule a yearly professional inspection, especially for hardwood and engineered floors. Experts can identify issues before they become costly repairs, and some recommend applying a fresh coat of sealant every few years to maintain durability.
Future Trends in Flooring Maintenance
Looking ahead, I predict that smart cleaning devices will become more prevalent. Robotic vacuums equipped with sensors and app controls can manage routine cleaning with minimal effort, ensuring your floors stay immaculate. Additionally, eco-friendly cleaning products are gaining popularity, aligning with a sustainable lifestyle and reducing chemical exposure.
How do I maintain my flooring over time?
Developing a consistent cleaning schedule, investing in quality tools, and addressing issues early are the cornerstones of effective maintenance. Remember, the key is not just cleaning but also protecting and inspecting to catch problems early. Try implementing a weekly routine with your microfiber mop and vacuum, and schedule annual professional checkups to keep your floors looking their best for years to come. For expert advice on maintaining your flooring, visit your comprehensive guide.
Reflecting on my journey into flooring installation, I realized that the most valuable lessons often come from unexpected mistakes. One of the hardest lessons I learned was how crucial meticulous subfloor prep is—it’s the silent foundation that determines your entire project’s success. Skipping this step may seem harmless at first, but it can lead to uneven surfaces and costly repairs down the line. By investing time in inspecting and leveling your subfloor, you ensure your floors will stay durable and beautiful for years to come.
Another insight I gained is the importance of measuring and acclimating materials properly. I once rushed into installing hardwood without giving it time to adjust to the room’s humidity, which caused warping and gaps. Now, I always measure twice and let my materials acclimate for at least 48 hours. This simple step prevents many common issues and guarantees a tight, professional fit. Plus, dry-laying your pattern before installation allows you to visualize the final look and catch potential misalignments early.
Lastly, I learned that patience during installation is key. Starting from a perfect center point and working methodically, I avoided crooked seams and uneven edges. Applying finishing touches like baseboards and sealing your floors enhances both appearance and longevity. These behind-the-scenes lessons transformed my approach from trial-and-error to confident craftsmanship. For a comprehensive guide on durable flooring installation, I recommend checking out Your Guide to Durable Flooring Installation.
4 thoughts on “Top Flooring Installation Tips for Flawless, Lasting Results Today”
Emily Carter
December 28, 2025 at 8:10 amI completely relate to the importance of meticulous prep work before starting any flooring project. Missing the subfloor inspection was my biggest mistake early on, leading to squeaks and unevenness that I struggled to fix later. Now, I always take the time to thoroughly check and level the surface, which makes a world of difference in the final result. I also found that dry-laying tiles or hardwood planks really helps visualize the pattern and avoid poor alignment. One thing I’d add is investing in a good quality level and some spacers to maintain consistent expansion gaps—they’re surprisingly affordable and very effective. Have others found particular tools or tricks that make pattern layout or subfloor prep easier? I’d love to hear recommendations for those final finishing touches that really elevate the overall look and durability.
Michael Johnson
March 7, 2026 at 12:20 pmReading through this post reminded me of my own struggles with flooring projects, especially the importance of careful subfloor prep. I once skipped that step and paid for it dearly with uneven, squeaky floors that took ages to fix. Now, I always use a good level and moisture meter before proceeding—those tools are lifesavers. I also agree wholeheartedly about dry-laying tiles or planks; it really helps visualize the pattern and avoid costly mistakes at the end. One tip I’ve found helpful is using a laser level to create straight reference lines across the entire room, especially for larger spaces.
I’m curious, has anyone had success with specific brands of moisture barriers or underlayments that truly make a difference in preventing warping or moisture issues? Also, for those tackling complex patterns like herringbone, do you have any tools or tricks for maintaining perfect alignment over the course of a large area? I’d love to hear about what worked for others. Thanks for the insightful post, and I’m excited to implement some of these tips on my next project!
Susan Walker
April 3, 2026 at 5:02 pmThis post really hits the mark on the importance of meticulous planning and preparation when it comes to flooring installation. I’ve learned from experience that rushing through steps like subfloor prep or forgetting to acclimate materials can lead to issues that are not only frustrating but costly to fix later on. One thing I’d like to add from my personal journey is the value of using quality tools, especially a good laser level, which makes a huge difference in maintaining straight lines across large spaces. Also, investing in a moisture meter was a game-changer for me—detecting moisture problems early prevents warping and mold growth.
Have others found certain brands or types of moisture barriers or underlayments particularly effective in your projects? I’m always on the lookout for reliable products that really do what they promise. Additionally, for those dealing with complex patterns like herringbone, what tricks or tools have you used to ensure the alignment stays perfect throughout? Sharing these tips can save a lot of headaches for DIYers tackling intricate designs.
Lena Scott
April 16, 2026 at 12:00 pmThis post really resonated with me because I’ve often underestimated the importance of that initial subfloor inspection. I once skipped this step in a rush to finish my living room, and as a result, I experienced uneven tiles and minor cracks within just a few months. Learning from that, I now always dedicate time to properly inspect and level the subfloor before proceeding. It makes a huge difference in the overall finish and longevity of the floor. I also found that dry-laying tiles or planks helps me visualize the pattern and avoid awkward cuts, especially with complex patterns like herringbone.
Has anyone experimented with different types of moisture barriers? I’ve heard that some brands perform better in high humidity areas, but I’d love to hear real experiences. And for those who have laid intricate designs, do you have specific tools or tips for maintaining perfect alignment? Sharing those little tricks could really help make the process smoother. Thanks for all the helpful insights here—this guide has definitely inspired me to be more meticulous next time!