I remember the first time I tried to install new baseboards in my living room. I was so eager to see the transformation, but somehow, the edges looked uneven, and the corners didn’t quite meet right. It was frustrating—like trying to put together a puzzle without all the pieces fitting properly. That lightbulb moment made me realize that even small details, like how you cut and install baseboards and carpets, can make or break the entire look of a room. If you’ve ever faced a similar struggle, you’re not alone. Many homeowners and DIY enthusiasts stumble at this stage, eager for that flawless, professional finish but unsure of the best strategies to get there.
The Promise of a Flawless Finish
Today, I’m here to share proven tips and tricks that will elevate your installation game. Whether you’re tackling a full renovation or just updating a room, mastering these strategies can save you time, money, and a whole lot of frustration. From perfecting your cuts to ensuring seamless transitions between carpet and baseboards, I’ll guide you through the essential steps that lead to a stunning, durable result. Trust me, once you learn these techniques, you’ll wonder why you ever settled for anything less.
Will These Tips Really Make a Difference?
Early in my DIY journey, I made the mistake of rushing through measurements without double-checking. That led to uneven cuts and gaps that screamed “amateur.” But once I started paying attention to the details—like using a miter saw for precise corners and choosing the right materials—I saw a huge improvement. If you’re skeptical, I get it. It’s easy to think that professional results are out of reach, but I promise, with a little patience and the right method, anyone can achieve that perfect finish. For more insights, check out expert installation strategies that can make your project look like you hired a pro.
Now, let’s dive into the key strategies that will transform your space and leave your friends asking, “Did you do this yourself?”
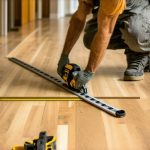
Measure Twice, Cut Once
During my first big project installing baseboards, I learned the importance of meticulous measurement. I took the time to double-check each wall length and used a quality measuring tape. When I marked my cuts, I kept the pencil line precise, ensuring clean, straight edges. This simple step prevents gaps and uneven corners later, making the entire process smoother. Always verify your measurements before cutting to avoid costly mistakes. For detailed guidance, visit expert strategies for flawless baseboard installation.
Many homeowners and even seasoned DIYers fall into traps when tackling flooring, carpet installation, or shower upgrades. Let’s dig deeper into some overlooked nuances that can make or break your project’s success. For instance, a widespread misconception is that choosing cheaper materials will always save money. However, in my experience, selecting high-quality, durable options—like those discussed in this comprehensive guide—can actually save you money long-term by reducing repairs and replacements.
Another myth is that all adhesives and sealants work equally well for showers. In reality, the wrong choice here can lead to leaks and mold growth, which is a costly mistake. Always opt for products rated for bathroom environments, and I recommend checking out modern shower renovation ideas for the best materials and techniques.
What Advanced Installers Know That You Don’t
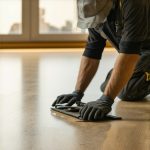
One crucial nuance often missed is the importance of proper surface preparation. For floors, this means ensuring your subfloor is perfectly flat and stable before installing new materials. Skipping this step can lead to uneven surfaces, gaps, and early wear. According to a study by the National Tile Contractors Association, surface prep is responsible for up to 80% of installation failures in flooring projects. This is why I always emphasize thorough subfloor inspection and leveling, which you can learn more about in expert flooring tips.
Similarly, when installing baseboards, many overlook the impact of expansion gaps and precise miters, especially around corners and door frames. A common mistake is to cut miters at incorrect angles, leading to gaps or misaligned joints. Advanced installers use specialized tools and techniques, such as coping or scribing, to achieve perfect fits, which is detailed in latest baseboard trends.
Lastly, do not underestimate the importance of proper moisture barriers, especially in shower renovations or basement flooring. A failure to install these correctly can cause mold, warping, and structural damage over time. For a deeper understanding, check out creating a luxury shower experience.
Have you ever fallen into this trap? Let me know in the comments. Mastering these hidden nuances can dramatically improve your results and save you headaches down the line. Remember, investing a little extra effort into preparation and material choice pays off in stunning, long-lasting finishes.
Once you’ve completed your flooring, carpet installation, or shower renovation, the real work begins: maintaining your investment to ensure it stays beautiful and functional for years to come. Having the right tools on hand and understanding key maintenance practices can make all the difference in preserving your work and avoiding costly repairs down the line.
Invest in Quality Tools for Ongoing Care
My go-to tool for keeping floors pristine is a high-quality microfiber mop paired with a gentle, pH-balanced cleaner recommended for your specific flooring type. I prefer this combo because it effectively removes dirt without scratching or dulling the surface. For hardwood or engineered wood, I use a soft-bristle broom regularly to prevent debris from scratching the finish, which I learned from this comprehensive guide. A vacuum with adjustable height and a soft brush attachment is also invaluable—especially for carpets, to remove dirt deep within fibers without damaging them.
For shower maintenance, I rely on a handheld grout brush and a quality silicone squeegee. These tools help prevent mold buildup and keep tiles looking fresh. I also keep a small spray bottle of a mildew-resistant disinfectant for routine cleaning, which is essential for bathrooms in humid climates. Choosing the right products and tools ensures you can perform quick touch-ups or deep cleans as needed, prolonging the lifespan of your renovation.
Long-Term Strategies for Durability
In addition to daily or weekly cleaning routines, I recommend scheduling periodic inspections of your flooring and shower seals. Over time, caulking and grout can crack or degrade, leading to leaks or water damage. Replacing these materials before they fail is crucial. When doing so, I use a silicone sealant rated for high-moisture environments, which I learned from modern shower renovation tips.
For floors, ensuring that your subfloor remains stable and level is vital. I use a laser level periodically to check for any shifts or unevenness that might occur over time. Addressing these issues early prevents more extensive repairs later, saving you money and frustration.
How do I maintain my flooring and showers over time?
Consistent cleaning with appropriate tools is your first line of defense. Avoid harsh chemicals that can damage surfaces; instead, opt for gentle cleaners suited to your materials. Regular inspections of caulking, grout, and seals allow you to catch problems early. For floors, keeping moisture levels in check—especially in bathrooms and basements—reduces the risk of warping or mold growth. Finally, consider applying protective coatings or sealants as recommended for your specific flooring or shower surfaces. These simple but effective steps will help your renovation stand the test of time. For more advanced tips, check out expert flooring maintenance strategies. Now, I challenge you to pick one maintenance routine and commit to it—your floors and showers will thank you!
The Hardest Lesson I Learned About flooring installation, carpet install, showers, baseboards
One of my biggest realizations was that even the smallest misalignment—whether it’s a slight angle in a miter cut or an uneven surface—can ruin the overall look. I used to think rushing through measurements was fine, but I learned the hard way that double-checking every step is what separates a good job from a professional one. Paying attention to surface prep, like leveling floors before installation, prevented many headaches later. These insights transformed my approach and can do the same for you.
3 Myths About flooring installation, carpet install, showers, baseboards That Held Me Back
There’s a misconception that cheaper materials save money in the long run. I discovered that investing in quality flooring and sealants actually reduces repairs and replacements over time. Another myth is that all adhesives work equally well—this led to leaks and mold in my projects until I learned to choose products rated for high-moisture environments. Lastly, I believed that tools didn’t matter much, but using the right tools, like a laser level or coping saw, made a huge difference in achieving tight joints and clean finishes.
What Experts Won’t Tell You About flooring installation, carpet install, showers, baseboards
One secret is the importance of proper surface preparation—ensuring your subfloor is flat and stable can make or break your project. Advanced installers cope with corners and curves by scribing and scribing, techniques that create perfect fits and hide gaps. Also, understanding moisture barriers and expansion gaps helps prevent future problems like warping or mold. These subtle nuances are often overlooked but are vital for durable, professional results that last.
Where to Go from Here
If you’re serious about elevating your flooring, carpet, shower, and baseboard projects, I recommend exploring resources like this guide to durable flooring and modern shower renovation ideas. Investing in good tools, quality materials, and continuous learning will pay off with stunning results that stand the test of time. Remember, every detail counts—your craftsmanship will speak for itself and inspire others to follow your lead.
Your Turn to Try
Now that you know the hidden lessons and expert secrets, what’s the first step you’ll take to improve your next flooring or shower project? Share your plans below—I’d love to hear how you’re going to make your space truly remarkable.