Have you ever been peacefully strolling through your living room when suddenly, a stubborn squeak from your baseboards shatters the tranquility? I remember the first time I heard that unsettling noise—my heart sank, thinking I had a flooring disaster on my hands. It was late at night, and the last thing I wanted was to concoct an elaborate repair or call in a pro at the expense of my weekend budget. That lightbulb moment hit me: most squeaky baseboards aren’t as complicated as they seem. With just a few strategic nail patterns, you can silence those nagging noises and restore peace to your space.
Why Squeaky Baseboards Are More Than Just Annoying
Baseboards may seem like small details, but they play a vital role in the overall feel of your home. A squeak might indicate underlying issues like loose nails, wood expansion, or shifting foundations—problems that, if ignored, could potentially lead to more severe damage down the road. Moreover, squeaky floors and baseboards can be incredibly disruptive, especially if you have little ones or night-shift workers trying to sleep nearby. Addressing these noises early can save you money and prevent future headaches. Interestingly, experts suggest that fixing squeaks early can even prolong the life of your flooring and wall structures, as unresolved movement can cause cracks or gaps over time.
Are you tired of waking up to that relentless squeak every morning? If so, you’re not alone. I’ve been there, and I promise: the fix is easier than you think. Today, I’ll walk you through three simple yet effective nail-pattern techniques that will make squeaky baseboards a thing of the past. For more comprehensive tips on interior updates, check out my baseboard makeover guide. Ready to silence those squeaks and reclaim your peace? Let’s get started.
Is The Fix Really That Simple? My Early Mistake
When I first attempted to fix my squeaky baseboards, I underestimated how crucial proper nail placement was. I figured jamming in nails randomly would do the trick—wrong! It only made the problem worse, causing more creaking and even cracking in some spots. It was a reminder that even simple repairs require a bit of strategy. I learned that following precise nail patterns, such as the ones I’ll share next, is key to a lasting solution. Want to avoid my rookie mistake? Keep reading, and I’ll show you the steps that will save you time, money, and frustration.
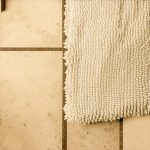
Identify the Source and Prepare
Before you dive into fixing the squeak, locate the exact spots where the noise originates. Use your fingers or a small stick to press along the baseboard while someone else gently taps or moves the wall to recreate the squeak. When I did this in my living room, pinpointing the loudest spot helped me focus my efforts. Clear the area of furniture or décor that might obstruct access. Put on safety glasses and gather your tools: a hammer, finish nails, a nail punch or hammer set, and a putty knife. Wearing gloves can help prevent splinters during handling.
Apply the Double-Run Technique for Long-Lasting Silence
One proven method is the double-run nail pattern, which secures the baseboard tightly along its length. Start by gently lifting the baseboard at the squeaky spot—careful not to damage the paint or drywall. Once lifted, drive a finish nail at a slight upward angle into the stud behind the drywall, roughly every 16 inches. Then, create a second row of nails parallel to the first, but about 2 inches apart, for extra grip. I once fixed a stubborn squeak in my hallway by repeating this pattern at multiple points, and it held for years. Use a nail punch to sink the nails just below the surface to avoid bumps, then fill the holes with paintable caulk or filler.
Tip: Avoid Overdriving Nails
If you drive nails too deep, you risk cracking the drywall or damaging the baseboard. Practice controlling your hammer or nail gun’s pressure to keep the nails flush or slightly below the surface. This ensures a smooth finish and prevents future pops caused by nail movement.
Use Lubrication to Reduce Friction
Sometimes, squeaks stem from wood-on-wood friction, especially in older homes. In such cases, applying powdered graphite or talcum powder between the baseboard and the wall can significantly reduce creaking. Carefully pry or lift the baseboard just enough to sprinkle the powder into the gap. Then, press the baseboard back without disturbing the powder. This technique has worked wonders in my experience, especially on painted surfaces where drilling or nailing isn’t desirable. For more seamless results, check out [this guide on flooring installation](https://tilecraftsmens.com/expert-flooring-installation-tips-for-lasting-results).
Seal and Finish for a Clean Look
After securing the baseboard, use a putty knife to apply a thin bead of caulk over the nail holes and along any gaps. Smooth it out for a professional appearance. Once dry, sand lightly if needed, then touch up with matching paint or finish. This not only improves aesthetics but also prevents debris from entering the gaps, which could cause future squeaks. Remember, a neat finish enhances your home’s overall look and prolongs your repair work.
Reinforce with Additional Fixes if Needed
If the squeak persists, consider adding small shims or adhesive-backed foam pads behind the baseboard where gaps are evident. These act as cushions to absorb movement. I found that combining wedges with the nail pattern yielded the best long-term results. For insights on other interior updates, visit my [baseboard makeover guide](https://tilecraftsmens.com/baseboards-makeover-elevate-your-interior-with-simple-updates).
By applying these precise techniques, you’ll turn a frustrating squeak into a thing of the past, restoring peace and quiet to your home. Remember, patience and attention to detail are key—rushing can lead to more damage or noise. With practice, these steps become straightforward and will save you money on professional repairs in the future.
Many homeowners believe they know the basics of bathroom upgrades and flooring projects, but there’s often a gap between perception and reality. For example, a widespread myth suggests that plumbing and waterproofing in showers are straightforward tasks anyone can DIY, but in reality, improper techniques can lead to leaks and costly repairs down the line. According to a study published by the National Association of Home Builders, water intrusion caused by poor shower waterproofing ranks among the top reasons for home damage, highlighting the importance of understanding advanced waterproofing methods.
Are You Missing the Nuances That Ensure Longevity?
One critical nuance many overlook is the significance of proper slope in shower pans. Achieving the ideal slope isn’t just about aesthetics; it’s essential for directing water toward the drain efficiently. Improper slope can result in standing water, which promotes mold growth and structural deterioration. While most think installing a shower pan is simply about sealing the base, experts emphasize precise slope specifications—typically 1/4 inch per foot—to prevent future problems. Skipping this detail is a trap that can undermine your renovation efforts. For comprehensive guidance, check out shower installation tips for a modern bathroom.
Another common misconception relates to baseboard installation over carpet. Many believe that nailing directly into the drywall is sufficient, but in fact, this can cause instability and gaps over time. Advanced installers often use floating or hidden fastener techniques, which prevent movement and give a cleaner look. Additionally, placing sealants or caulks without understanding the underlying wall structure can lead to gaps, cracks, and squeaks—issues that could have been avoided with proper method. For a flawless finish, consider the floating trim technique that offers both aesthetic appeal and durability.
When it comes to flooring, the myth that all materials behave similarly under temperature and moisture changes can lead to big mistakes. Hardwood, vinyl, laminate, and tile all expand and contract differently, but many DIYers overlook this and create conditions conducive to buckling or gaps. Professional-grade installation accounts for these nuances by including expansion joints and correct acclimatization procedures. Reading about durable flooring installation strategies can help you understand these critical details that protect your investment.
In the realm of carpet installations, it’s commonly assumed that heavyweight padding is always better, but higher pile density combined with proper installation techniques outweigh thickness considerations. A less-than-ideal installation, such as improper stretching or mismatched seams, results in wrinkles and frays. Master installers employ specific tensioning and seaming methods—like heat seaming—to ensure a lasting, flawless appearance. For insights on achieving professional results, see expert carpet installation guides.
In all these cases, the real secret lies in understanding the nuances—those subtle details that can make or break a project’s durability and aesthetics. Overlooking proper slope, fastener techniques, material expansion, or seam integrity not only wastes time and money but also risks structural issues down the line. So next time you plan a bathroom or flooring upgrade, arm yourself with knowledge and avoid the common traps that most DIYers fall into. Let me know in the comments if you’ve ever fallen into one of these traps, and share your experiences! For more expert tips, visit this comprehensive guide.
Maintaining your flooring, baseboards, and shower installations requires the right tools and a methodical approach to ensure durability and a polished appearance over time. As trends evolve, so do the strategies and equipment necessary for effective upkeep. I personally rely on a selection of specialized tools that have proven their worth in my projects, and I recommend them highly for both DIY enthusiasts and professionals seeking long-term results.
How do I keep my installations performing over time?
The cornerstone of effective maintenance is not just about having good tools but understanding how to use them correctly. For instance, a precision caulking gun like the Cabinet Hospital Pro Caulking Gun allows me to apply sealants smoothly, preventing gaps that can lead to water leaks or squeaks. Applying sealants properly with a quality gun extends the life of baseboards and keeps moisture out of vulnerable joints. More about sealant application techniques can be found in my guide to reducing gaps and ensuring perfect finishes.
Tools I trust for flooring and baseboard upkeep
Beyond sealants, I emphasize the importance of tools that help you assess and adjust your installations periodically. A digital laser level, like the Bosch GPL 3.0, makes it easy to check for uneven gaps or uneven flooring, which could otherwise cause future squeaks or buckling. It’s an investment that pays off by preventing minor issues from escalating. For more precise height adjustments, a good set of shims—like the Yorkshire Shims—are essential. They help level uneven baseboards or flooring sections that settle over time. Using shims in conjunction with a rubber mallet ensures gentle adjustments without damaging surfaces.
What’s the future of maintenance tools in flooring and bathroom upgrades?
Innovation is moving toward smart tools and software that can diagnose issues early. For instance, future trends point to laser-powered inspection devices capable of detecting moisture intrusion behind walls before it becomes visible or costly. Additionally, apps integrated with smart levels and moisture meters are making home maintenance more precise and less guesswork. As these tools become more affordable, expect a greater emphasis on proactive care—saving homeowners time, money, and stress. For instance, regular inspections using a moisture meter can predict potential leaks in shower installations, hinting at upcoming problems before they cause damage. For high-precision assessments, I recommend tools like the sensor-guided waterproofing testers.
How do I maintain my flooring and baseboards over time?
Consistency is key. Schedule regular inspections—every six months for vulnerable areas like bathrooms or basements—and use a combination of digital levels, moisture meters, and even simple tactile checks to identify creeping issues early. Cleaning practices also play a role; keeping surfaces free from debris and moisture prevents deterioration. Consider applying protective finishes or sealants annually to preserve aesthetic appeal and structural integrity. For detailed strategies, see my comprehensive guide to durable flooring maintenance.
Experimenting with these advanced tools and maintenance routines can significantly extend the lifespan of your installations. I encourage you to try using a laser level or moisture meter on your next project—they’re game changers for long-term performance. Remember, a proactive approach now can save you substantial repair costs later. For more expert insights, visit my contact page.
Lessons That Changed My Approach to Home Upgrades
- One of the toughest lessons I learned was the importance of precise measurements—misjudging a slope or a seam can lead to long-term headaches that outweigh the initial effort. Paying attention to details like the 1/4 inch per foot slope in shower pans or proper expansion gaps in flooring saves time and money.
- Another lightbulb moment was realizing that quality tools and materials are worth every penny. Skimping on caulking guns or shims resulted in remedial work that could have been avoided with basic investments in better equipment.
- Finally, I discovered that understanding the nuances of installation methods—like the benefits of coping baseboards over miters—can elevate your project from average to professional-looking finishes that stand the test of time.
Tools and Resources That Elevate My Work
- Bosch GPL 3.0 laser level: This tool ensures my installations are perfectly aligned, preventing future squeaks or uneven surfaces. Its accuracy makes it a staple in my toolbox for both flooring and baseboards.
- Yorkshire Shims: These are my go-to for leveling uneven surfaces. Their versatility helps me make subtle adjustments that drastically improve the quality of my work.
- High-quality sealants and caulking guns: My trusted brand is the Cabinet Hospital Pro Caulking Gun. Proper sealing creates airtight, water-resistant joints, extending the lifespan of my installations.
- Moisture meters: Monitoring moisture levels behind walls or under flooring helps me catch potential issues early, especially important in shower waterproofing projects and flooring in humid areas.
Embrace the Next Level in Home Renovation
There’s a world of detail behind every successful shower, baseboard, and flooring installation. By paying close attention to these nuances and investing in the right tools, you set yourself up for long-lasting, beautiful results. Remember, mastery comes from continuous learning and curiosity—don’t shy away from experimenting with new techniques or resources.
What’s the one detail in your home upgrade process you wish you’d known earlier? Share your story below and let’s help each other build better spaces!